CHANGELOG
The latest improvements to Prospero
Prospero gets better every week. Subscribe to get a monthly email with a summary of the latest updates.
Inventory Booking Improvements
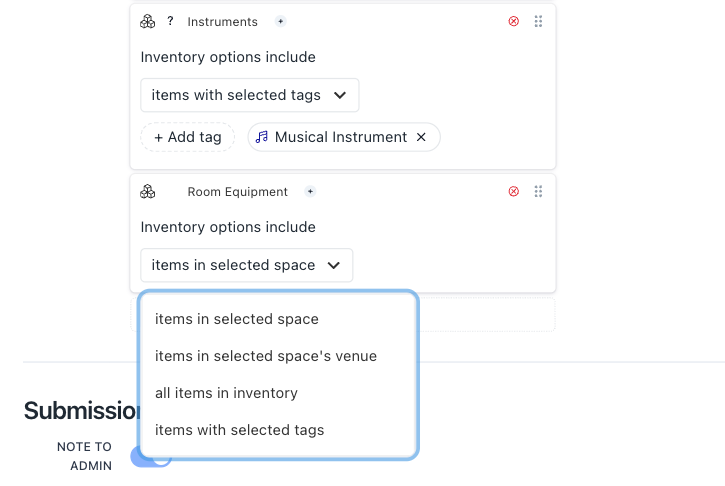
When bookers request equipment, it’s important to give them the right options up front to reduce follow-up questions and keeps bookings moving. You can now add multiple inventory fields to booking forms, allowing you to present curated groups of items based on what makes the most sense for your workflow. Make available all the items within a selected space, an entire venue, your full organization, or narrow the list to items with a specific tag.
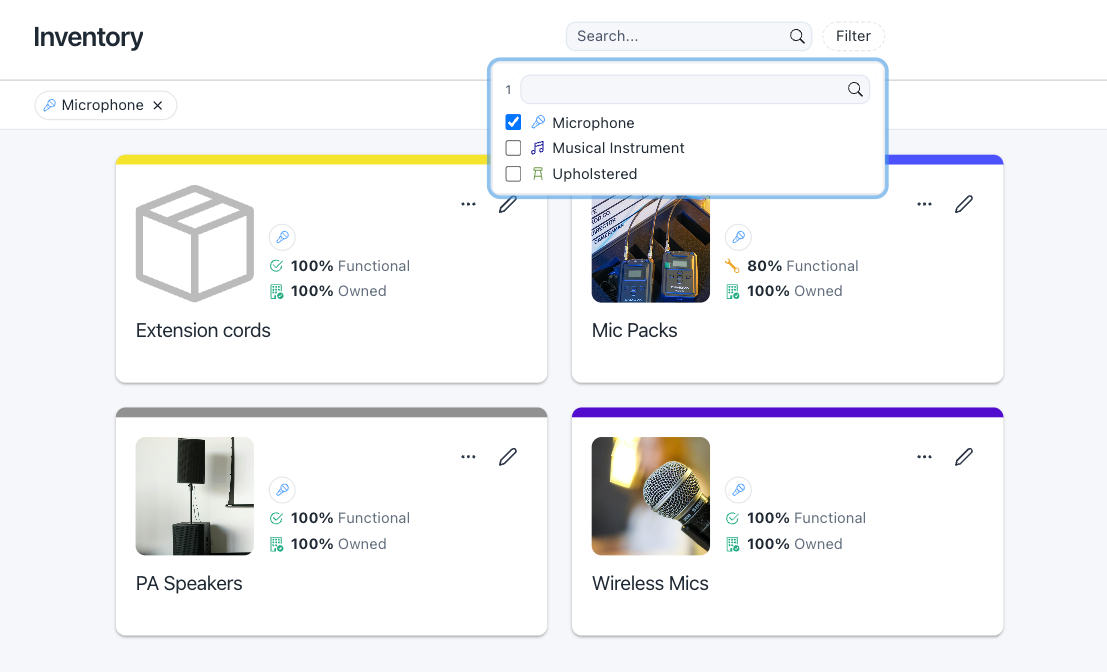
We’ve also introduced inventory tag filtering in the Inventory tab, making it faster for admins to locate exactly what they need and keep resources organized behind the scenes.
View Help & Permissions
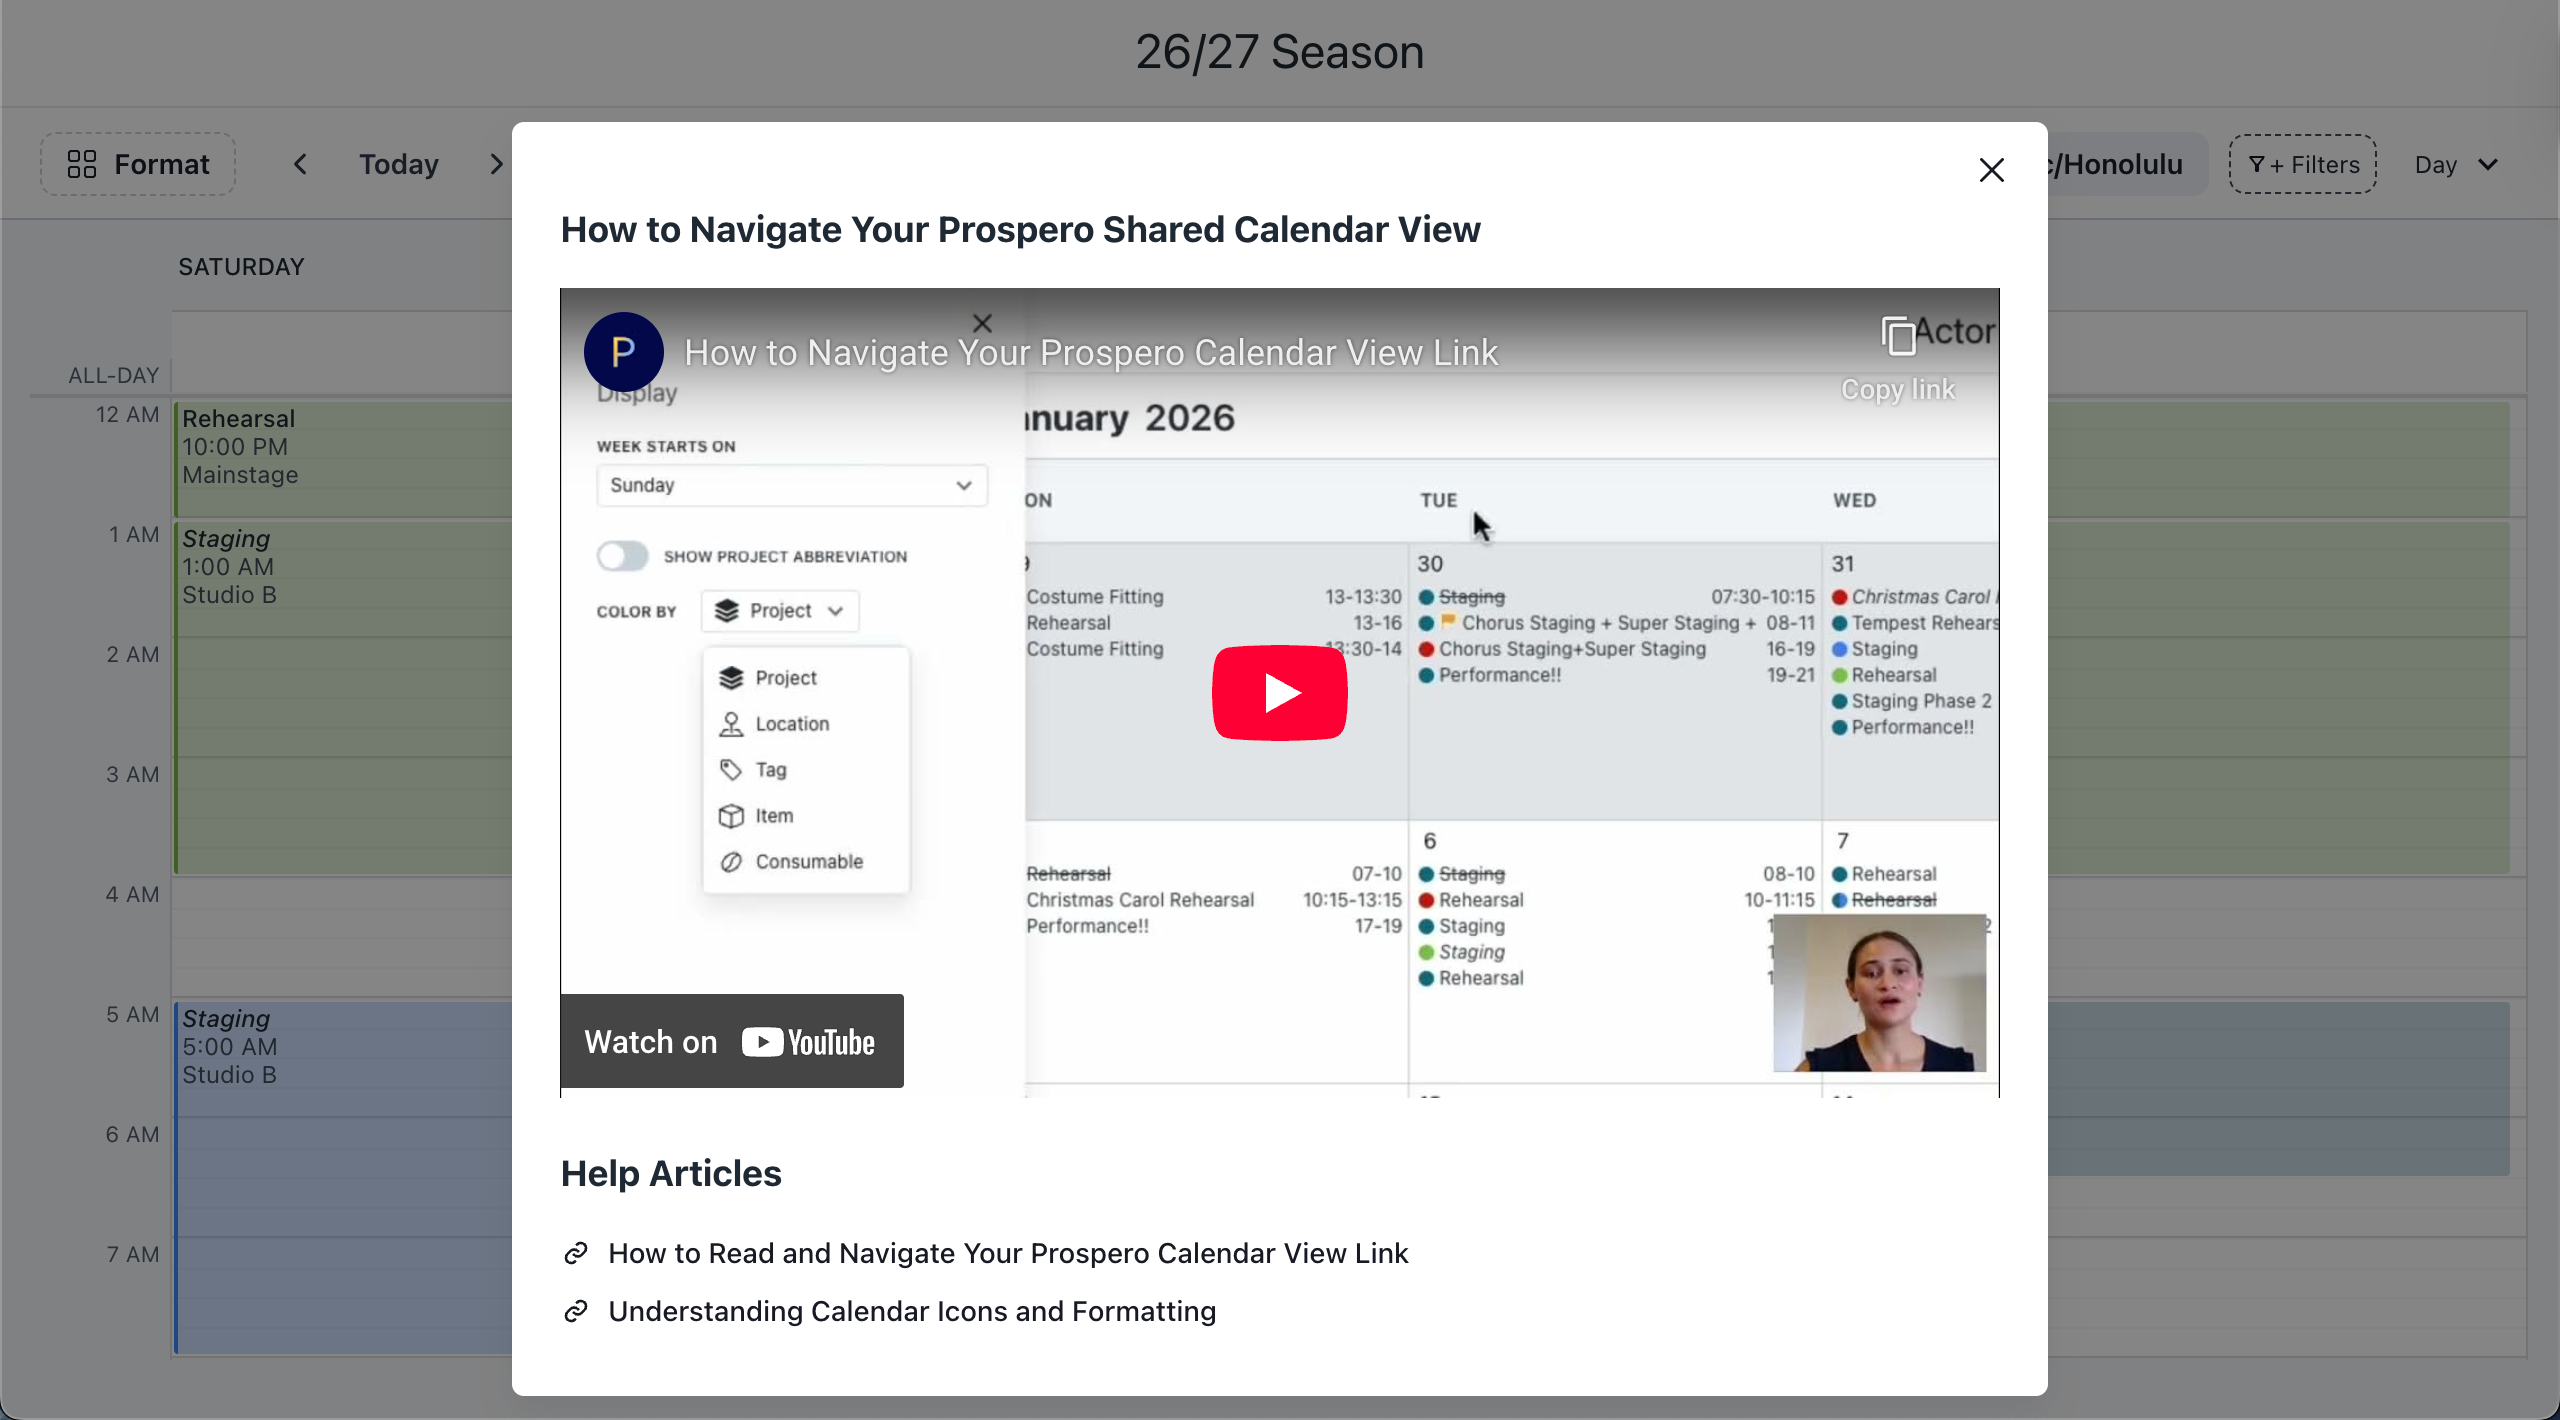
View links now include a (?) button that end-users can tap to access resources from our team on making the most of their view link. These resources include a new video tutorial created by Naomi, as well as help articles on How to Read and Navigate Your Prospero Calendar View Link and Understanding Calendar Icons and Formatting.
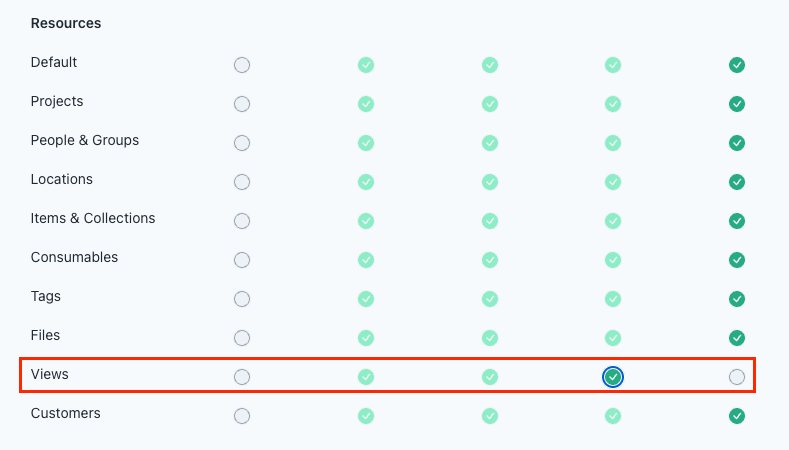
You can now also set permissions for admin users to adjust their access level to Views, from No Access to Delete. You can adjust your admins’ permissions via Settings > Members > … > Edit Permissions > Resources.
Improvements and fixes
- Searching in the calendar now searches event details and admin notes in addition to title text
- All-day events are included in booking portals
- Spaces are always ordered according to your chosen order in booking portals, including the sidebar, horizontal columns in the calendar, and the location selection field
- Line breaks in booking form field descriptions are rendered
- Booking rows in the admin app now include the year of the reservation for multi-event bookings
- Multi-event booking titles are no longer overridden by the first event’s title
- When an admin denies one of several events in a booking but accepts the rest, the denied event is now correctly rendered as denied for bookers
Multi-Event Bookings
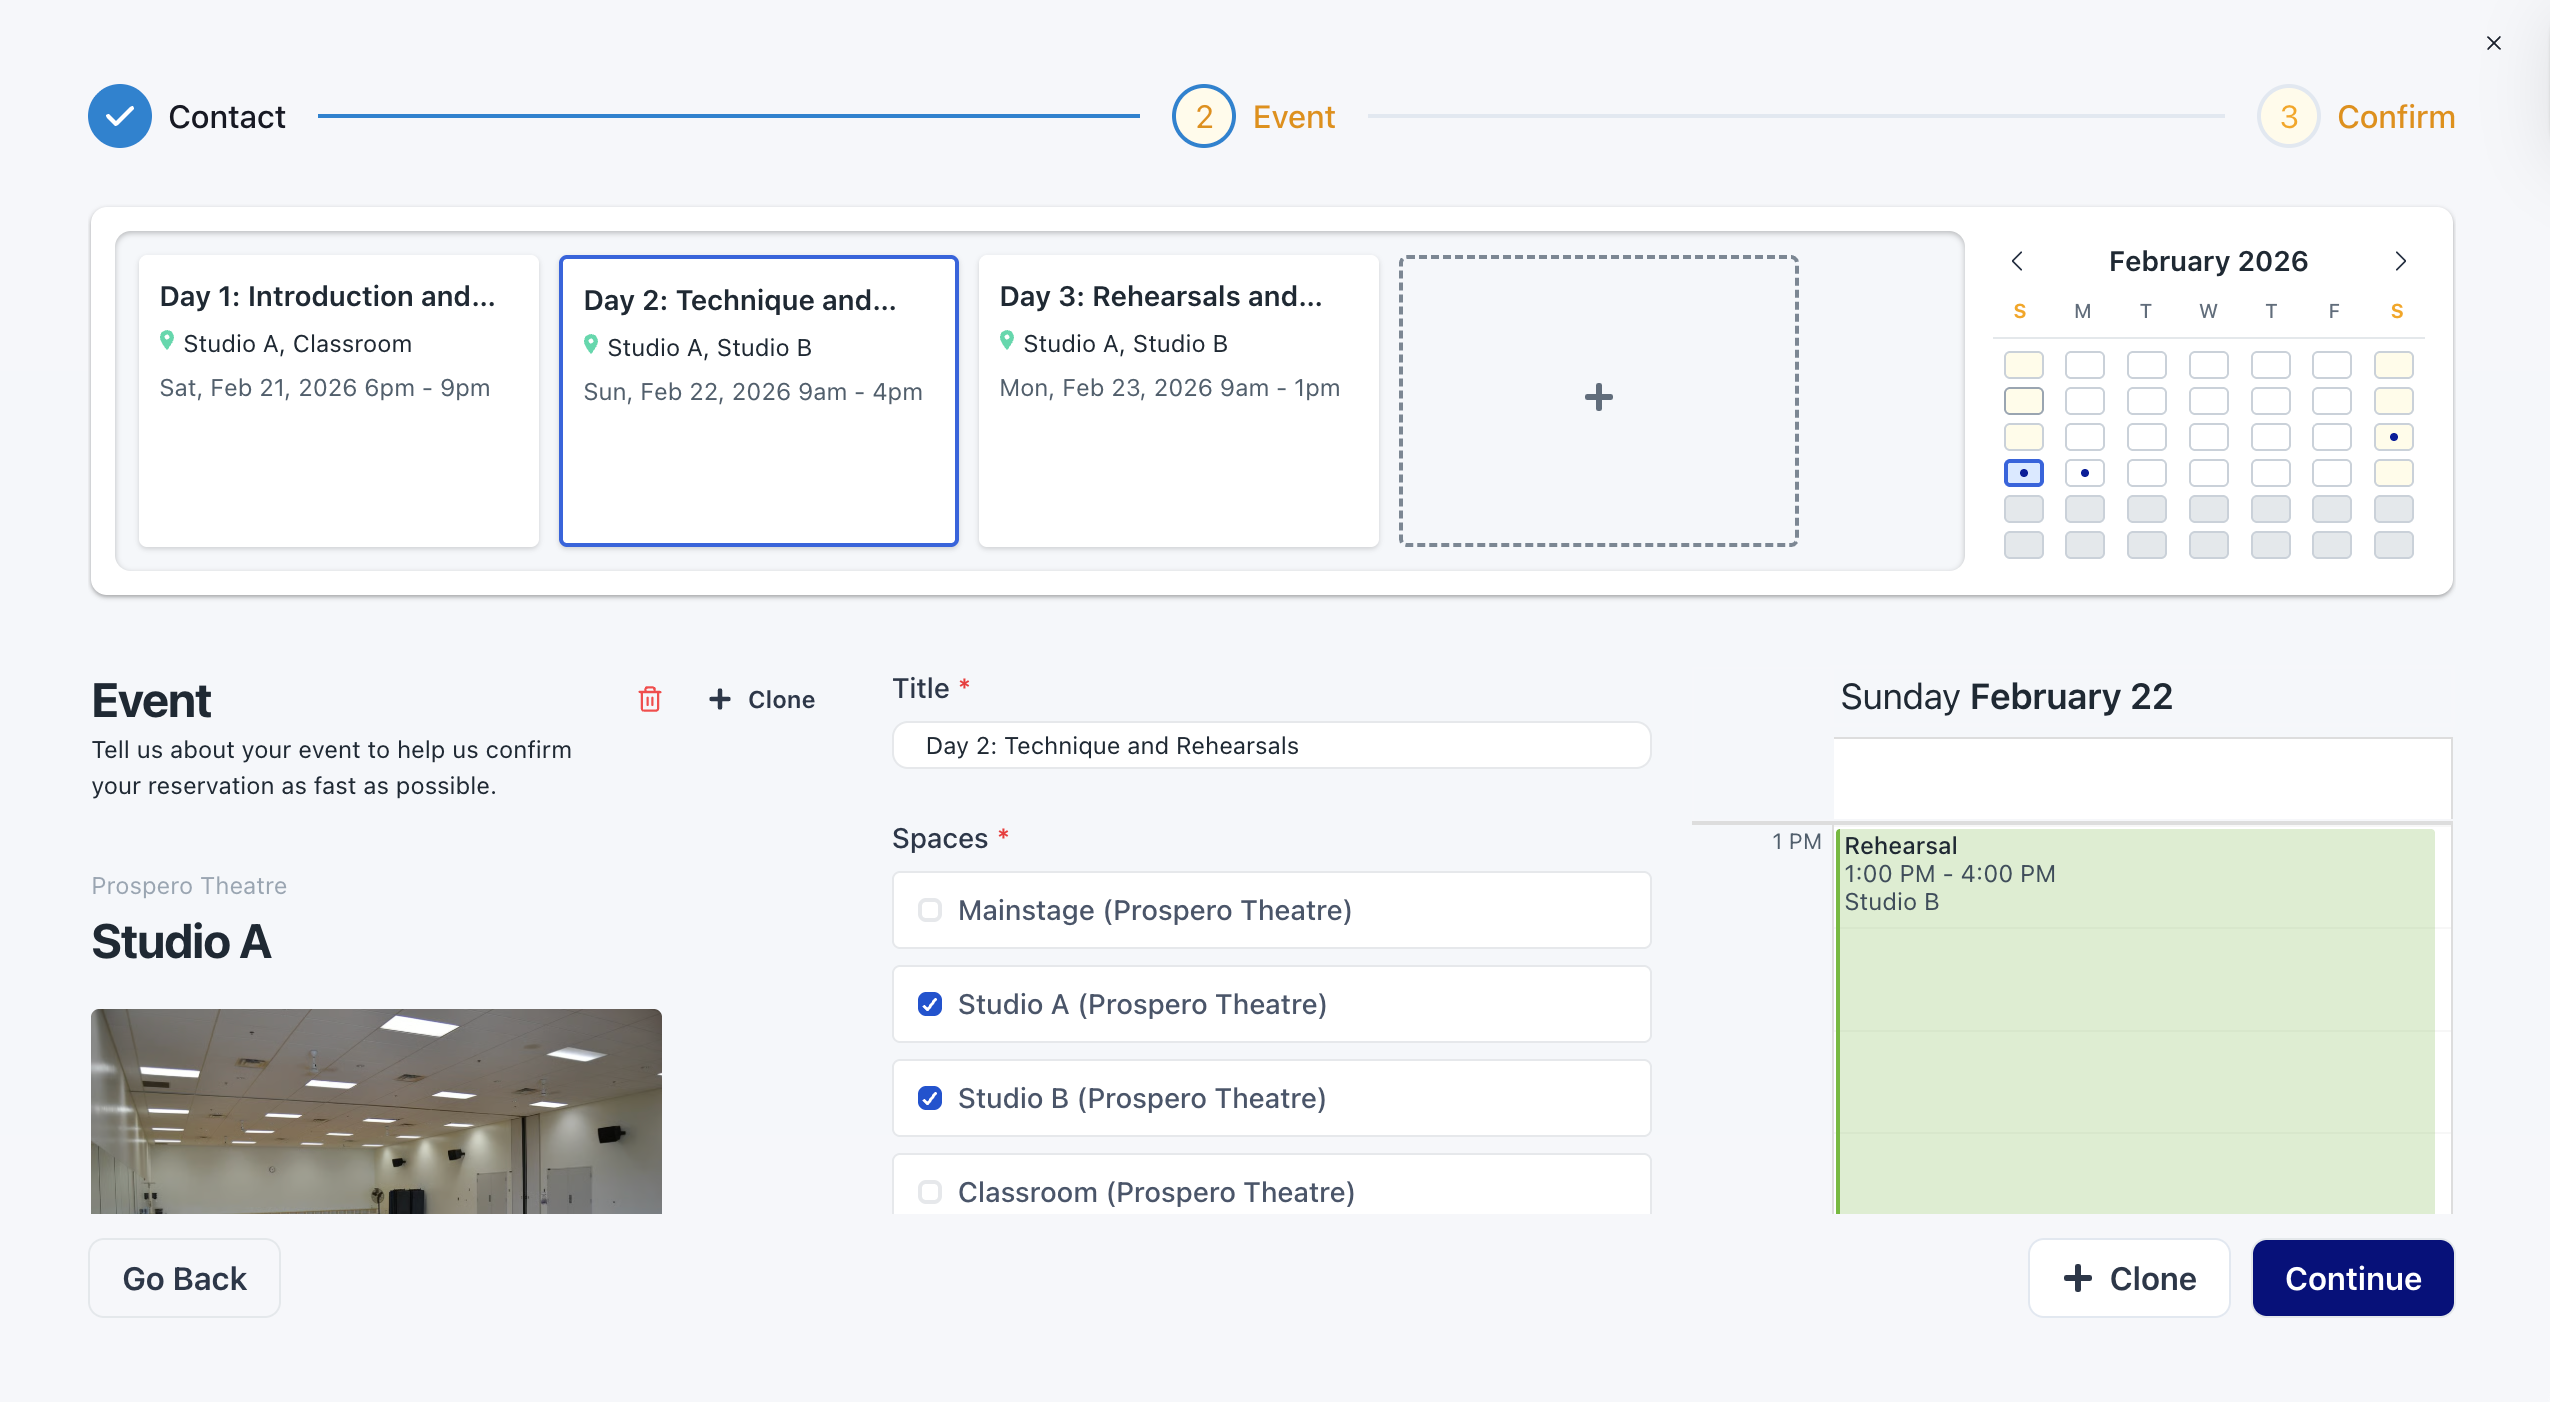
Not every event is a single-day affair— workshops, rehearsal blocks, multi-day conferences, and recurring classes often require multiple spaces across different dates. Bookers can now submit multi-event booking requests, allowing them to reserve multiple spaces and times in one streamlined workflow. The booking experience concludes with a clean summary page where clients can review their full request after submitting and request booking changes.
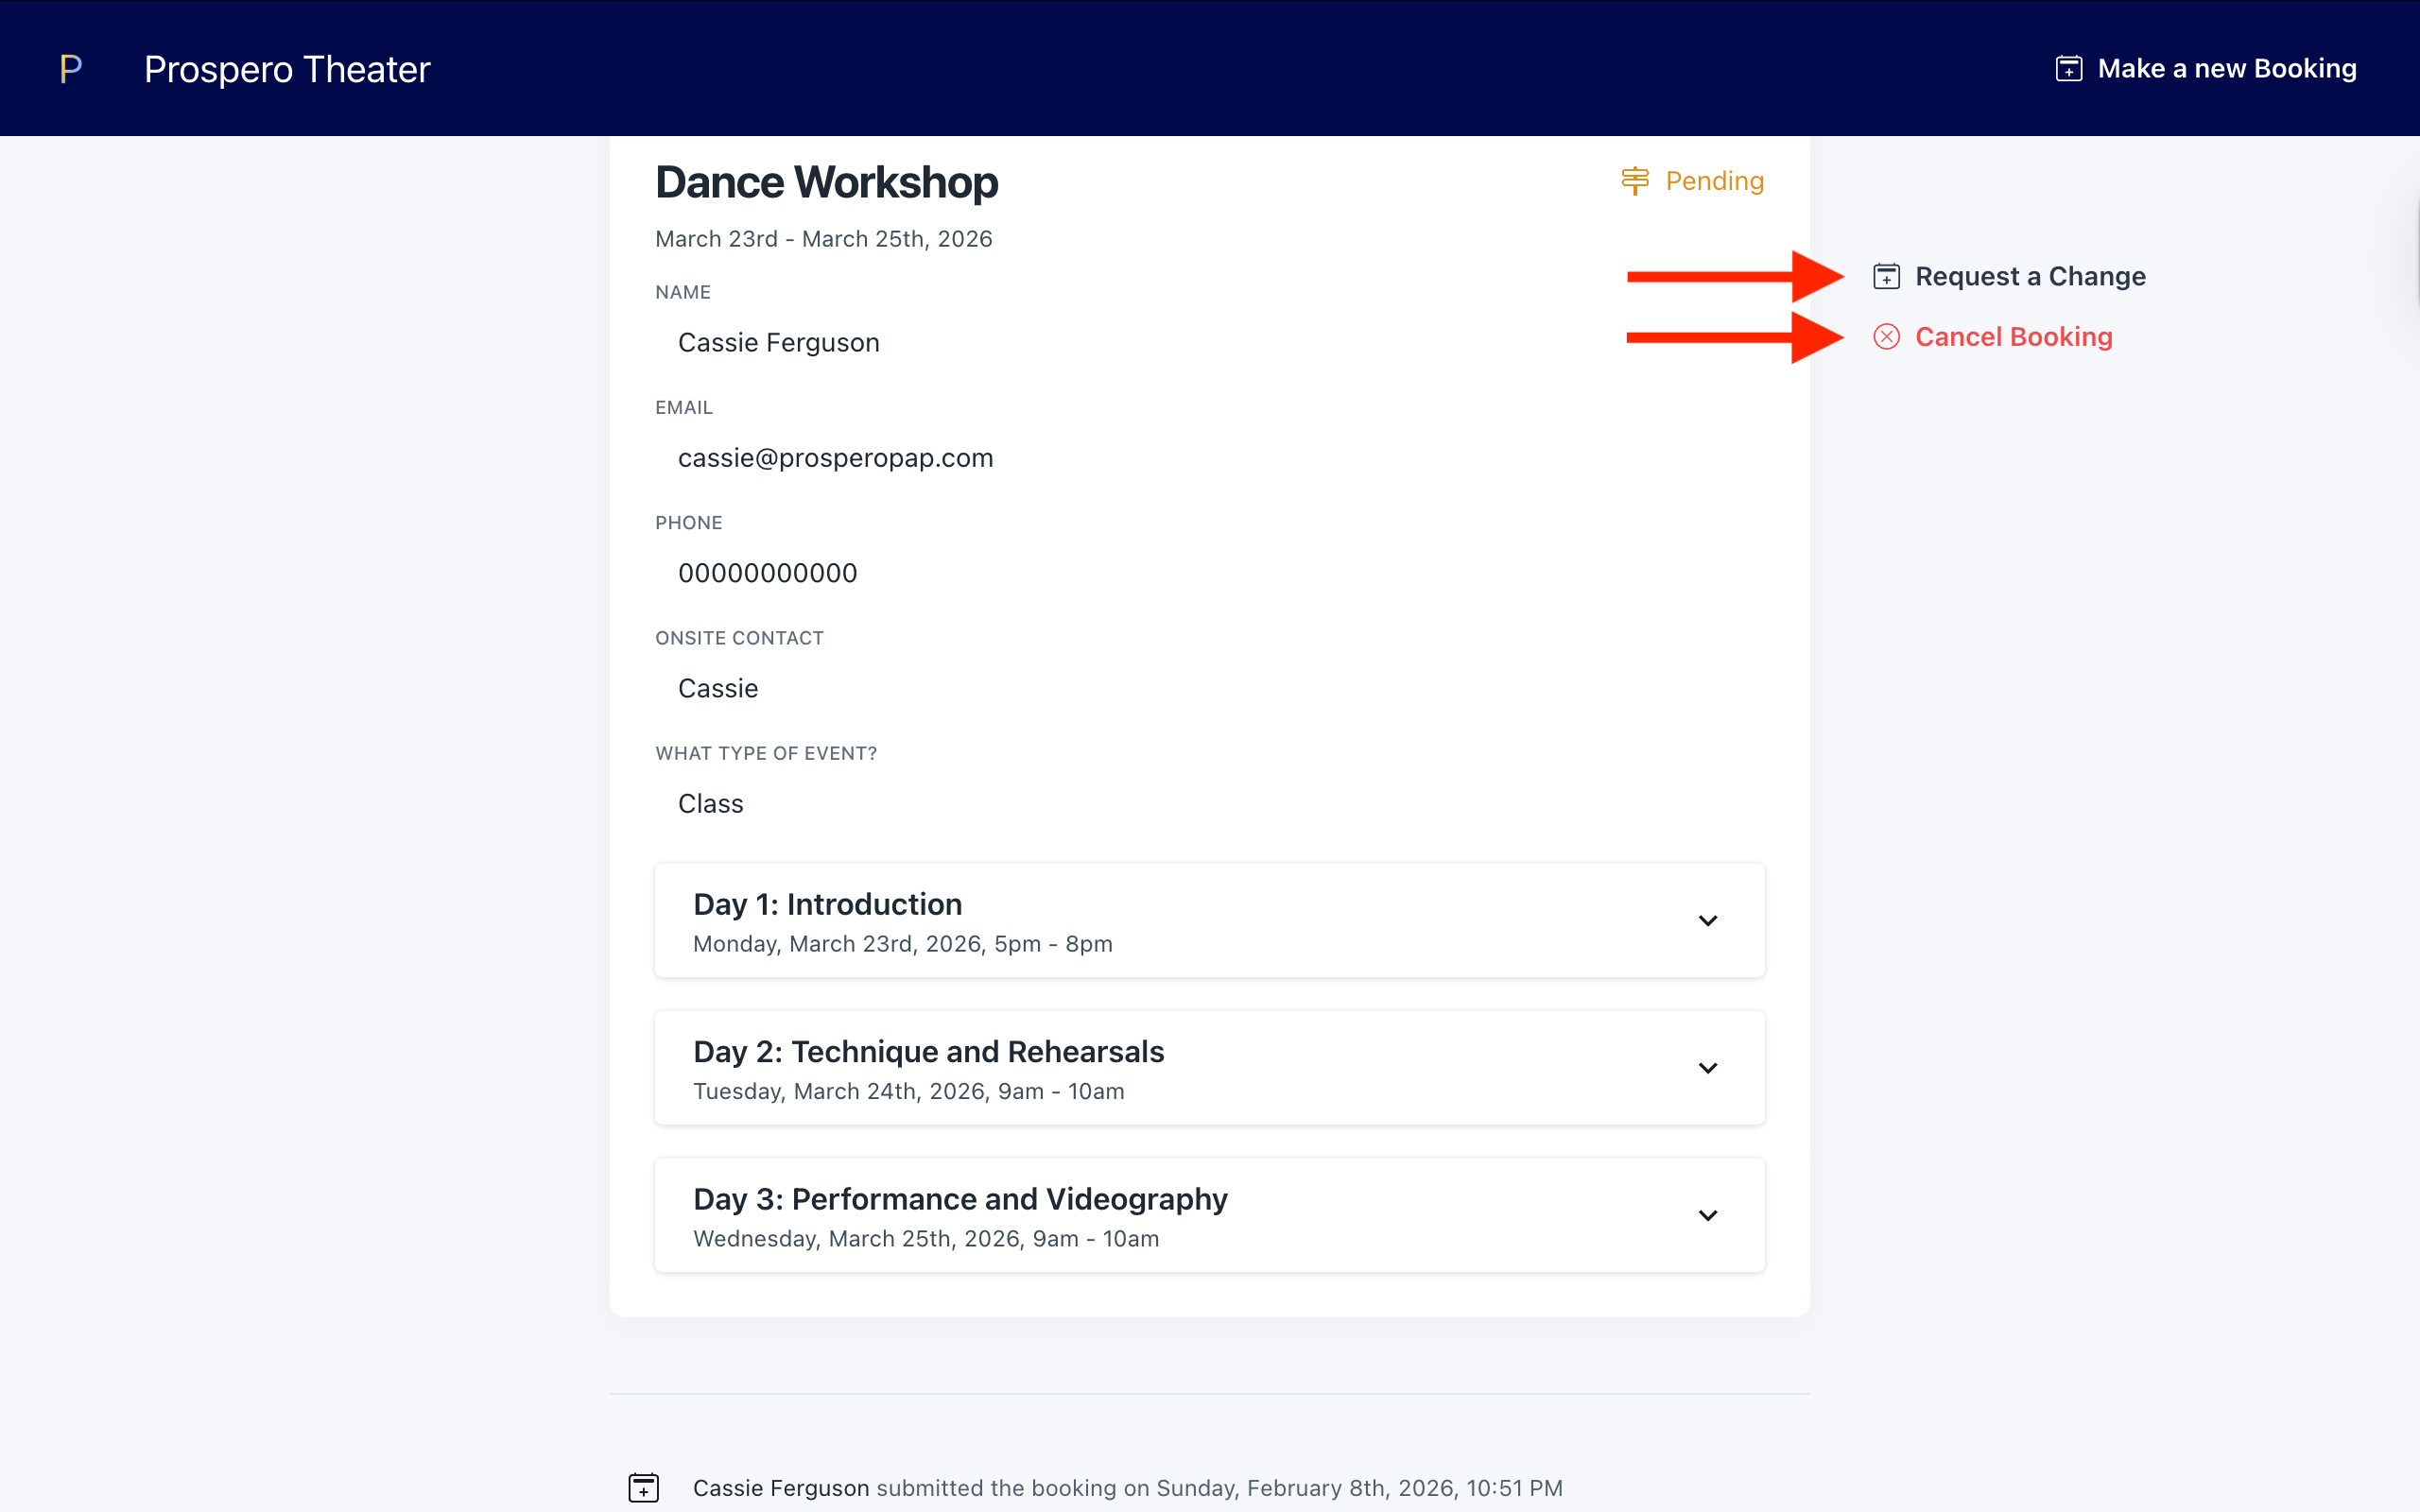
Bookers are automatically notified if admin change, approve, or deny any part of their request. Prefer to keep things simple? Single-event bookings are still fully supported alongside this new, more flexible option.
Triage Mode
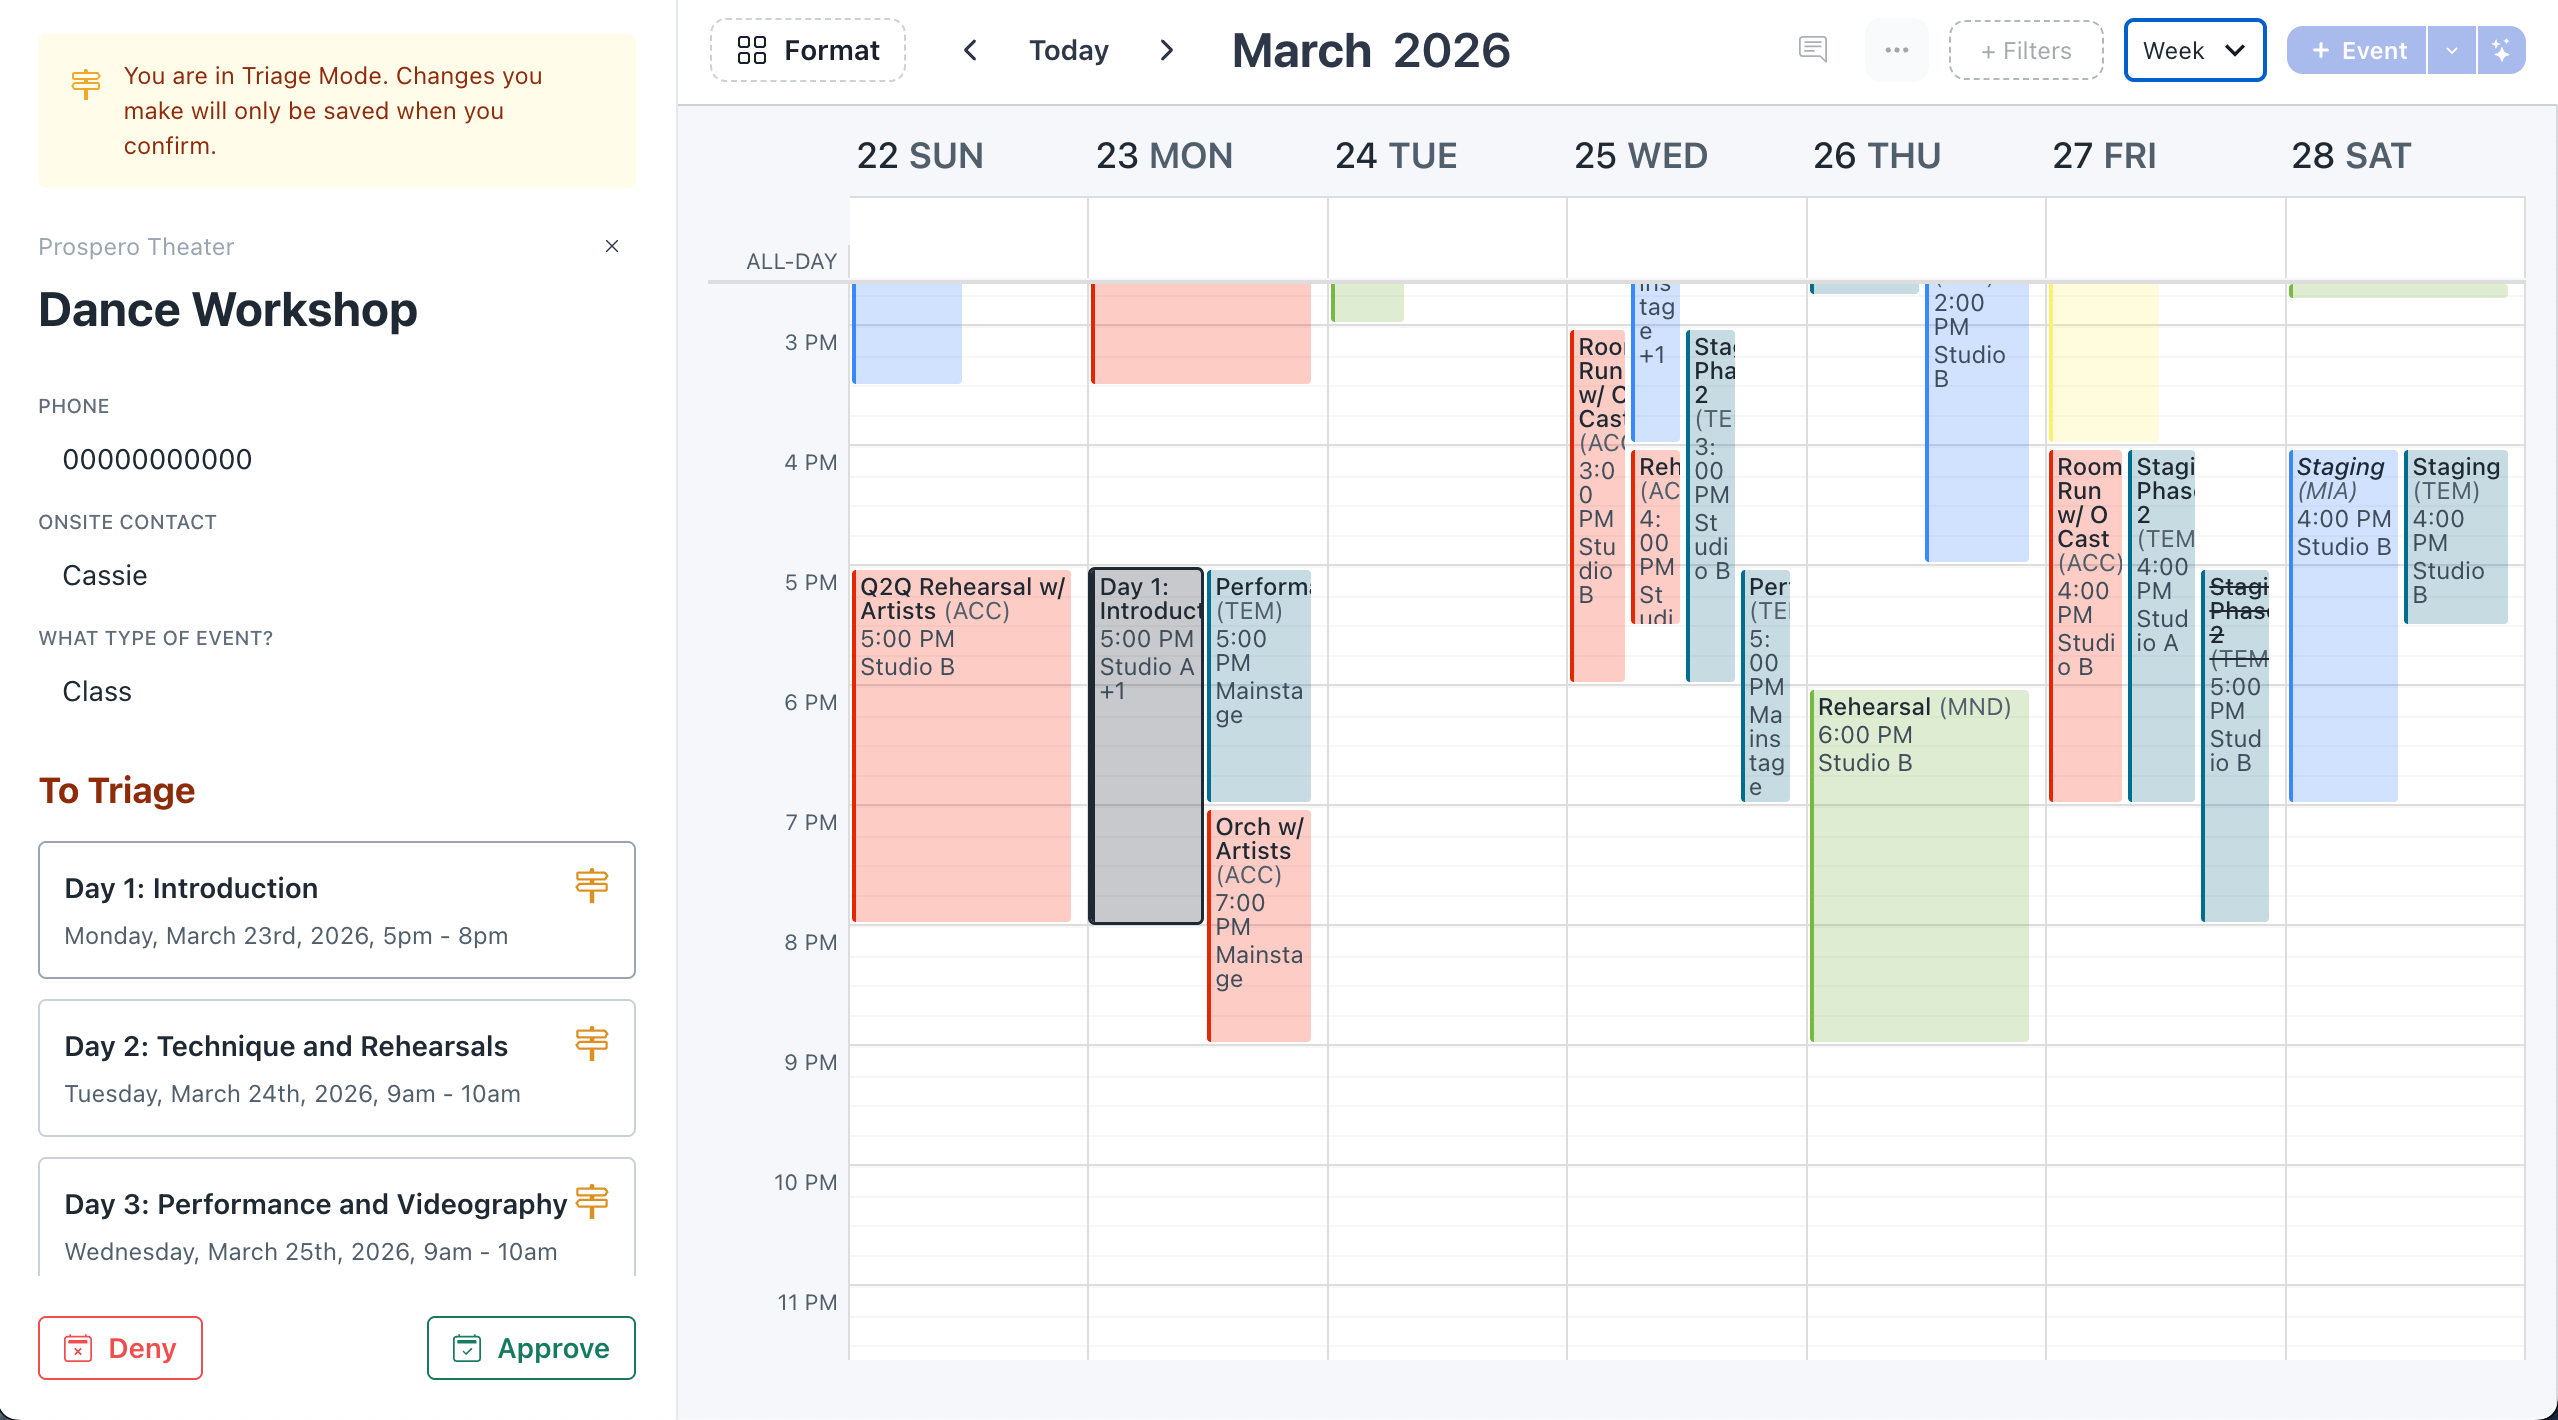
When a new booking request comes in, the first question is “How does this fit in the schedule?” Triage Mode gives you the context you need to answer that instantly. When you click Triage from a pending booking, you’ll enter a dedicated calendar view designed specifically for evaluating requests against your existing events.
Requested events are displayed on the side for quick reference. Simply hover over any request to highlight it directly on the calendar, allowing you to compare availability, spot conflicts, and understand how the booking fits into your broader schedule without switching screens.
Item Shopping Cart
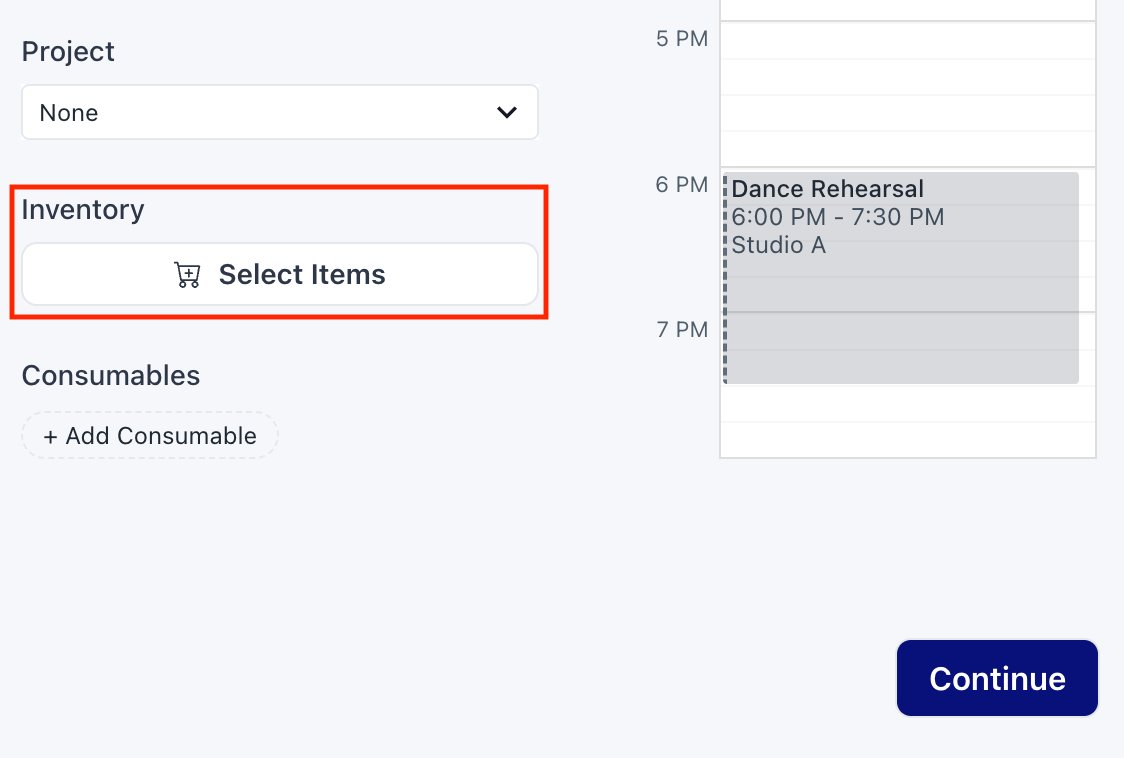
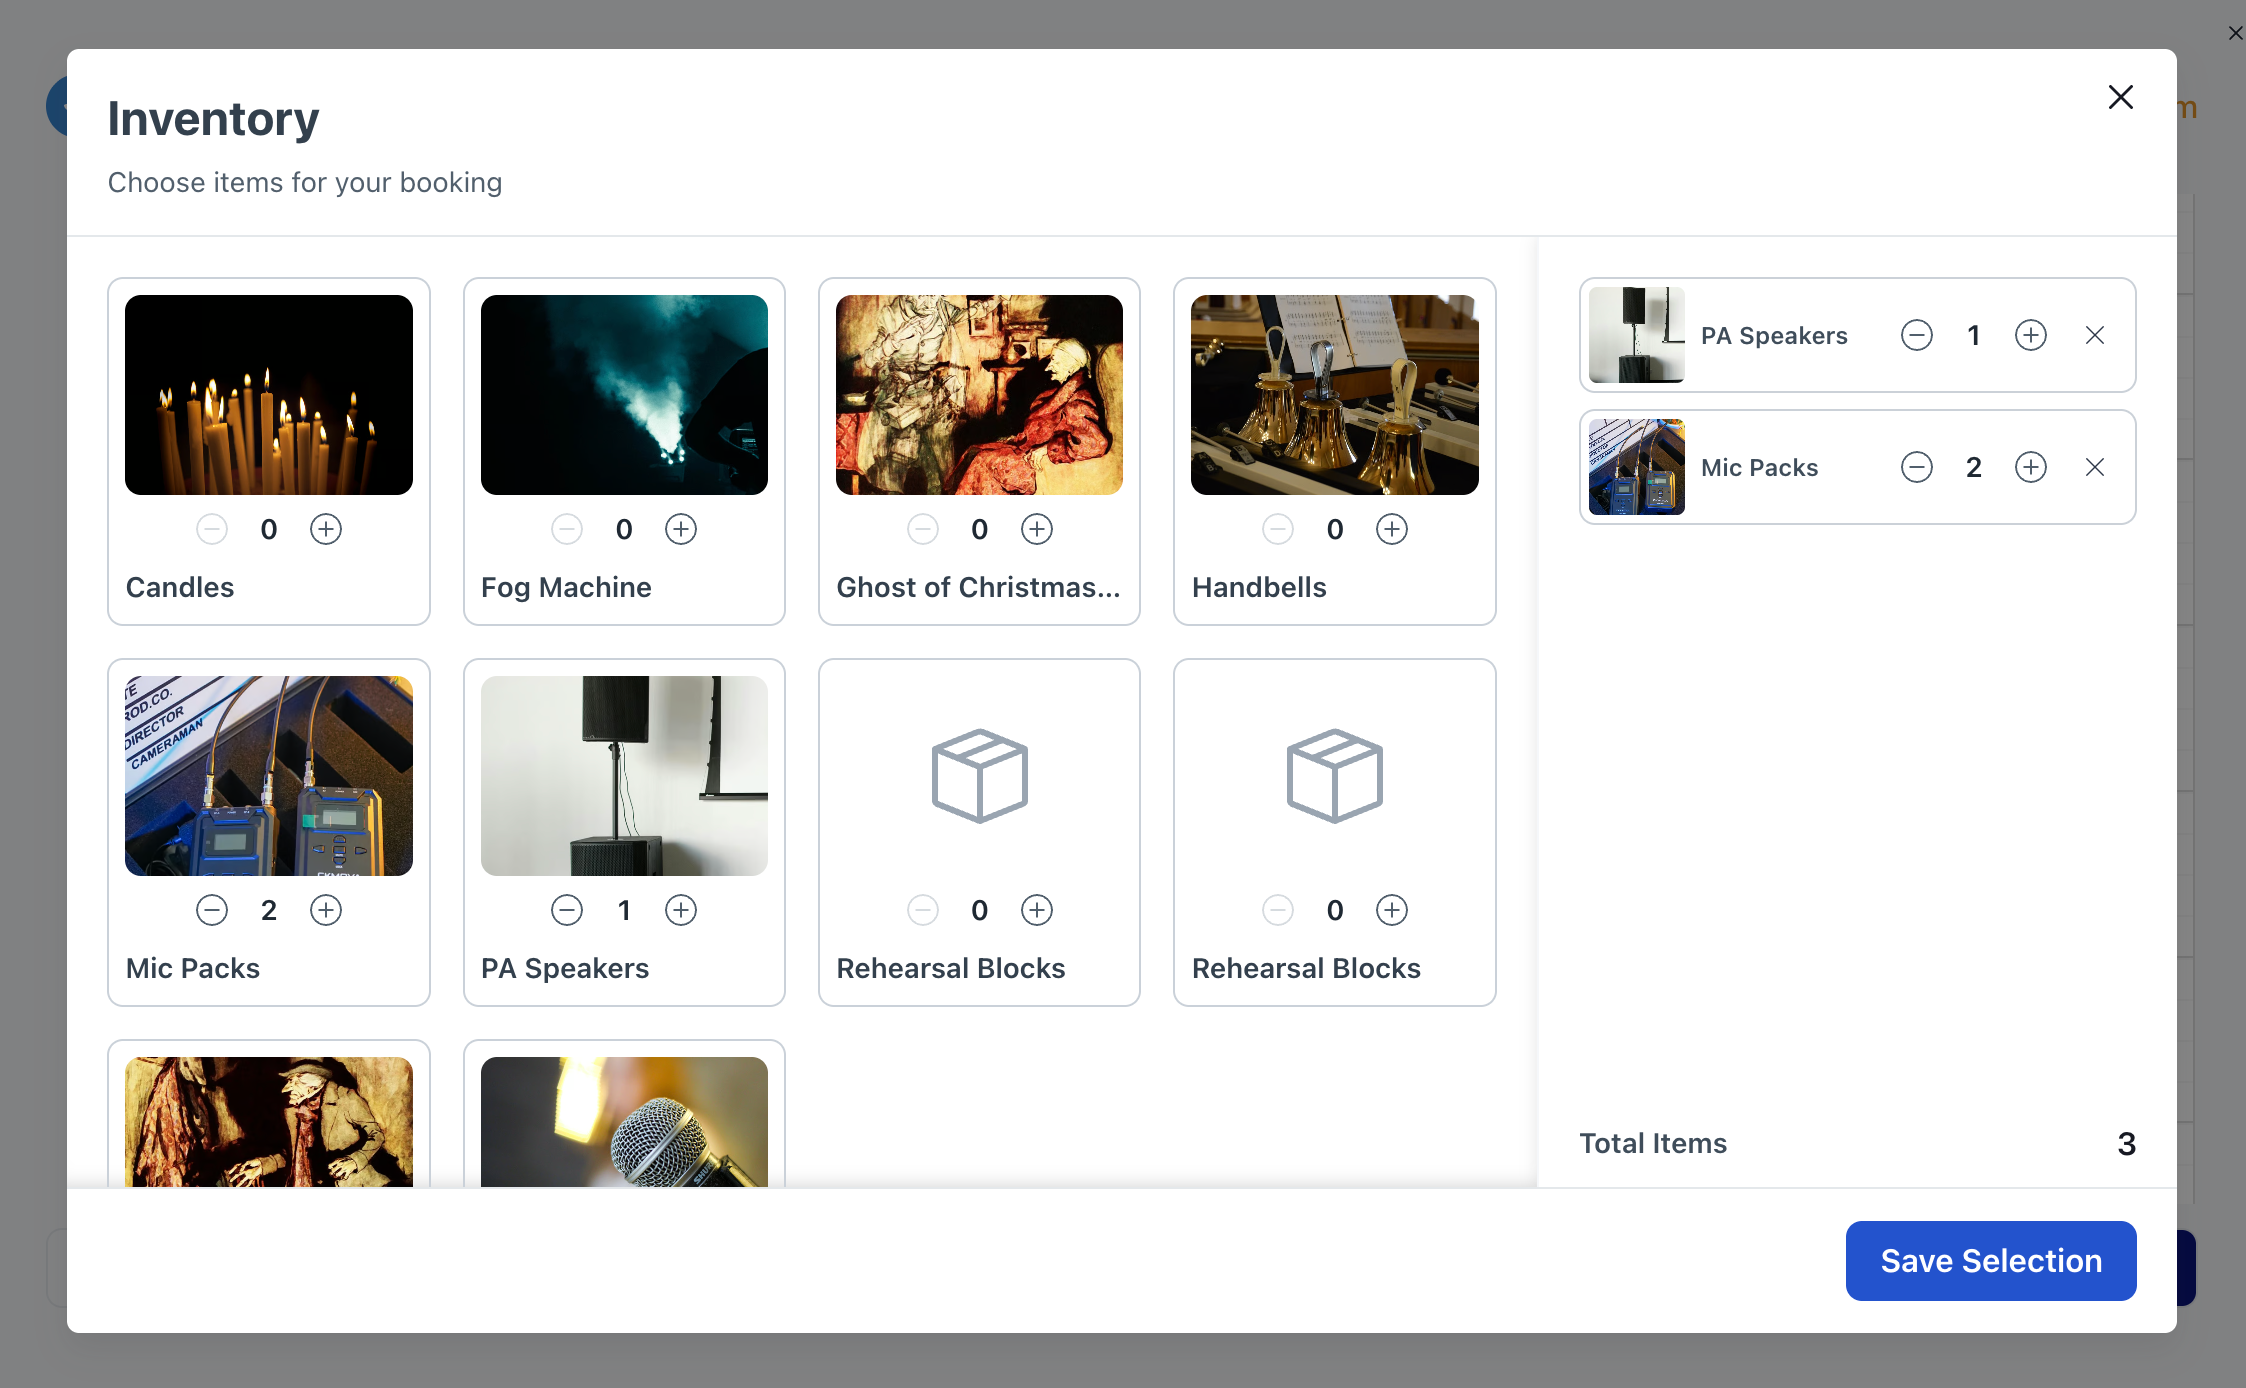
Inventory fields in booking forms now present a familiar e-commerce style shopping cart interface for bookers to select the items they’d like to include in their booking. Clicking on an item in the catalogue expands the card to display the item’s details.
Improvements and fixes
- Booking forms in booking portals are now split into three sections to improve clarity: Contact, Event, and Confirmation
- Updating the start time of an event while editing now moves the end time to maintain the current duration
- Deactivated users are separated from active users in Settings > Members
- Changing or removing a customer from a booking now also clears the contact
Custom Single-Select Booking Form Fields
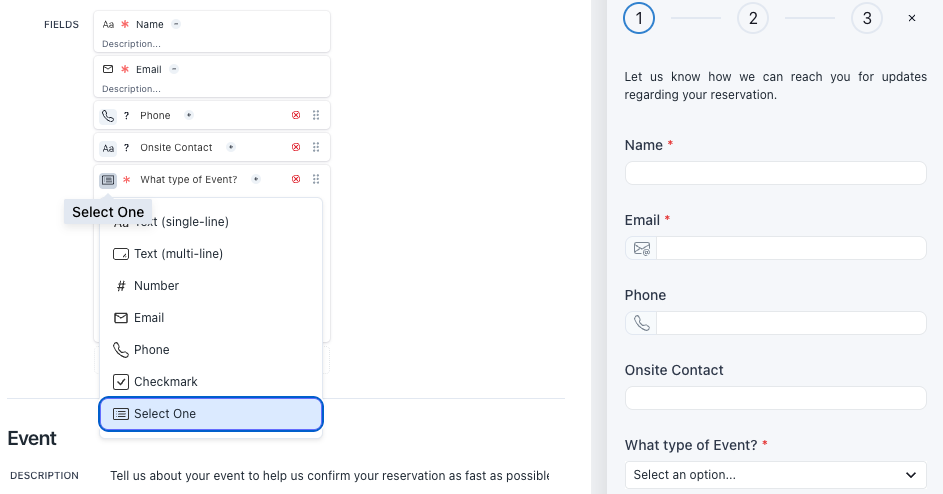
Make your booking forms clearer and more effective with customizable single-select fields. You can now add dropdown-style fields to booking portals, allowing bookers to choose from a predefined list of options. Whether you want to know the event type, a headcount range, or specific department for internal requests, single-select fields reduce ambiguity for bookers and admin, make incoming requests easier to triage.
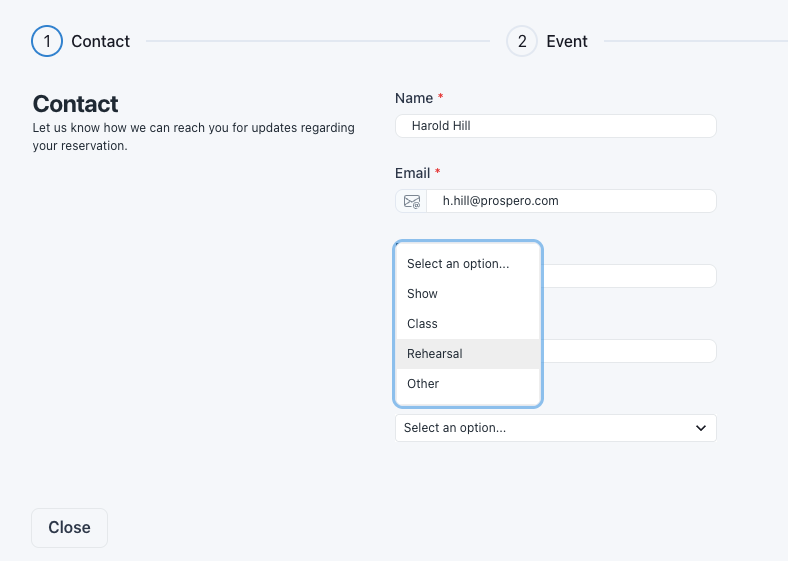
To add a drop-down, single-select field to the booking form, go the the Booking Form Tab in a booking portal editor. Add a new field and choose Select One as the field type. You can then edit the options available to select. Once added to a booking form, single-select responses will appear in the booking details and on the calendar.
Improvements and fixes
- Booking forms in booking portals are now split into three sections to improve clarity
- Updating the start time of an event while editing now moves the end time to maintain the current duration
- Deactivated users are separated from active users in Settings > Members
- Calendars in the booking portal show the correct date if the viewer is in a timezone that is different from the portal’s timezone
Booking Details in Calendar
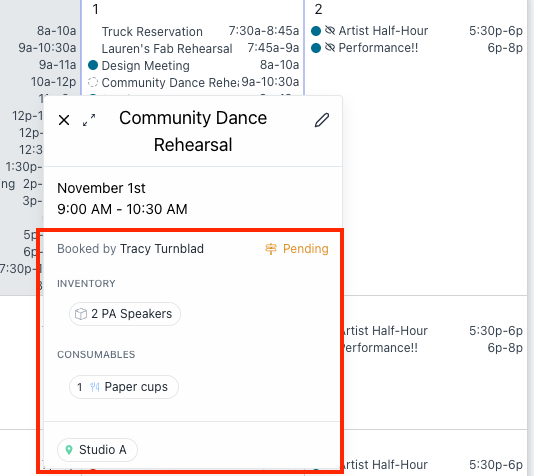
Booking details are now front and center when you click on an event. Event pop-ups that open when clicking on bookings now display all information collected through the booking form beyond basic fields like location, project, and items. This gives you immediate visibility into critical details like contact info, event requirements, and booker notes.
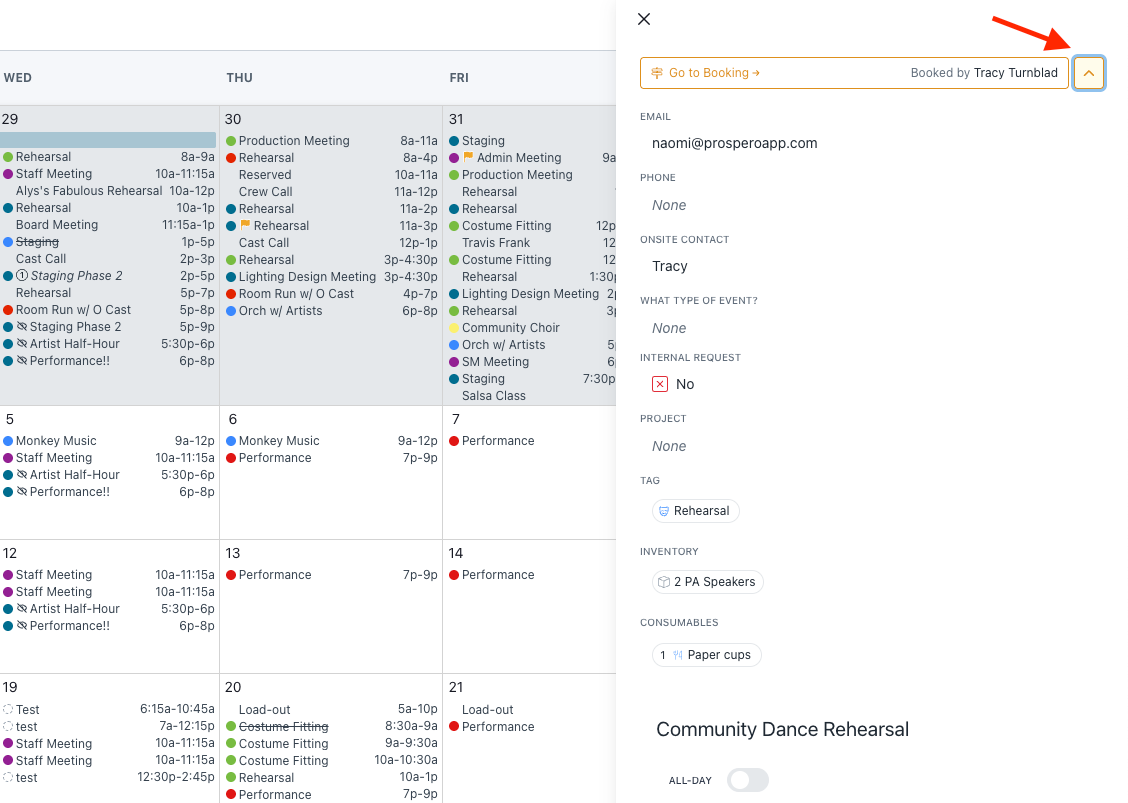
Booking fields are also visible when expanded directly within the event editor, making it easier to review, edit, and act on submitted information in one place. Double-click bookings on the calendar to open the editor and click the expand arrow next to the booker’s name at the top of the editor to view all booking details.
Improvements and fixes
- Consumables now appear in event change notification emails
- Files with “.” in titles can now be uploaded
- Booking “number” custom fields now have consistent displays
- Mobile booking portal dates are no longer cut off
- Organization logos now show in QR codes in view links
- TV Mode removes deleted events or bookings when it auto-refreshes
Multi-Location Bookings
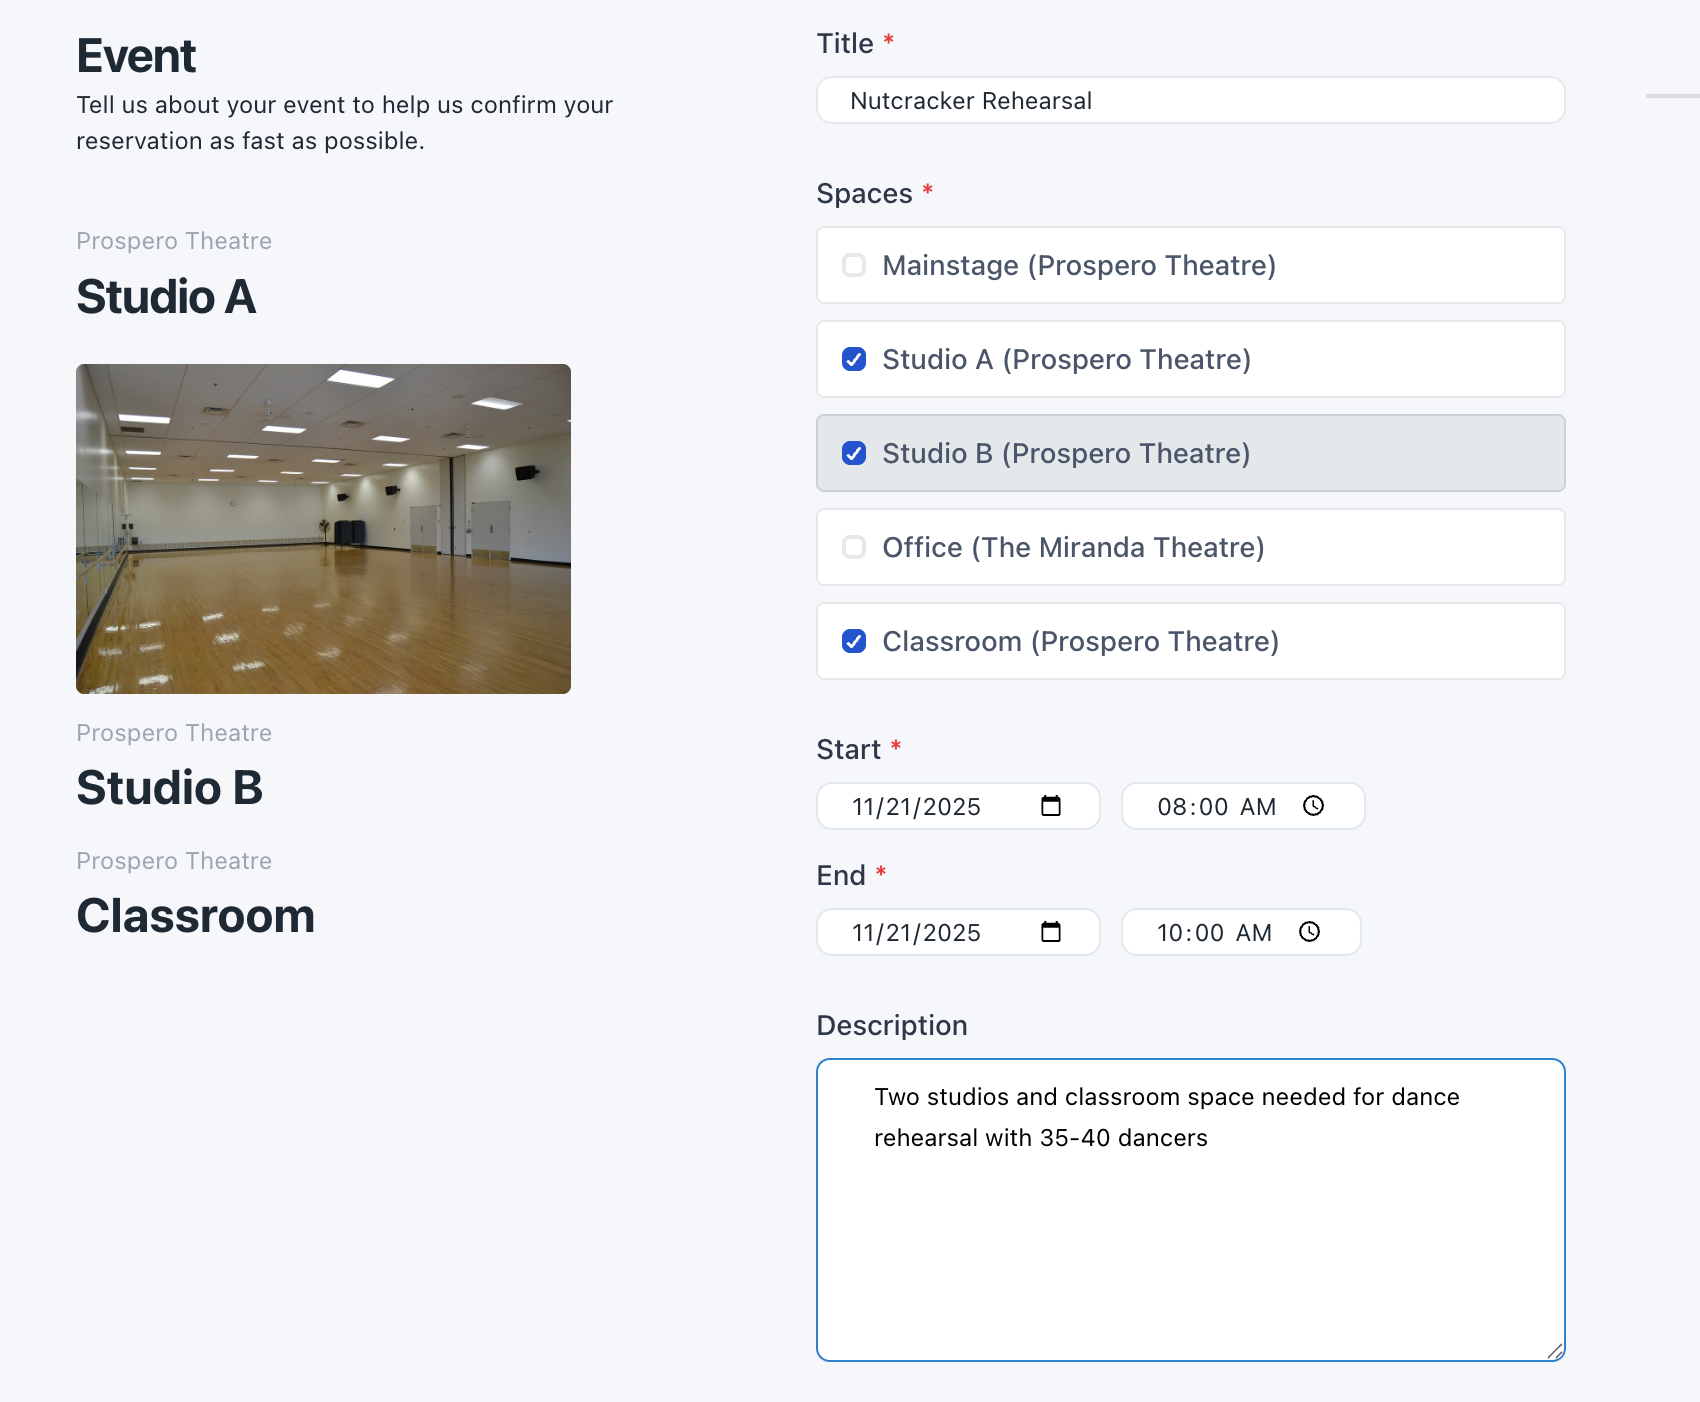
Bookers can now request multiple locations in a single booking, allowing for more flexibility when events span several rooms, studios, or venues. Whether a production uses one space for rehearsal and another for makeup and costumes, or a workshop runs simultaneously across breakout rooms, capture the full footprint of an event without having to create multiple requests.
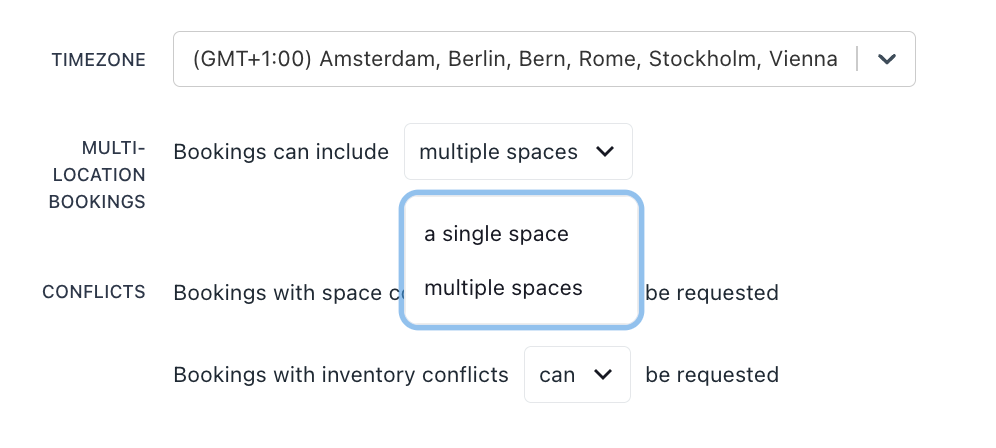
To allow for multi-location bookings in a specific portal, go to Booking Portals > Edit Your Portal > Configuration > Multi-location Bookings. Select to allow bookings to include multiple spaces. Bookers will then be able to select multiple locations for the same time when creating a booking request.
Improvements and fixes
- You can now select and deselect all in MultiSelect menus and the number of selected items is displayed at the top of the menu
European Date Format
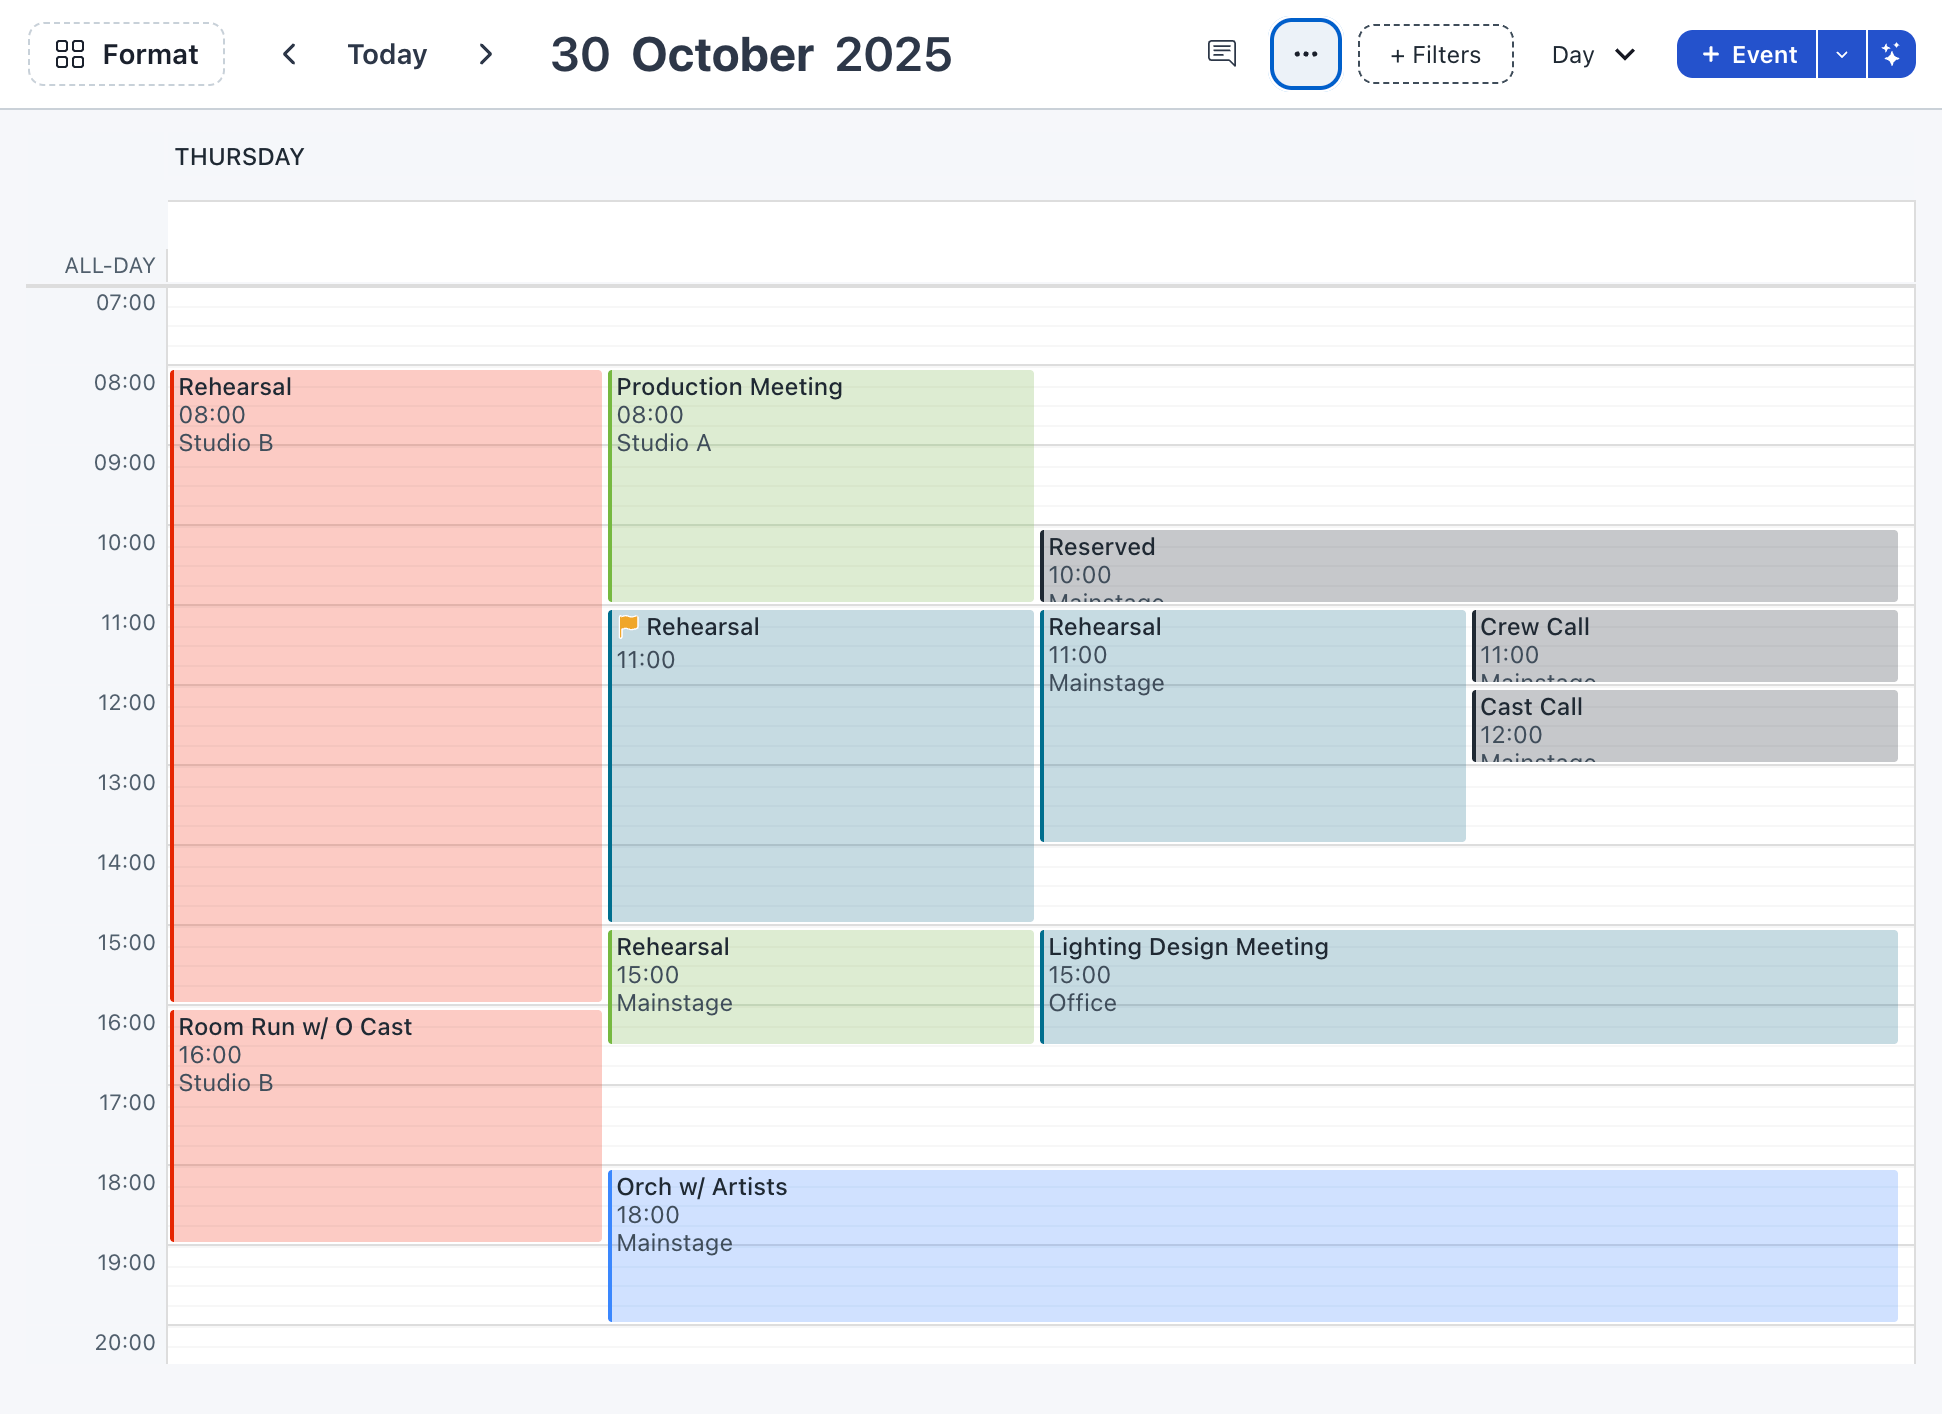
European teams can now view their calendars with DD/MM/YYYY date formatting. Use European date formatting across calendar layouts, shared calendar views, and booking workflows to schedule intuitively on both sides of the Atlantic 🌎
To toggle the date format, go to Settings > Organization > Date Format.
Improvements and fixes
- People names are now alphabetized when visible in event boxes
- Deleting an Event now also deletes associated booking change requests
- Rich text auto-links less broadly, limiting auto-linking to common domains
- Details are no longer hidden in list export
- Booking Portals now load much faster
Inventory page tag filters

Quickly find the right piece of gear, prop, or costume with Item Tags, a new way to organize and search your inventory items in Prospero. Whether you’re sorting through sound equipment, set pieces, or wardrobe items, tags make it easy to categorize and locate what you need. Create tags for themes, departments, or item types to streamline prep for any event.
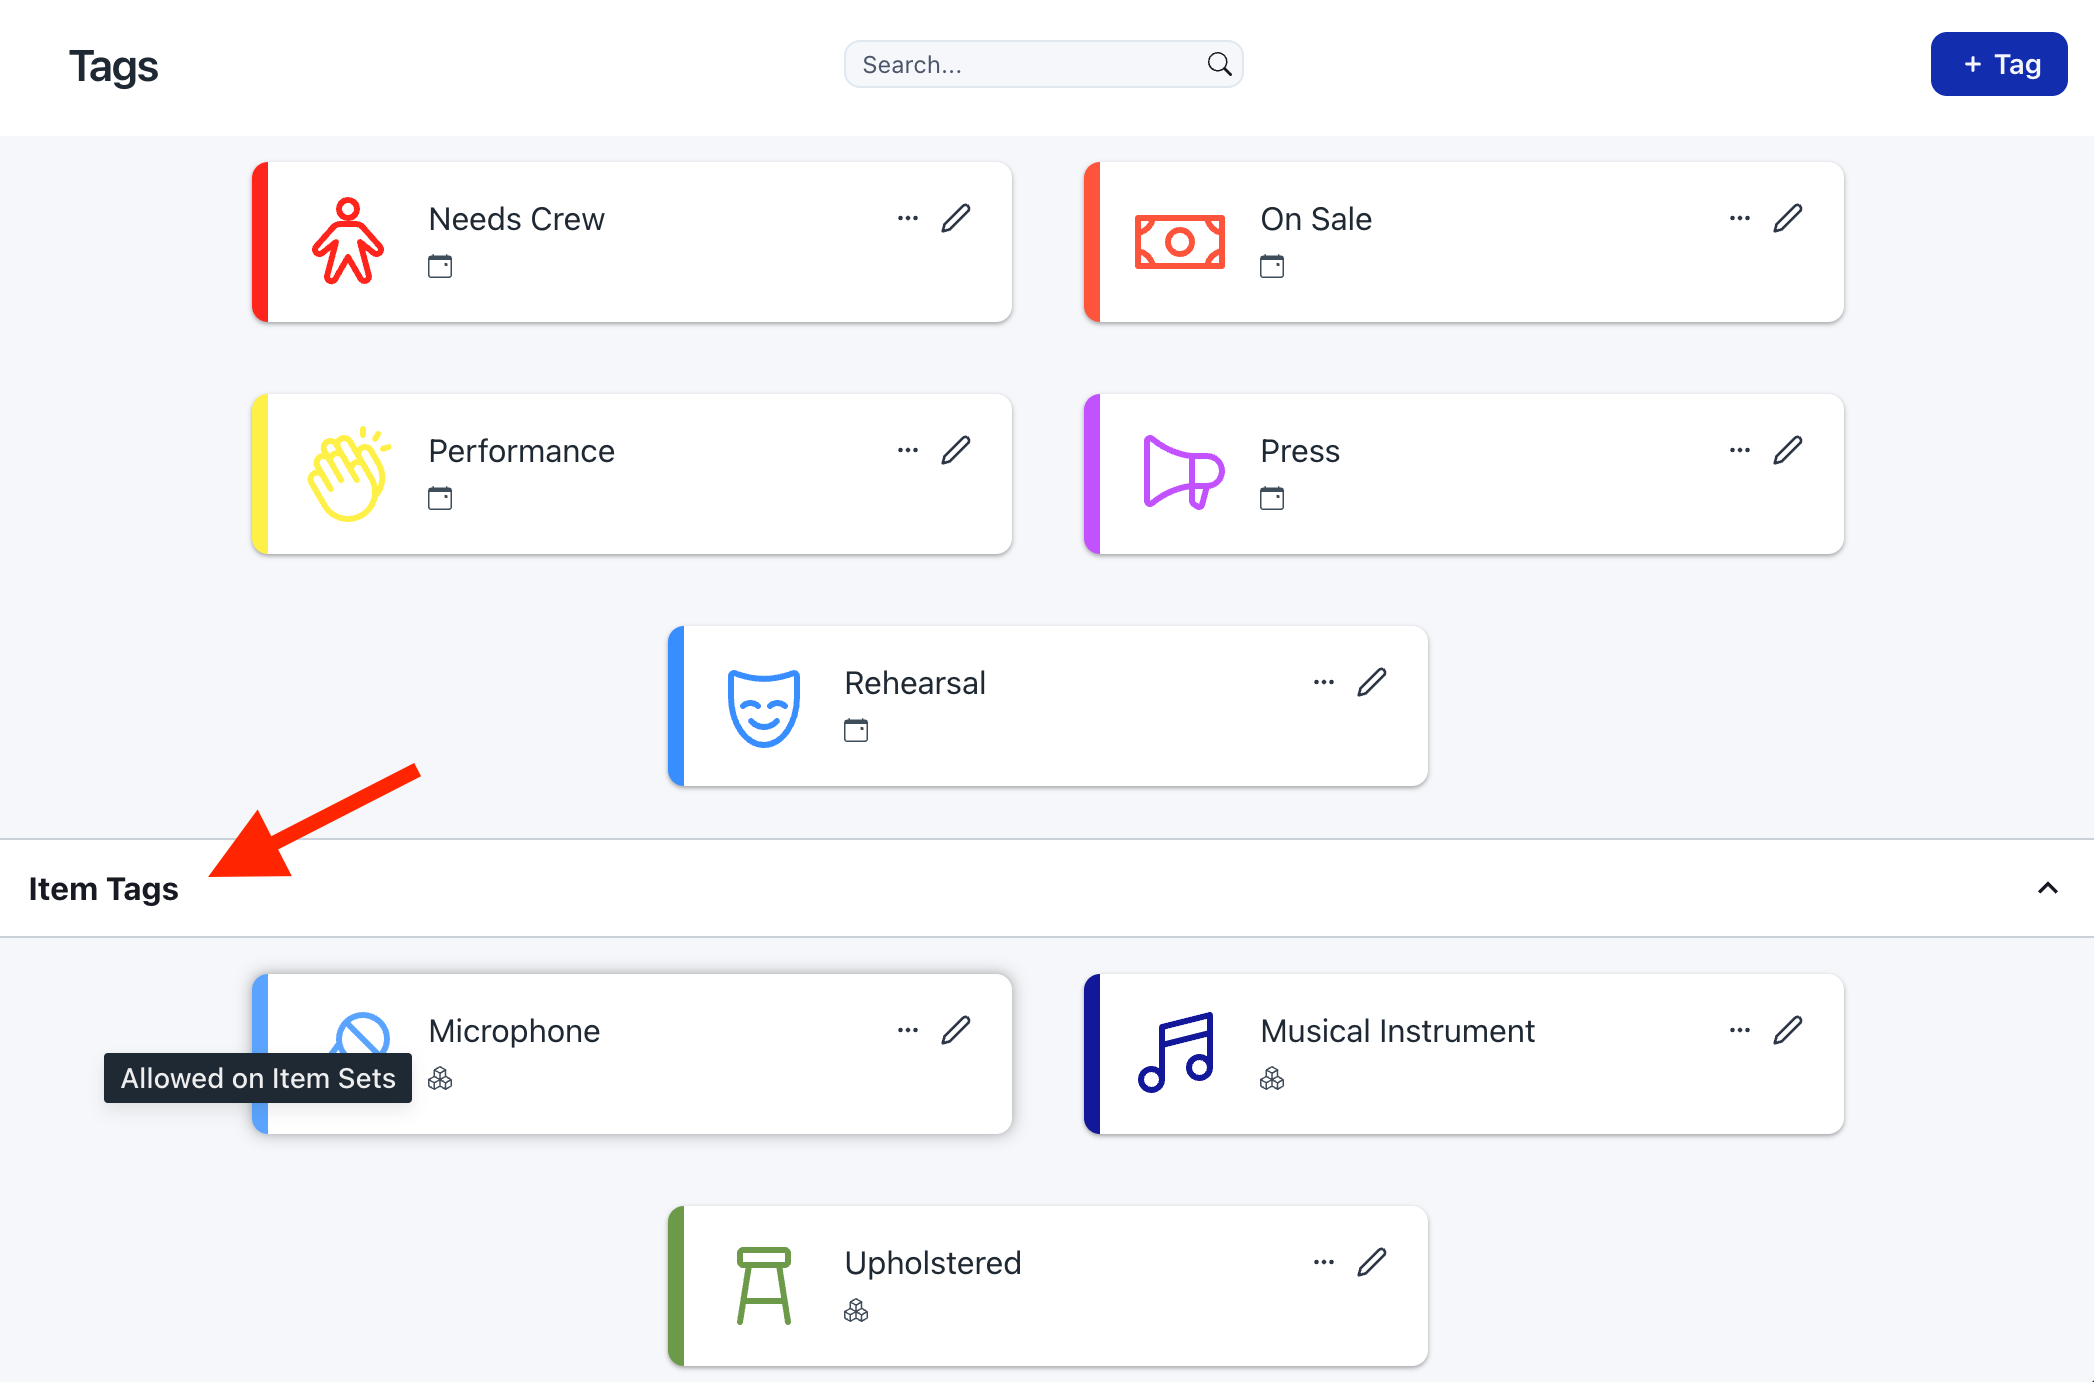
You can create item tags in the Tags tab (right alongside event tags). When creating a new tag, select for it to be allowed on Items instead of Events. These tags are for inventory only and can’t be added to events or used to filter events in the calendar. Once an item is tagged, you can filter by tag directly from the Inventory page to help you quickly pull up every “mic,” “chair,” or “costume” in stock.
Improvements and fixes
- You can now set calendar integrations permissions for all users.
- You can elect to continue without loading the archive when viewing an older part of the calendar.
- You can now remove the address of a venue.
- The tags page is scrollable when you have too many tags.
Event Archival
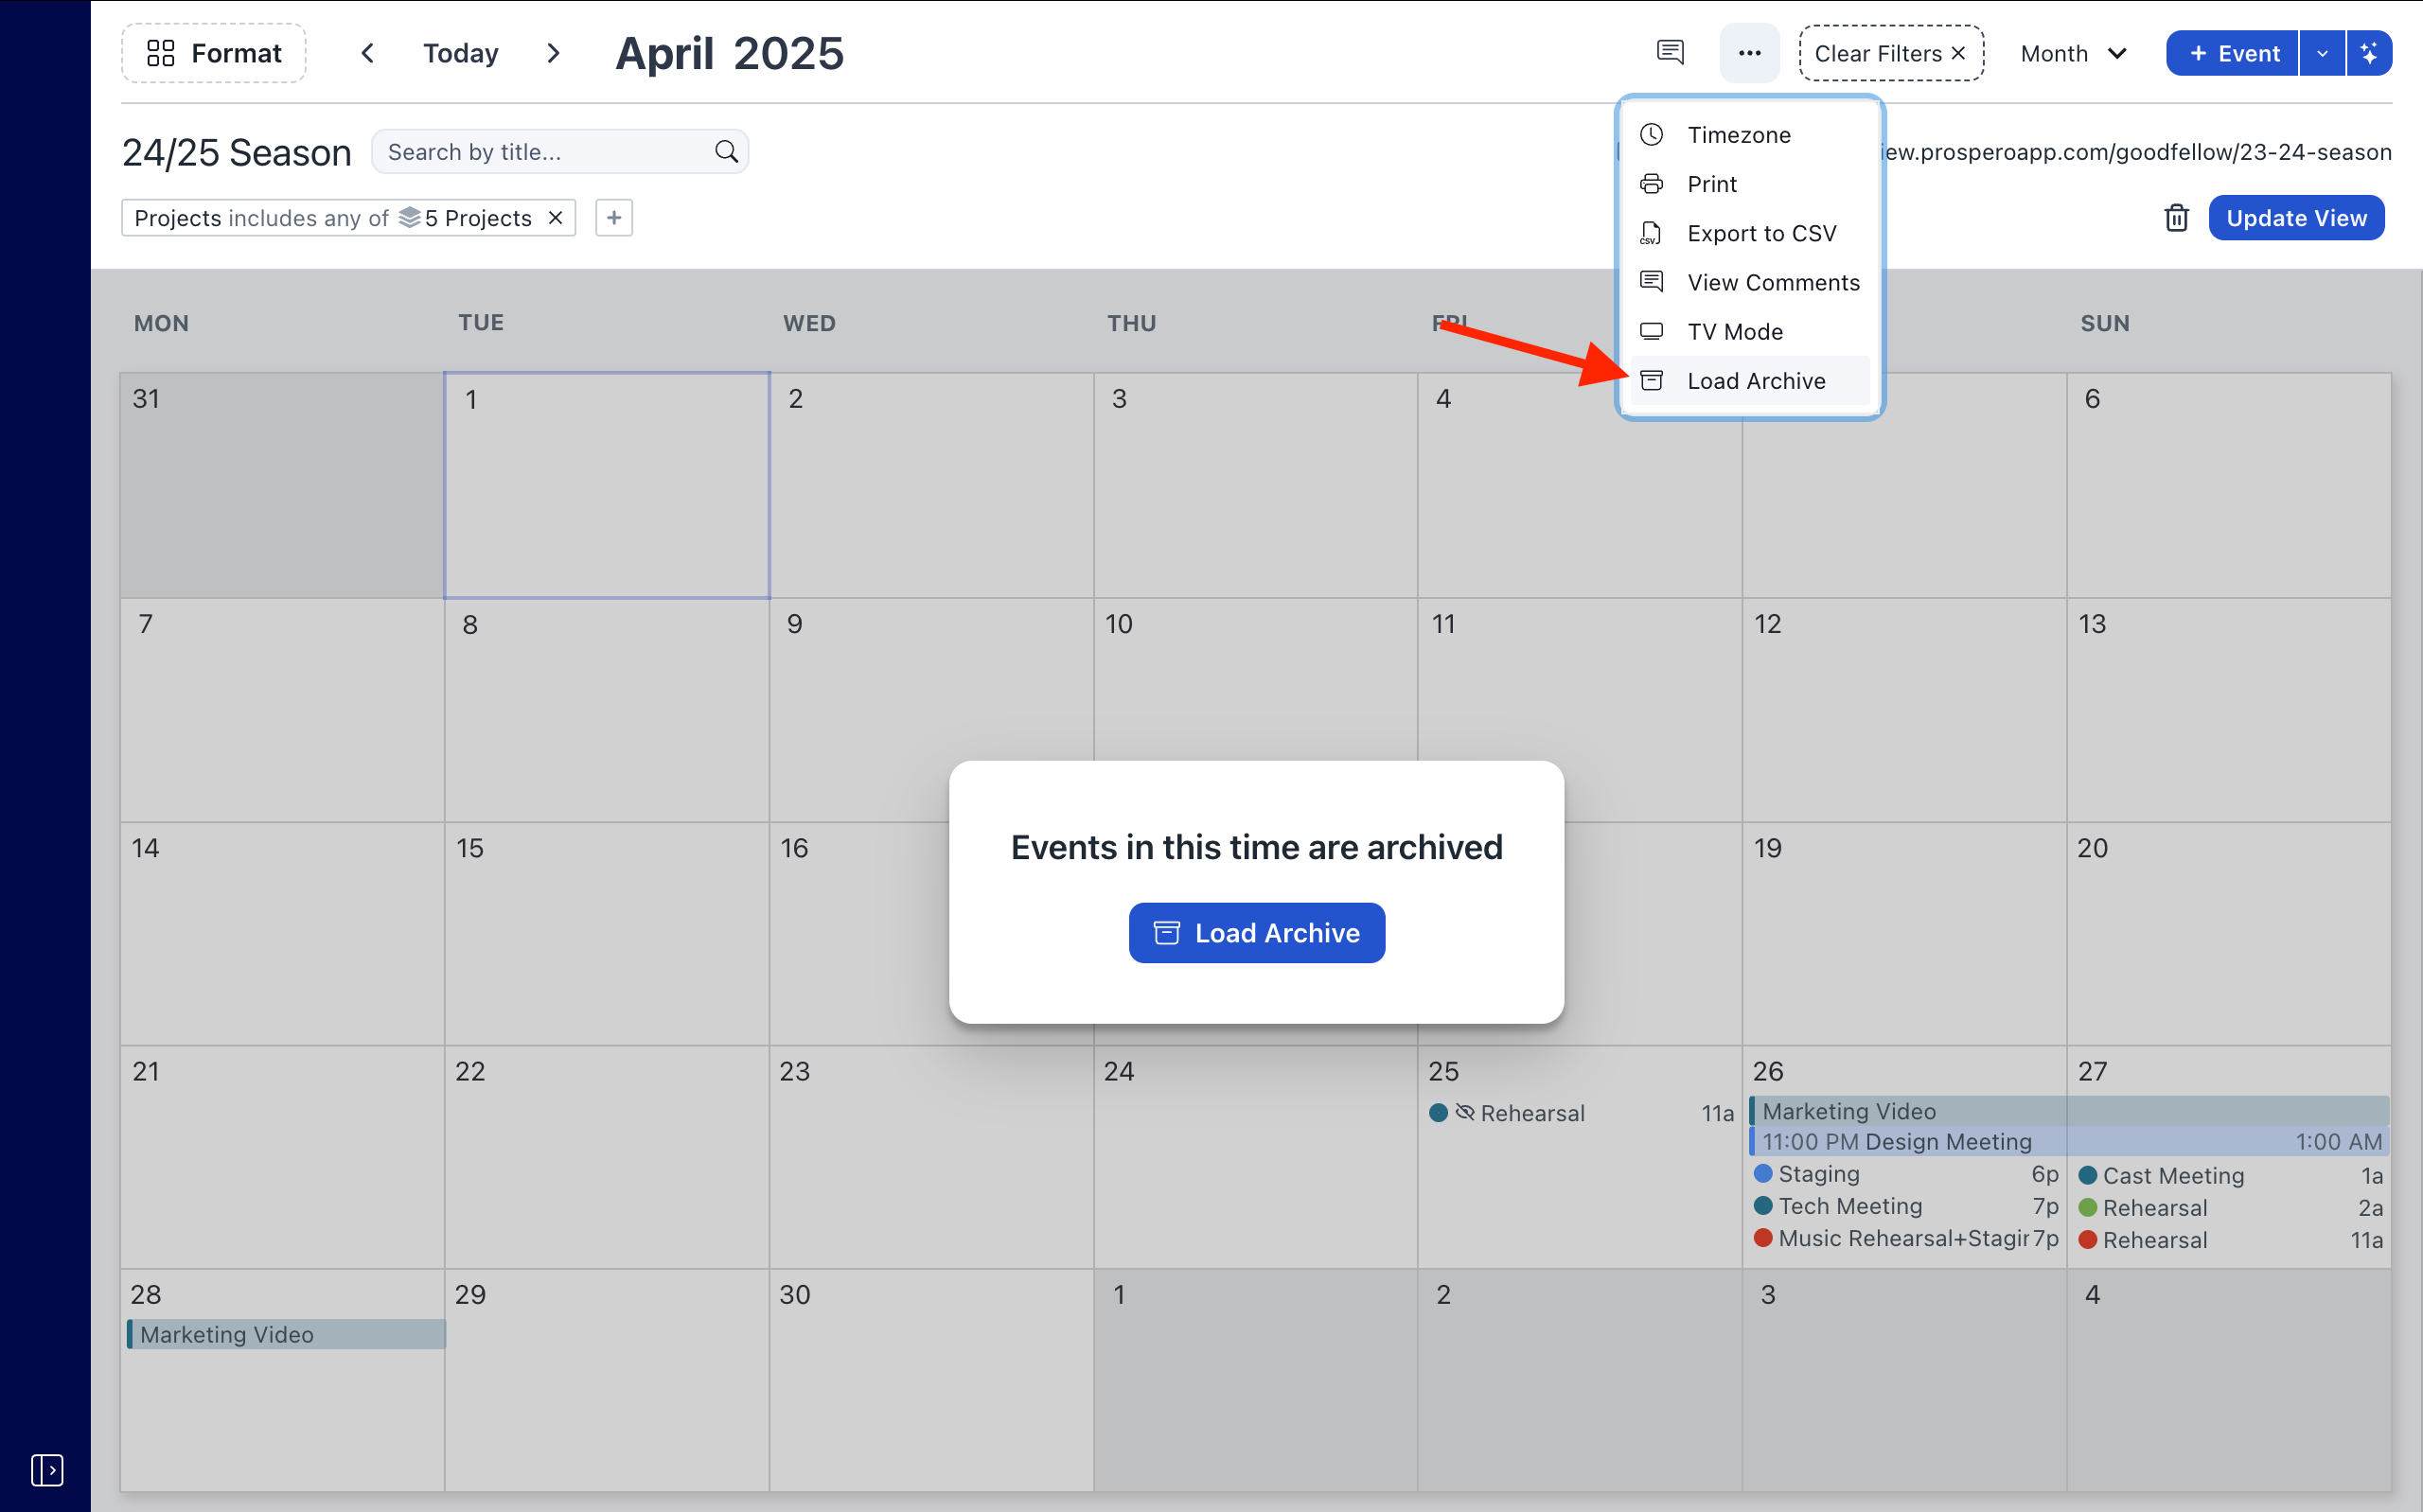
Over time, thousands of past events can slow down your calendar. Event Archiving keeps Prospero fast and efficient by automatically removing older events from the initial load, without losing your history. Archived events don’t appear on shared links or synced calendars, but you can load them anytime and even duplicate them to use as templates for future projects.
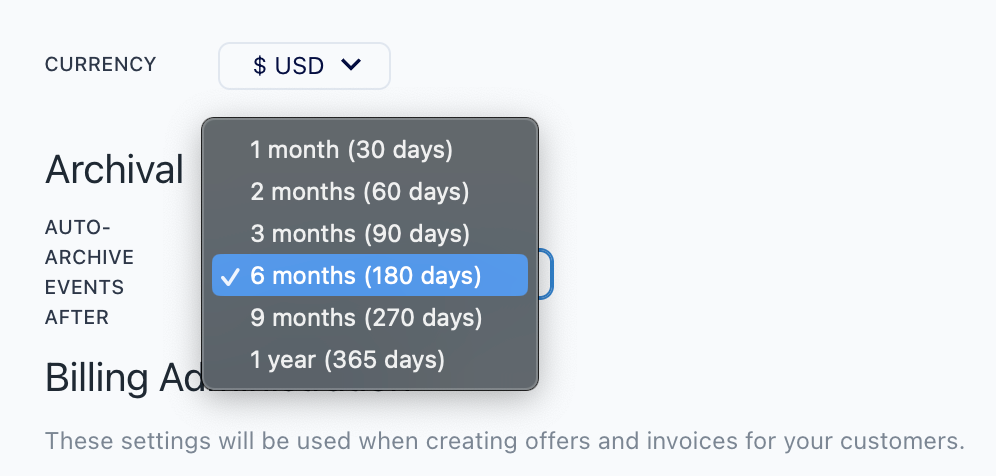
Prospero auto-archives events nightly based on your chosen threshold. To adjust how far back events are kept “live,” head to Settings → Overview → Archival. Load archived events at any time by clicking the Load Archive button prompted when in an archived time period, or click the three-dots menu in the calendar and select Load Archive to load events from the visible time frame.
Improvements and fixes
- You can now click on the date header in any calendar layout to open a “Go To Date” menu.
- You can now include a custom message when sending event notifications.
- You can adjust your organization’s region via Settings > Overview > Organization > Region. Your region setting will alter key financial vocabulary when creating offers & invoices (full app translation is not yet available).
- Bulk duplicating events will create draft events to prevent accidentally sending invitations via third-party calendars.
- Fixed a regression where global list layout format options would disappear when reloading the page.
- Fixed a bug where old views would not display all column options in the list layout format menu.
View Visibility Settings
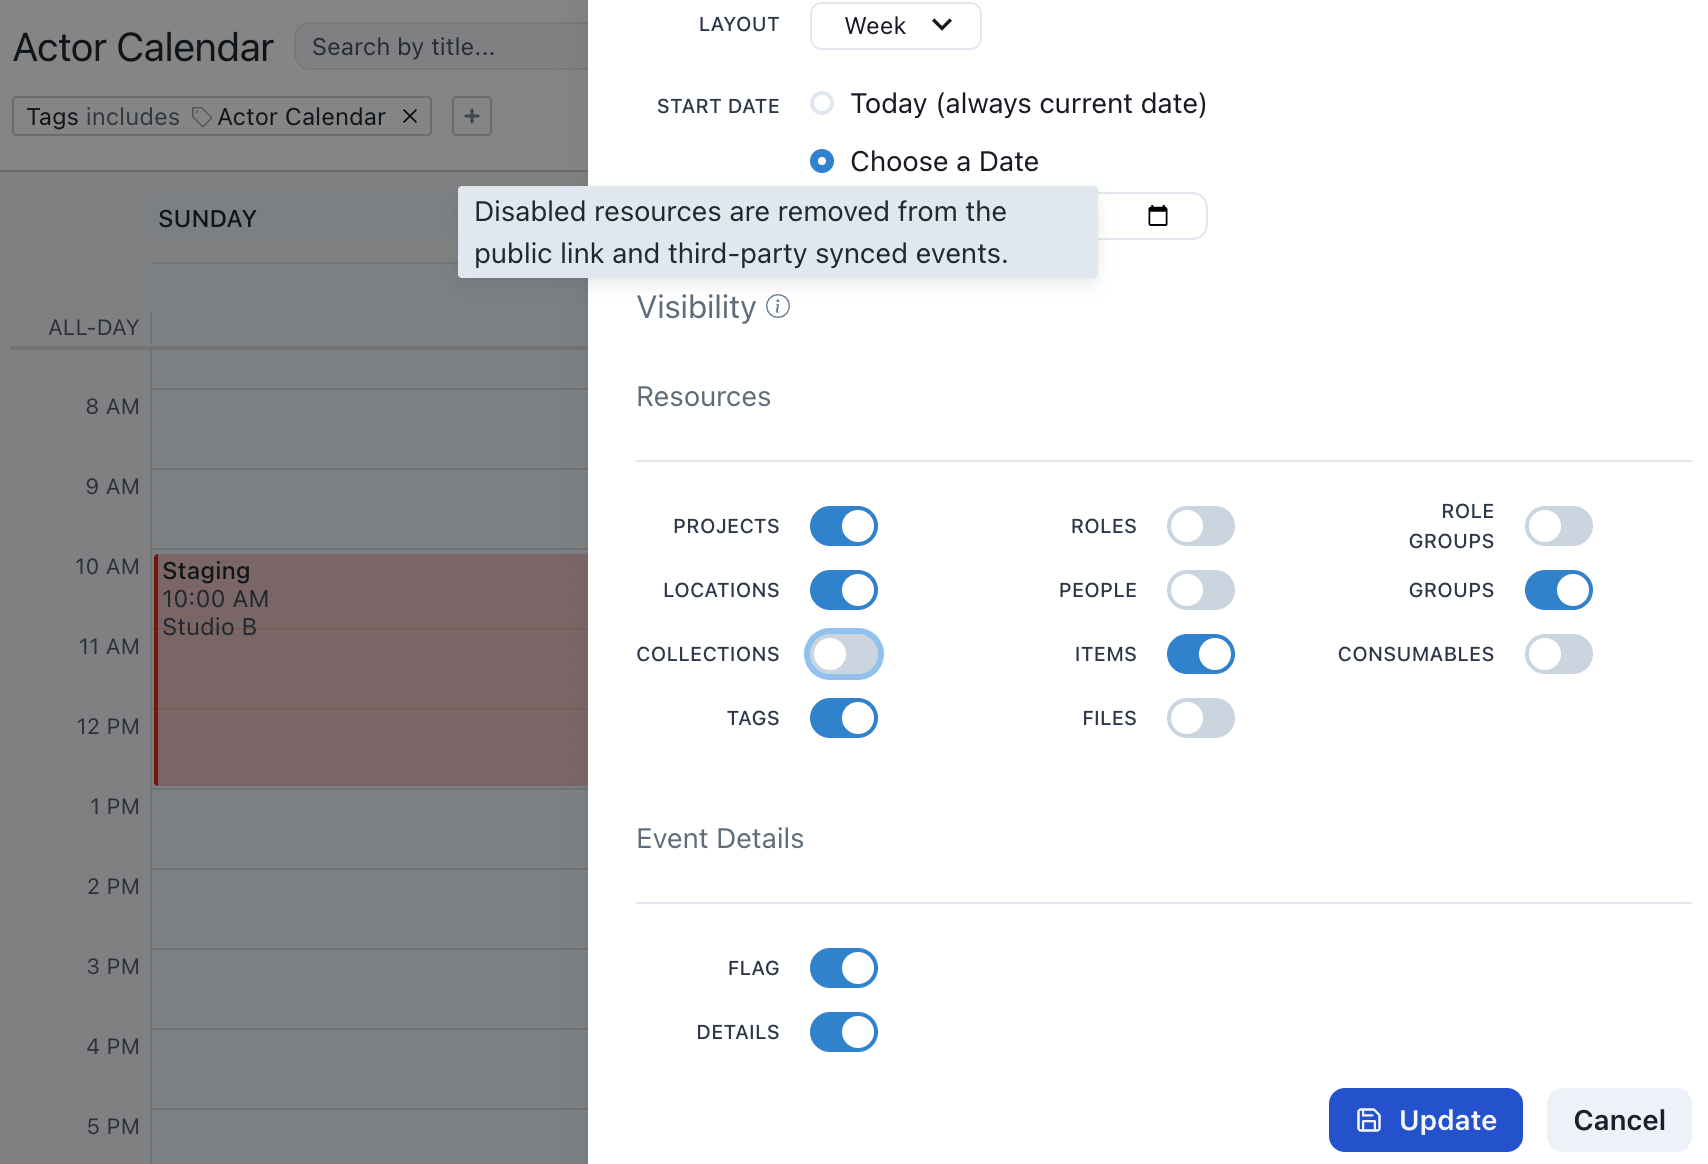
Whether you’re sharing schedules with students, guest artists, or external partners, you can now tailor exactly what information appears. Protect sensitive details while keeping everyone informed.
Set granular visibility settings for each view to decide what viewers see. Hide people to protect student privacy, toggle file visibility to share event documents, or remove tags if they’re only used for internal filtering.
You can configure visibility when creating a new view, or update existing settings by selecting a view in the sidebar and clicking Update View → Visibility.
Improvements and fixes
- Cancellation requests no longer have extra whitespace in booking portals.
- View names now always update immediately in the sidebar.
- Portal login background no longer cuts off if you use a very large logo.
- If you have no contacts, the “Create a Contact” button now works.
Day & Week Export to PDF
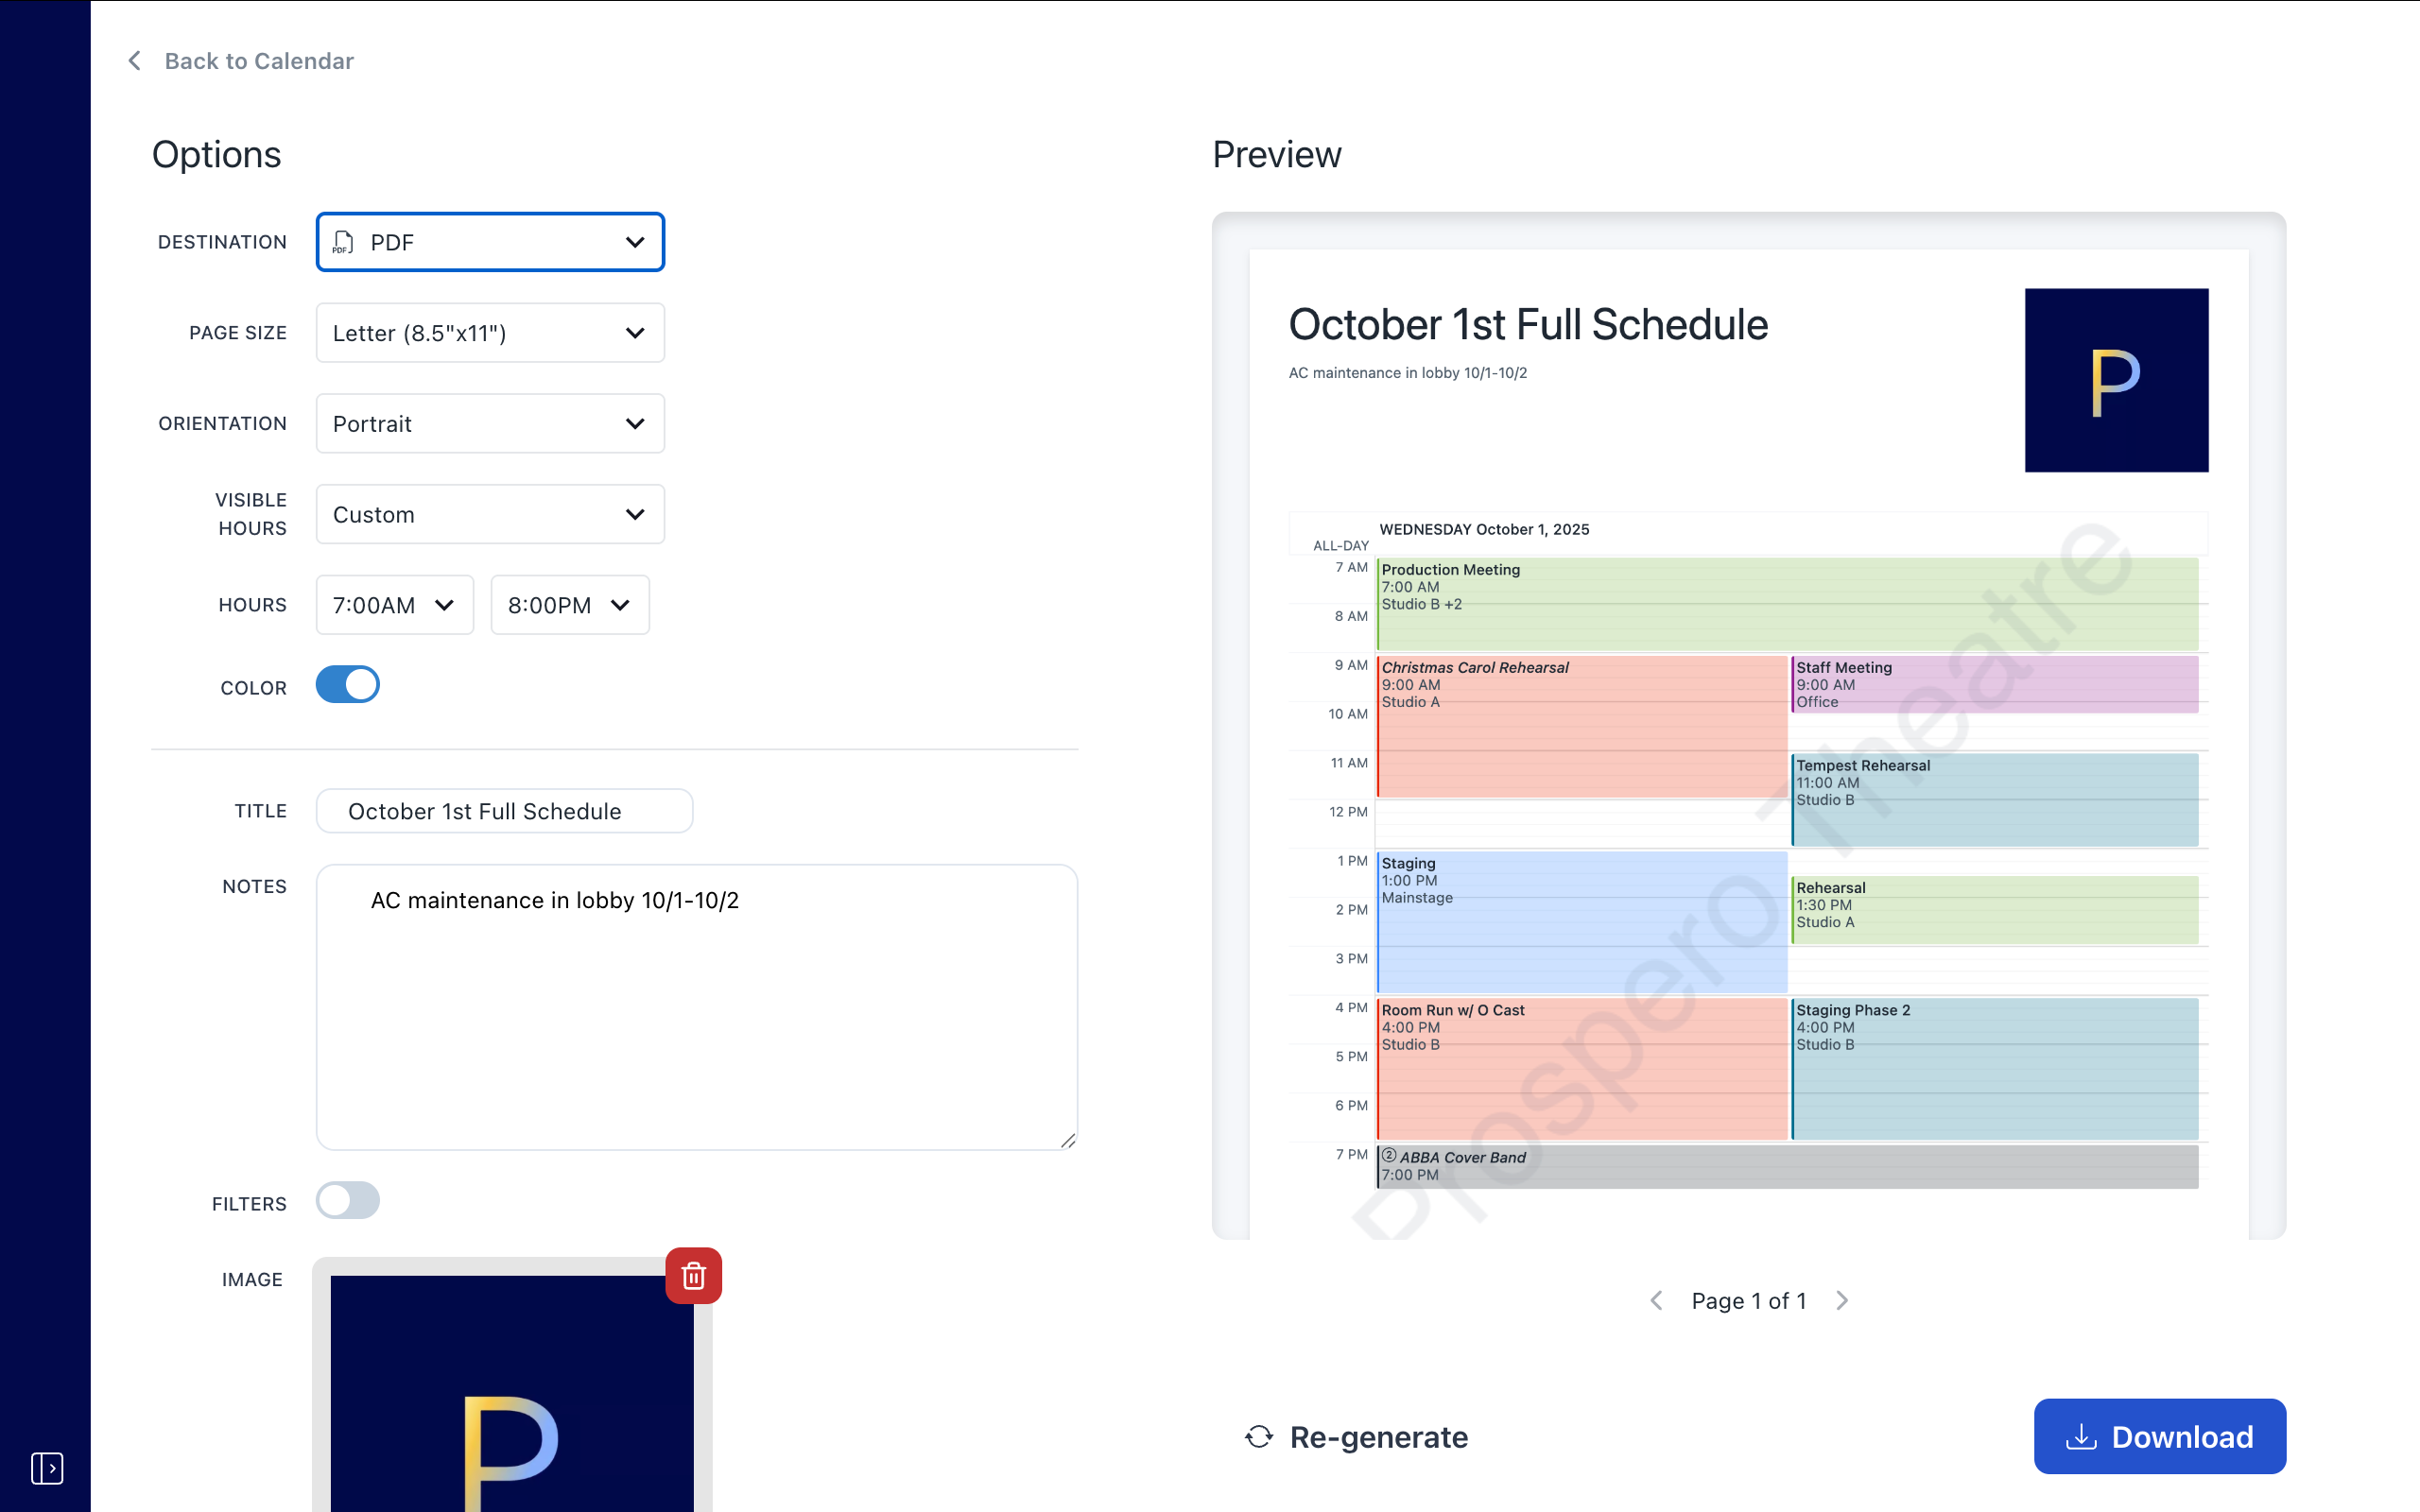
You can now use Prospero’s full export bay for Day and Week calendar layouts, just like you can with List layout. Whether you’re prepping a daily rehearsal schedule for the cast or a weekly overview for your crew, you can generate clean, professional printouts in seconds.
Similar to the other layouts, you can export a schedule to PDF by clicking the three-dots menu in your desired calendar layout and selecting Export to PDF. Adjust the orientation, page size, displayed title, schedule notes, brand image, and choose to display a watermark, date and time, or applied filters. In day and week layouts, you can also customize the visible hours to adjust when the schedule starts and ends.
Improvements and fixes
- The event comment icon is no longer visible in view links.
- All-day events now stay put within the boundaries of their column in week and day layouts.
- Splitting day layout by tags or consumables no longer crashes the app.
Customers
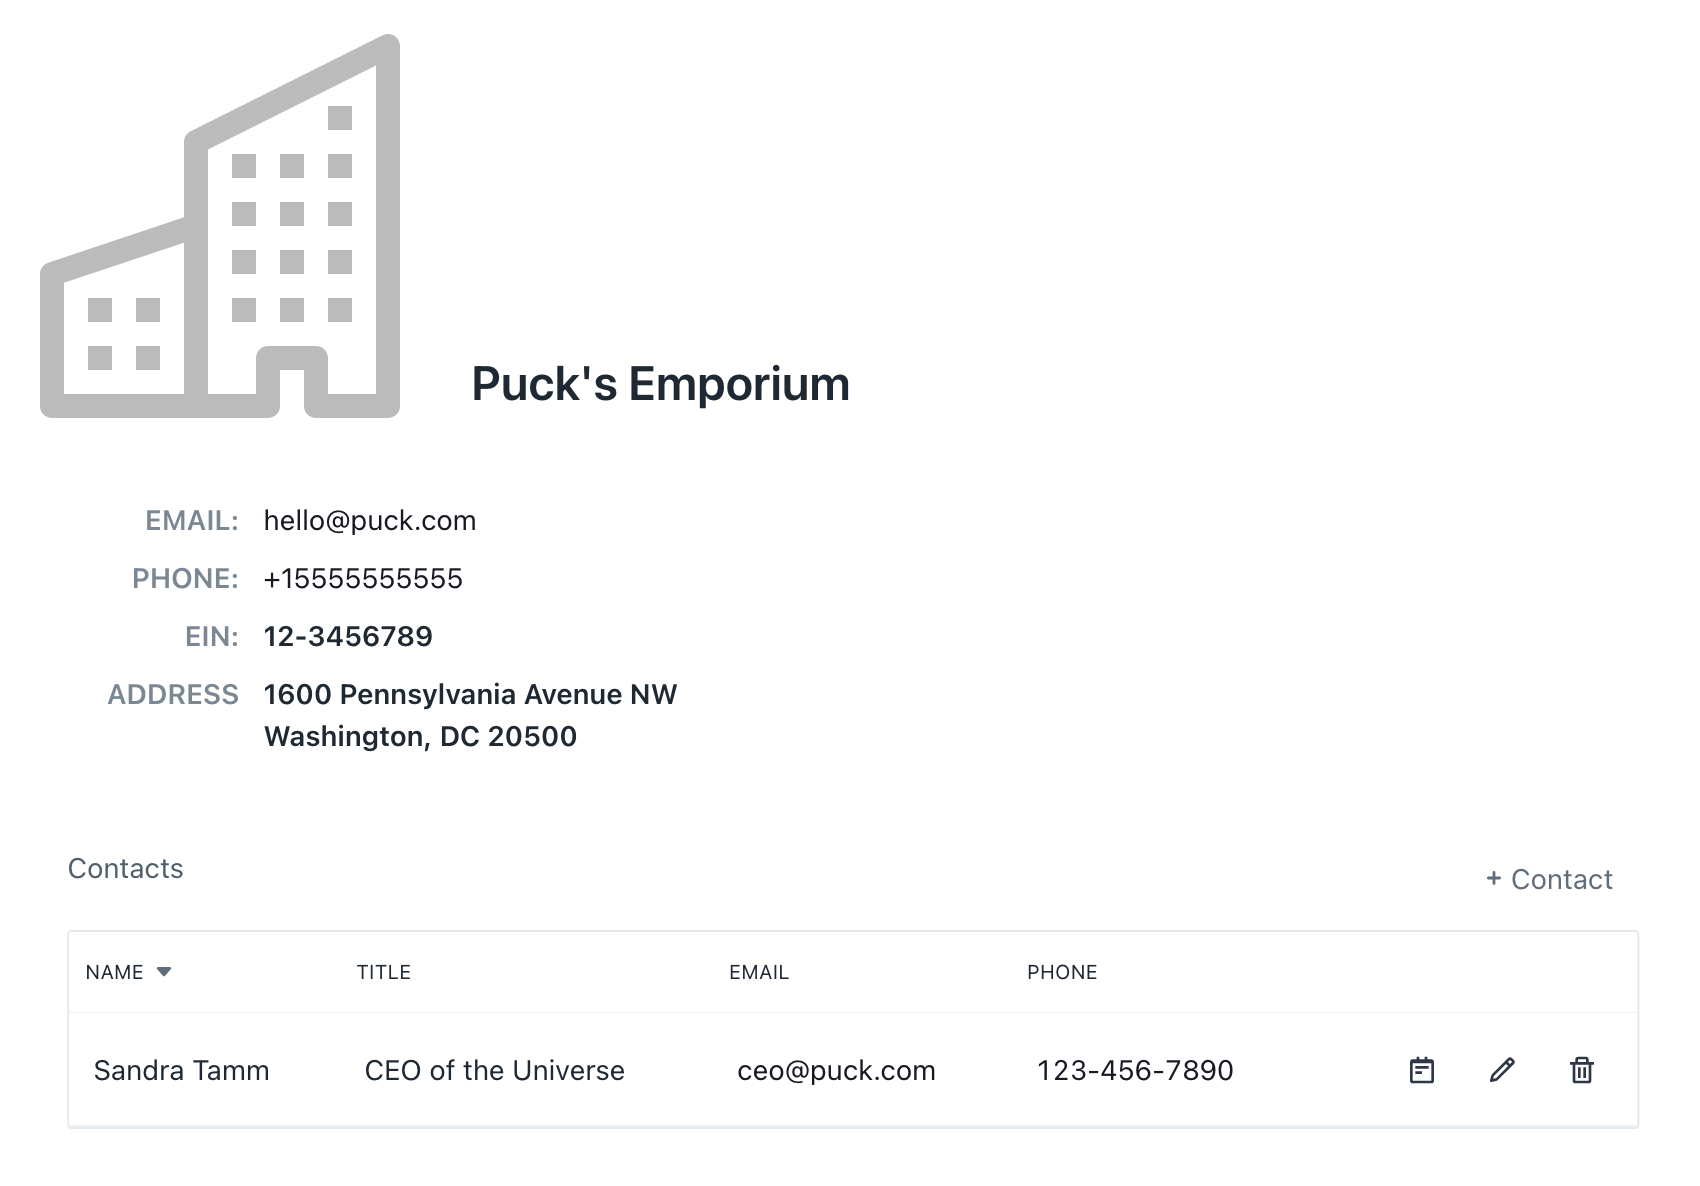
As your bookings grow in number, you’ll start to see familiar names crop up (that means you’re doing a good job!).
With customers and contacts, you can assign those familiar names to your bookings and keep track of your recurring bookers. When triaging a booking or editing an existing booking, a new Customer field appears below the time information. Adding a customer exposes the Contact field.
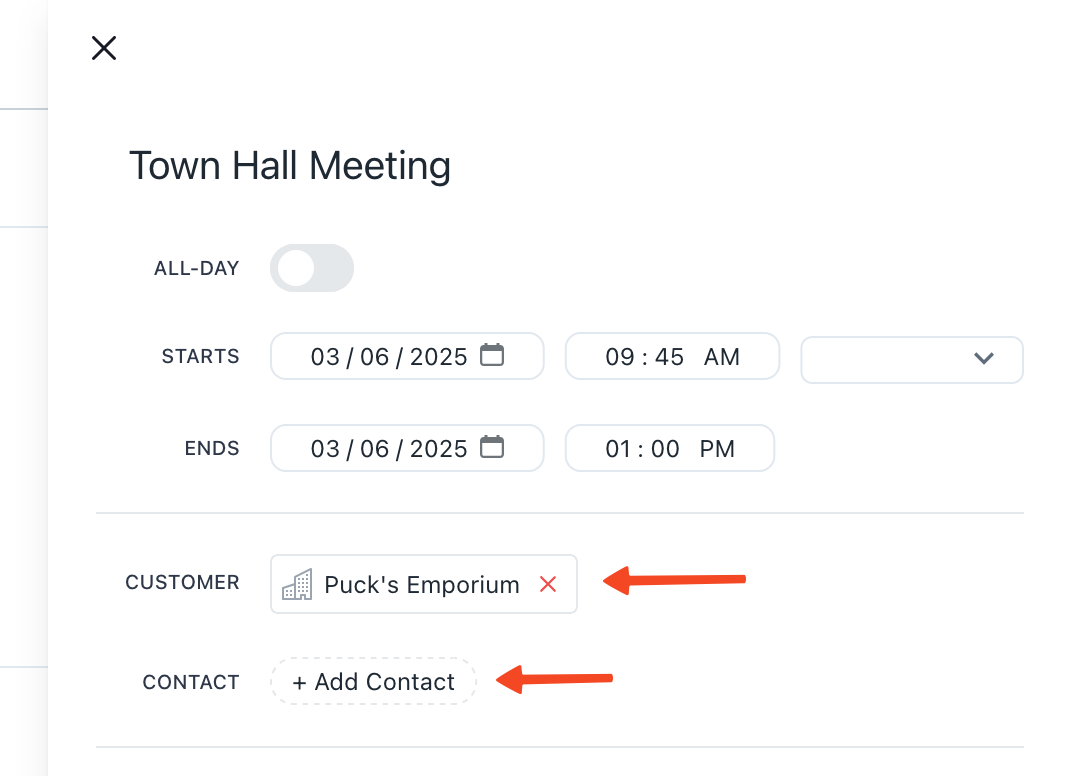
You can manage your customers and contacts in the new Customers tab. Click on a customer row to open the overview page, where you can manage the customer’s contacts.
Look out: we’ve got some significant improvements planned for your rental workflows over the coming months. 👀
Improvements and fixes
- You can now trigger TV Mode via a view link - just add “?tv-mode=true” to the end of the URL.
- Booking overviews now render custom field names on their own lines, improving readability for very long field names.
- You can now bulk edit event admin notes.
- You can no longer save an item set with no items in it - saving empty item sets was leading to unexpected behavior.
- Bookers can no longer submit booking change or cancellation requests for canceled or denied bookings. This prevents a rare edge-case that could cause a booking to be “stuck” in the admin bookings page.
- When opening TV Mode, the comments sidebar now always closes.
Item Tags
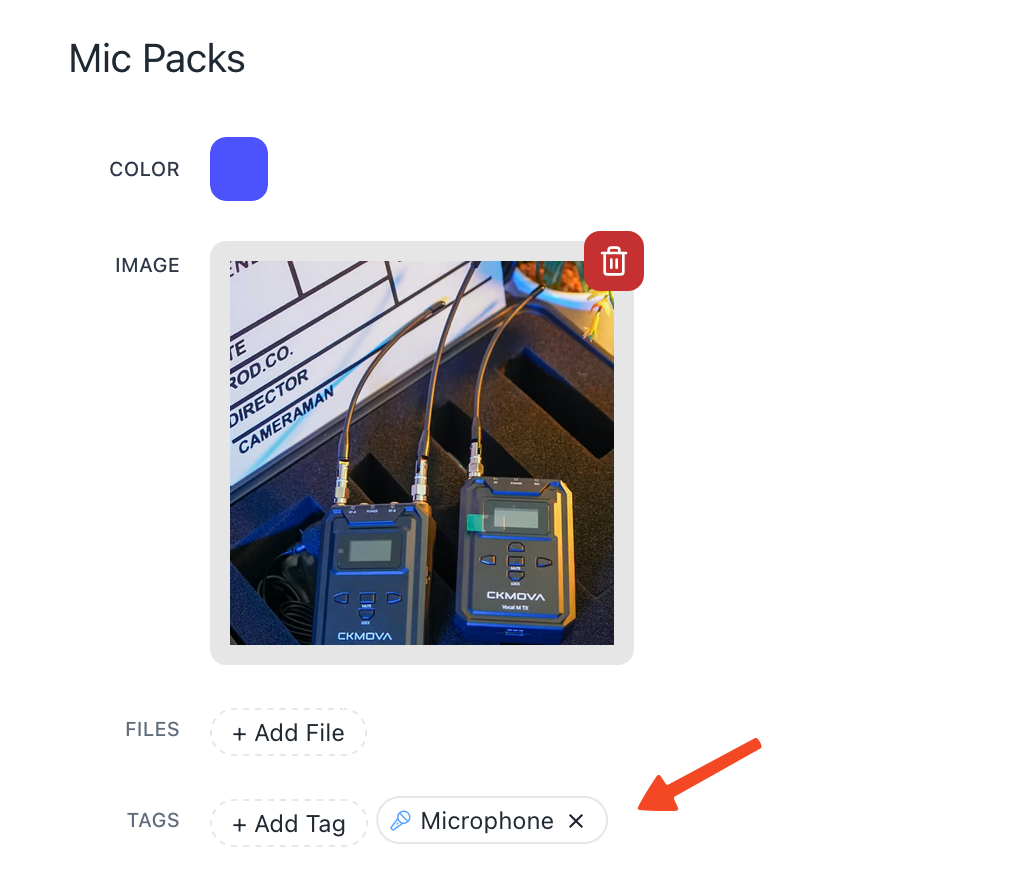
Whether you’re looking for a list of every upholstered armchair in your warehouse when designing a set or frantically searching for that last-minute mic replacement, quickly searching your inventory is key. To help you find what you need faster, we’re introducing tags on items.

You can now elect to make tags for events or items. Tags will only appear in dropdowns on their appropriate resource (no “Microphone” tag on events). Just like events, you can add as many tags to items as you want.
Improvements and fixes
- When you receive an in-app notification, a corresponding email notification is sent to you from [email protected].
- Syncing to Outlook and Google Calendar is now approximately 145x faster for large view syncs.
- You can now see all unresolved comments where you’re mentioned in the new “Mentions” tab in the comments sidebar.
- Fixed a regression where booking change requests could not be triaged.
Comments Sidebar
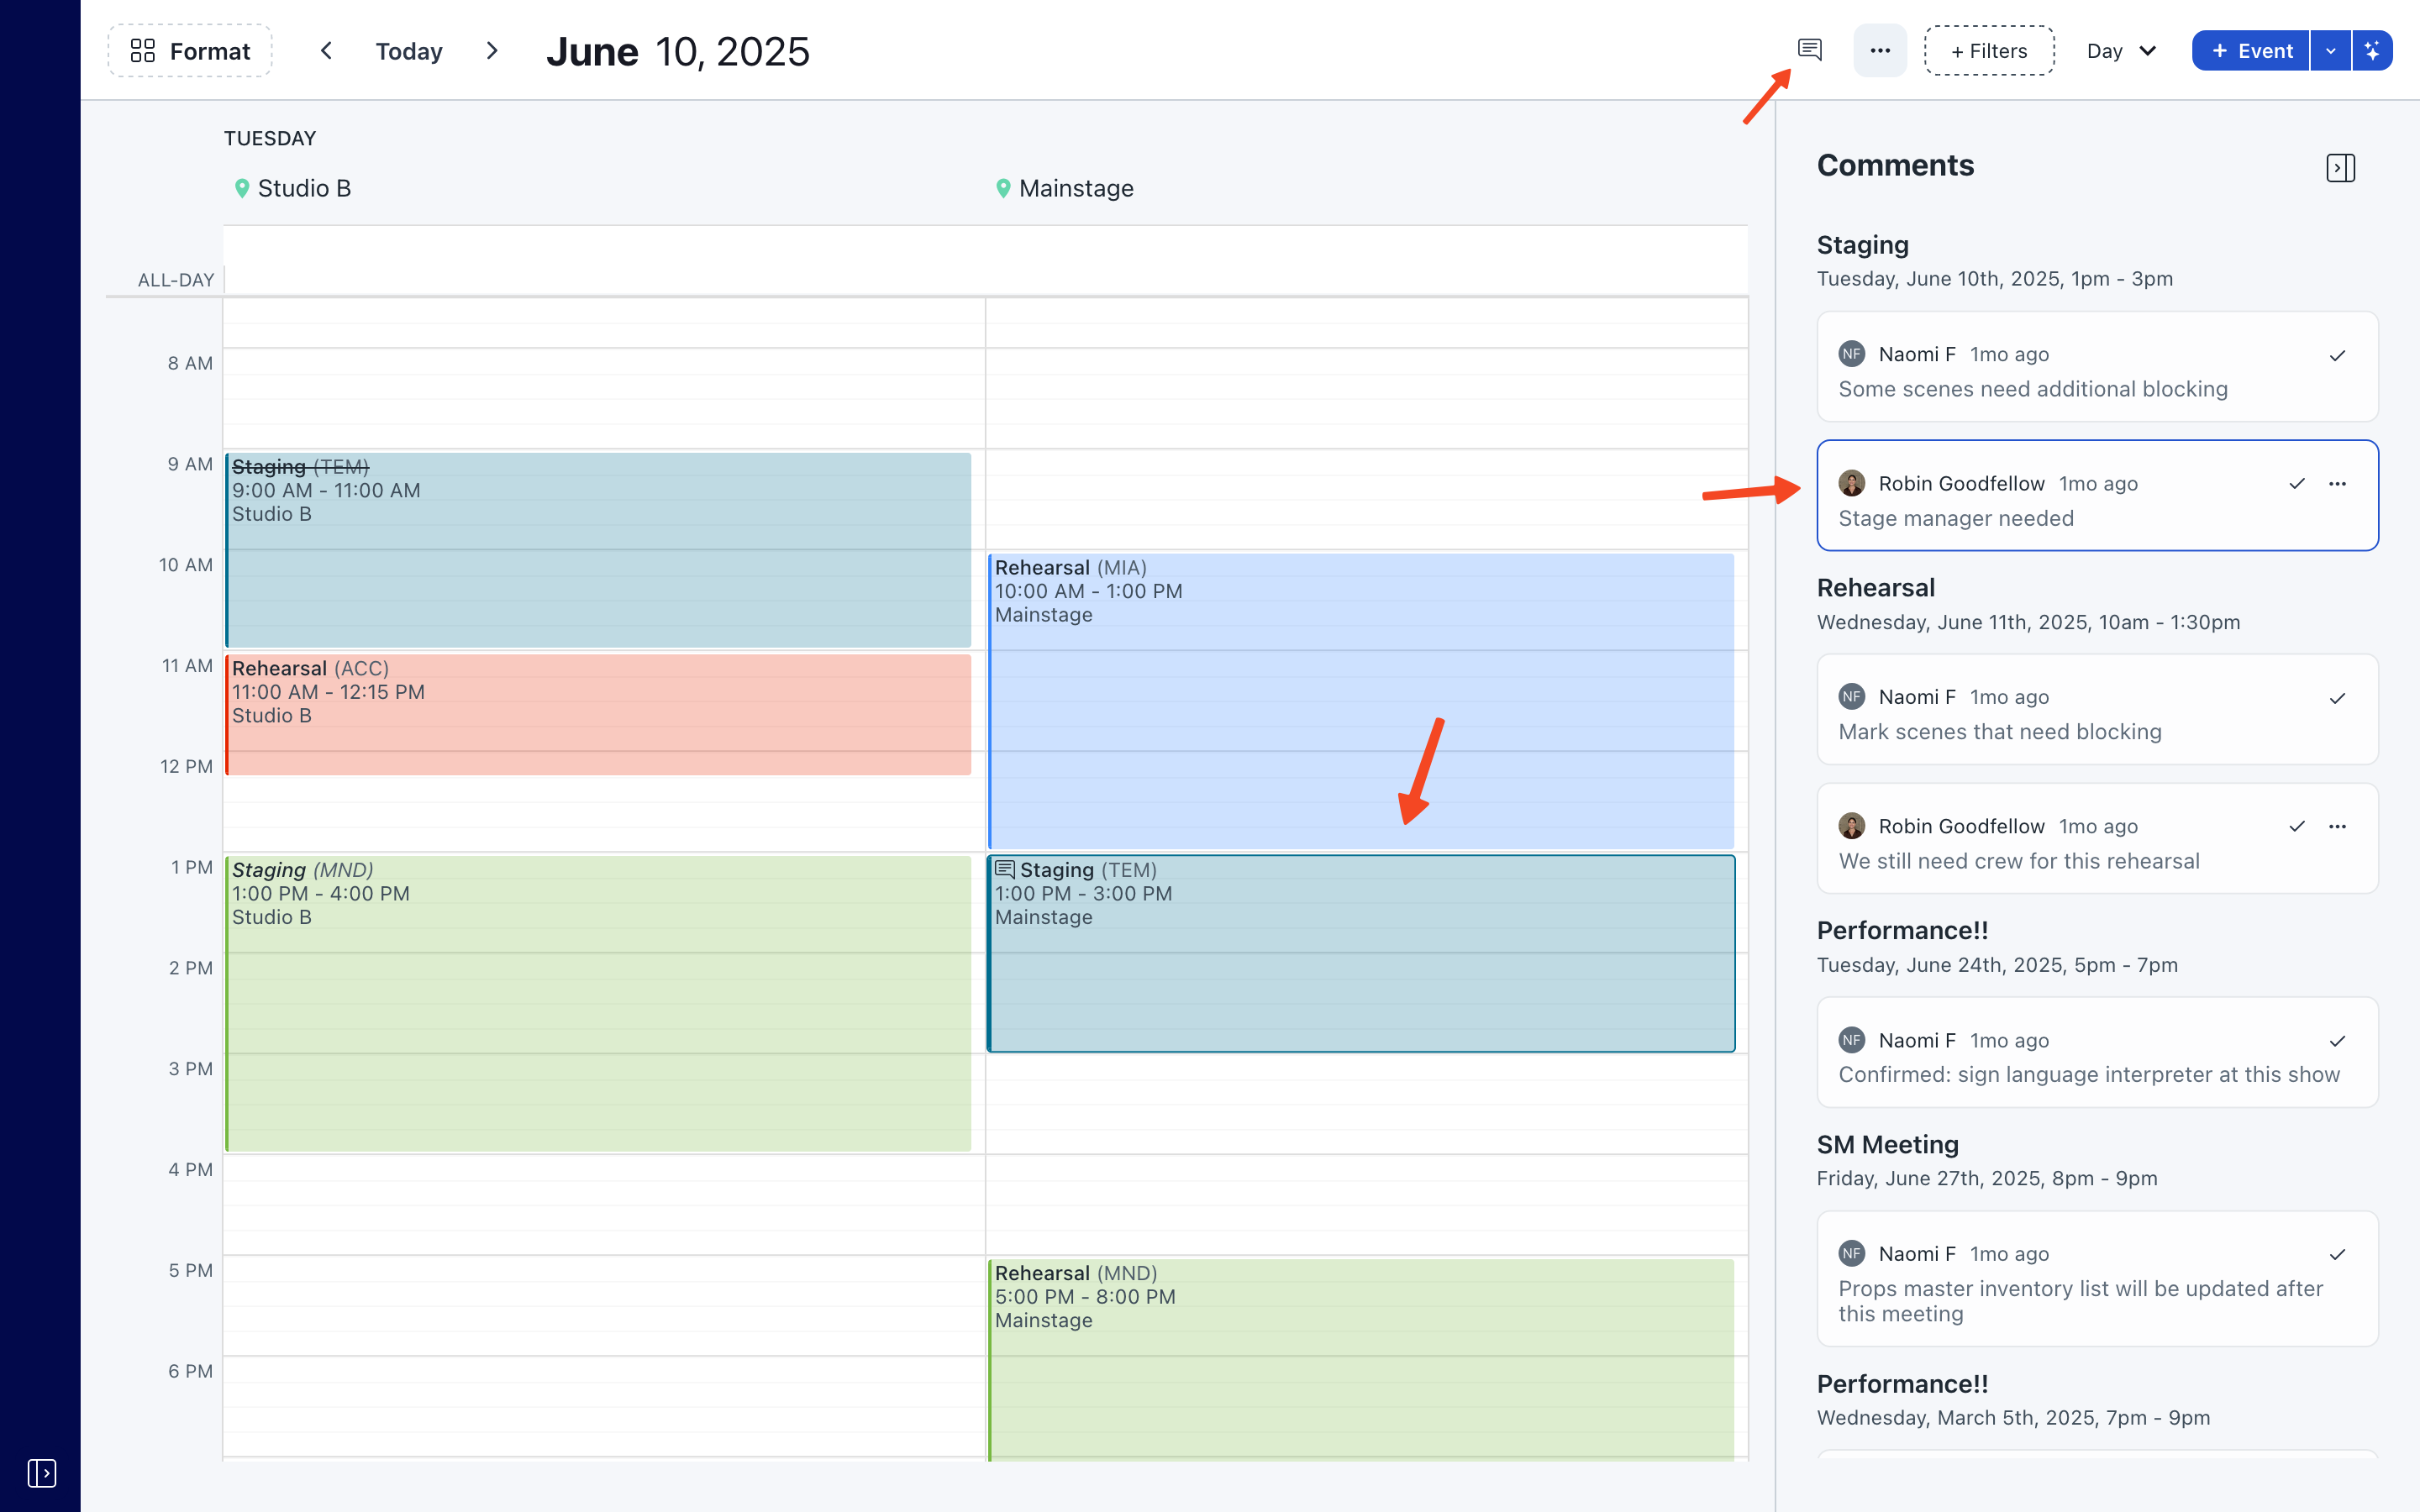
Looking for a full overview of every TODO in your calendar? Prospero’s new comments sidebar gives you insight into every unresolved comment on your events.
Hovering over a comment highlights its event on the calendar. Compare availability visually, make any needed edits, and resolve the comment - all without switching pages. Complete context is at your fingertips so you can take immediate action.
Improvements and fixes
- Stay up to date on your projects by subscribing to every event related to a project via “Projects” > “…” > “Subscribe to all Events”.
- Your selection is preserved after bulk editing, moving, or duplicating. Bulk duplicating will preserve your original selection and add any newly created events.
- View links now use the view title as the name of the browser tab.
- You can now choose the status of a booking when converting an event to a booking or creating a booking in the admin application.
- While editing a booking portal, changes now always appear in realtime in the mobile preview.
- Fixed a rare edge-case bug where differing timezones between a booking portal and the admin application would result in misleading start & end times for bookings created in the admin application.
- Fixed a bug where refreshed bookings could sometimes be missing their corresponding event.
@ Mentions
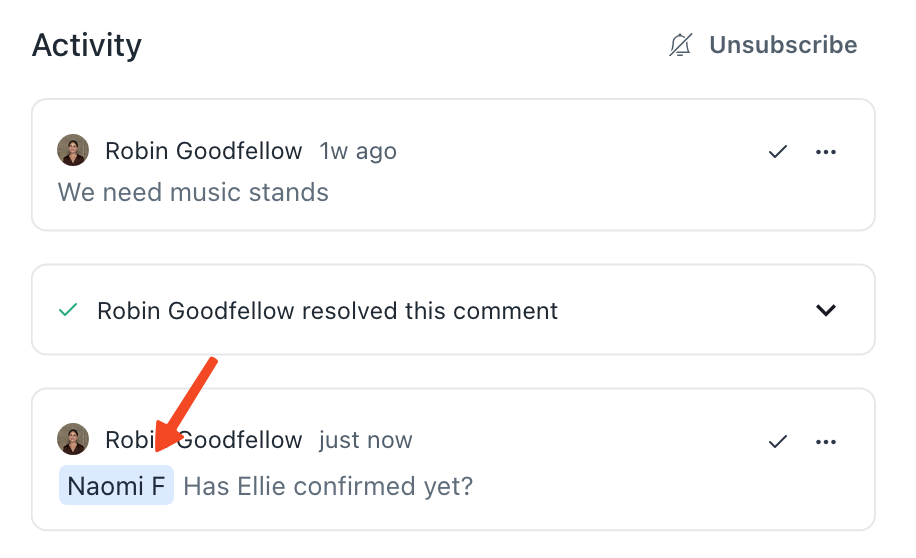
Sometimes, you really need to make sure that person sees your comment (this sentence definitely wasn’t directed at any specific individual…). Just type @ in the comment editor and tag another user to make sure they get a notification about your comment.
Improvements and fixes
- The booking page has been redesigned for clarity and future updates. You can now click directly on any booking row to get to the page, where you can click “Triage” to make adjustments, approve, or deny a booking.
- You can now convert an event to a booking via “…” > “Convert to Booking” > “Your Portal”.
Resolved Comments
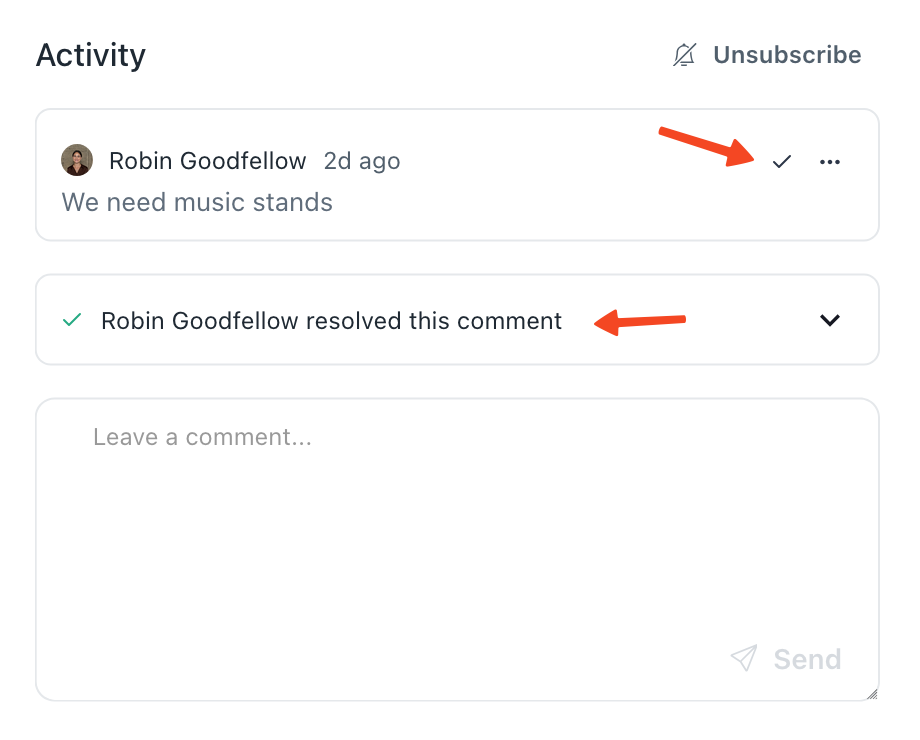
Resolve comments to track completed tasks and stay on top of your operations.
Comments can now be resolved, removing them from your feed. Resolved comments can still be viewed by clicking the ▾ button. You can “unresolve” comments to return them to your feed.
Improvements and fixes
- You can now create a new booking directly in the admin application with the ▾ button in the top-right of the calendar.
- Consumables are now supported in booking forms and bookings.
- Consumables are now connected to all systems, including third-party sync, notification emails, CSV export, and bulk editing.
- Consumable images, when available, are used in place of their symbol throughout the app.
- All resources are now sorted alphabetically in “+ Add Resource” dropdown menus.
- You can now disconnect third-party integrations from within Prospero by clicking “Disconnect” in Settings > Integrations.
- Fixed a bug where it wasn’t possible to add some items in booking forms.
- Fixed a bug where clicking “+” on an item in a booking form would occasionally add an item from a different set.
- Canceling a bulk operation now reverts any alterations that were temporarily made.
Consumables
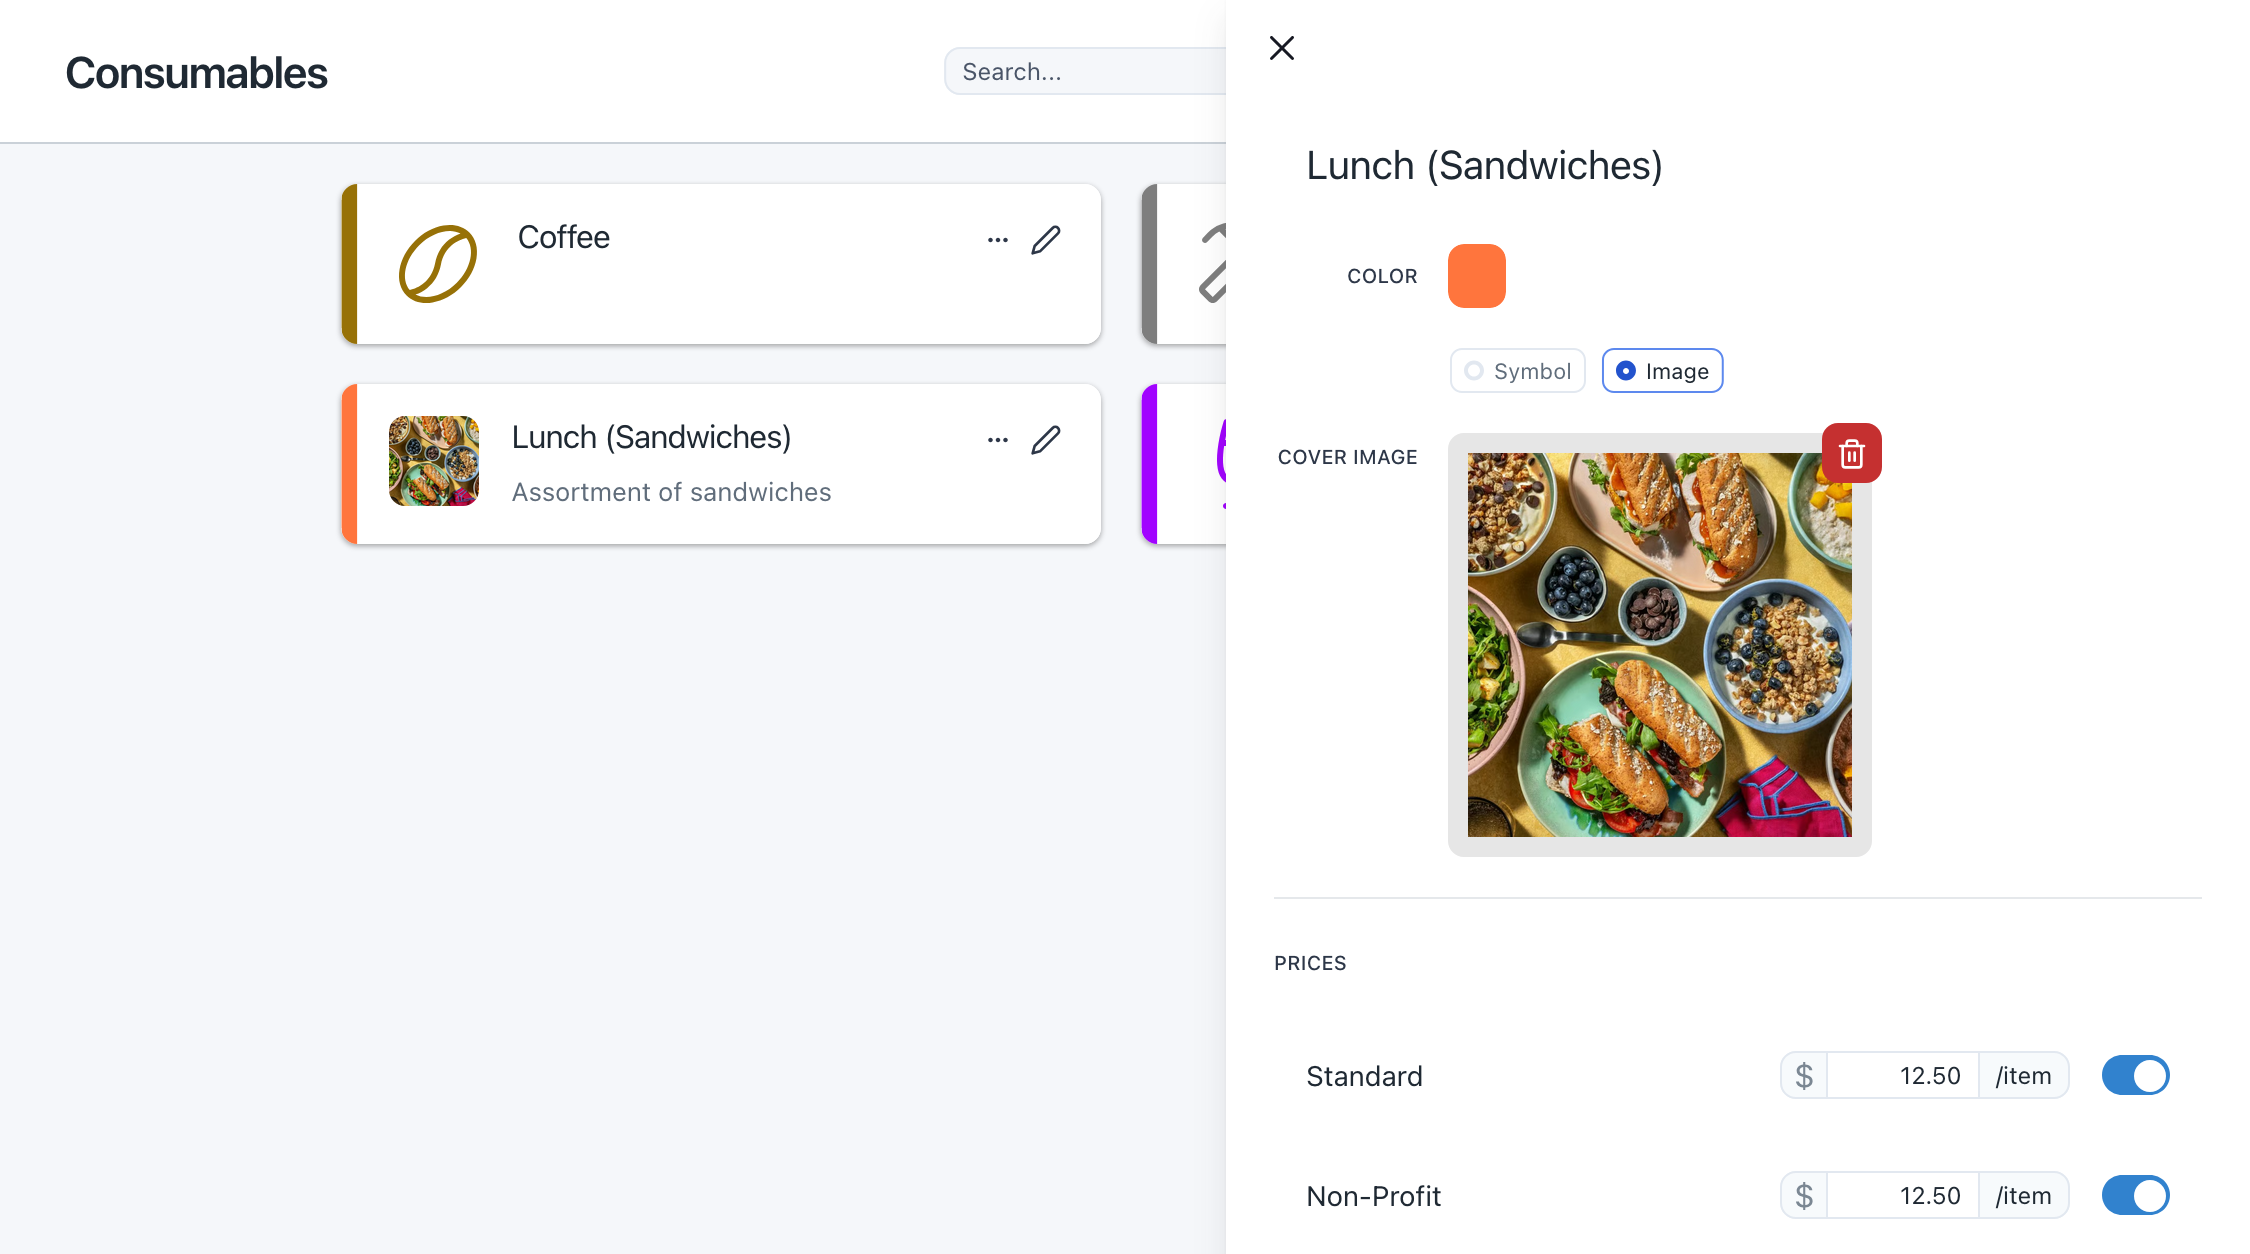
You can now create Consumables and attach them to your events! Consumables are a first-class resource, like Locations and Items. Customize them with colors and a symbol or image. Assign prices to automatically create line items in offers and invoices.

Adjust consumable quantities on events by directly typing a number or using the +/- buttons.
Improvements and fixes
- Day & week layouts now start at 7:30am when they are first loaded (you can still scroll up to see earlier events).
- Fixed a bug where clicking the “X” button on an item pill would “flip” the selected items in the set, instead of removing them.
- Fixed a bug where view links with their start date set to a day other than “Today” would not show events on that day until after calendar navigation.
- You can now change the admin assigned to a booking portal.
- Comments and admin notes are no longer displayed in email previews (they were never sent in emails, the preview now reflects that).
Comments
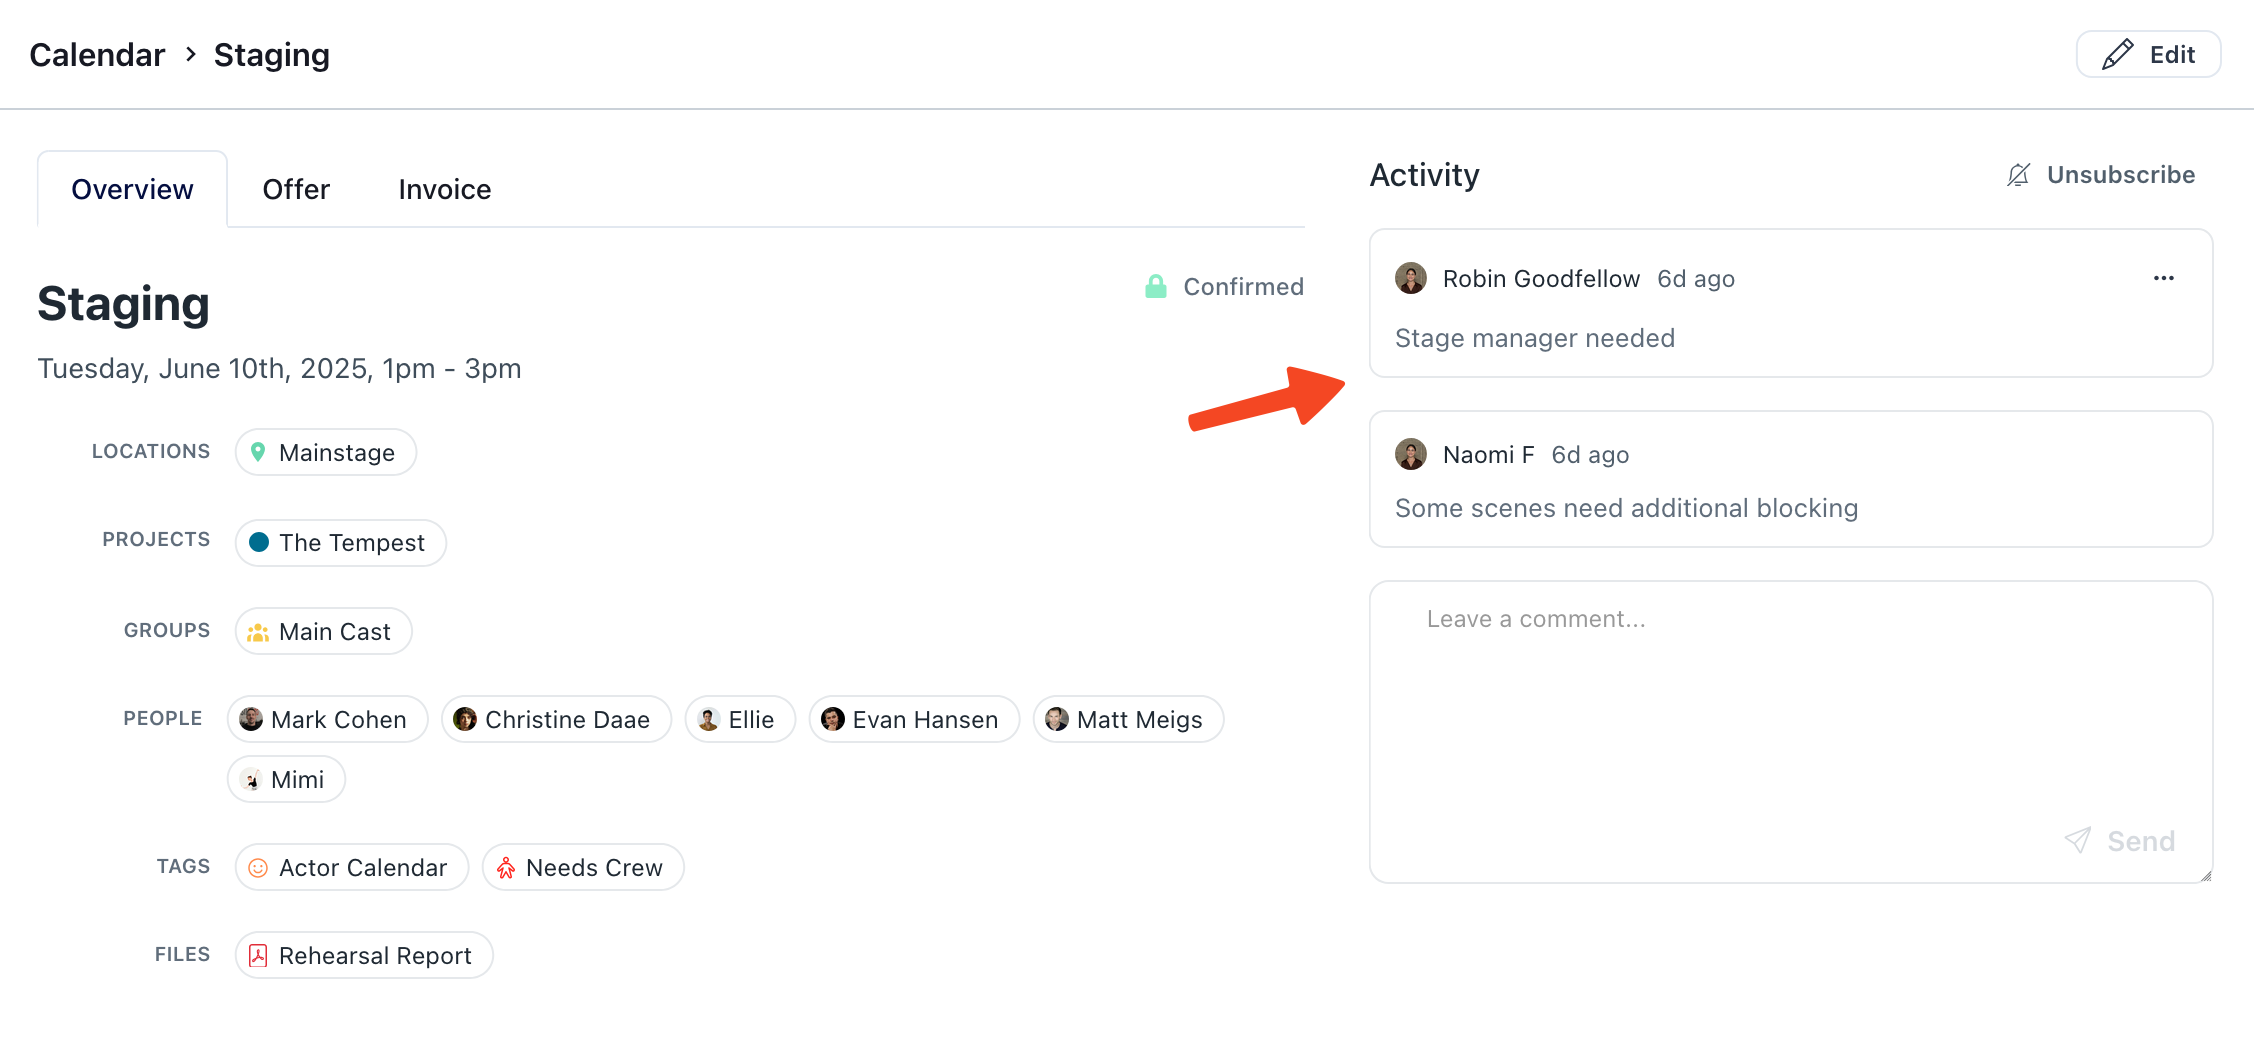
Today, we’re launching comments, a new way to collaborate on events in Prospero.
As your operations get more complex, answering the simple question “What do we need to do right now?” becomes increasingly difficult. Comments streamline that process by allowing your team to collaborate directly on the calendar and get a feed of outstanding conversations.
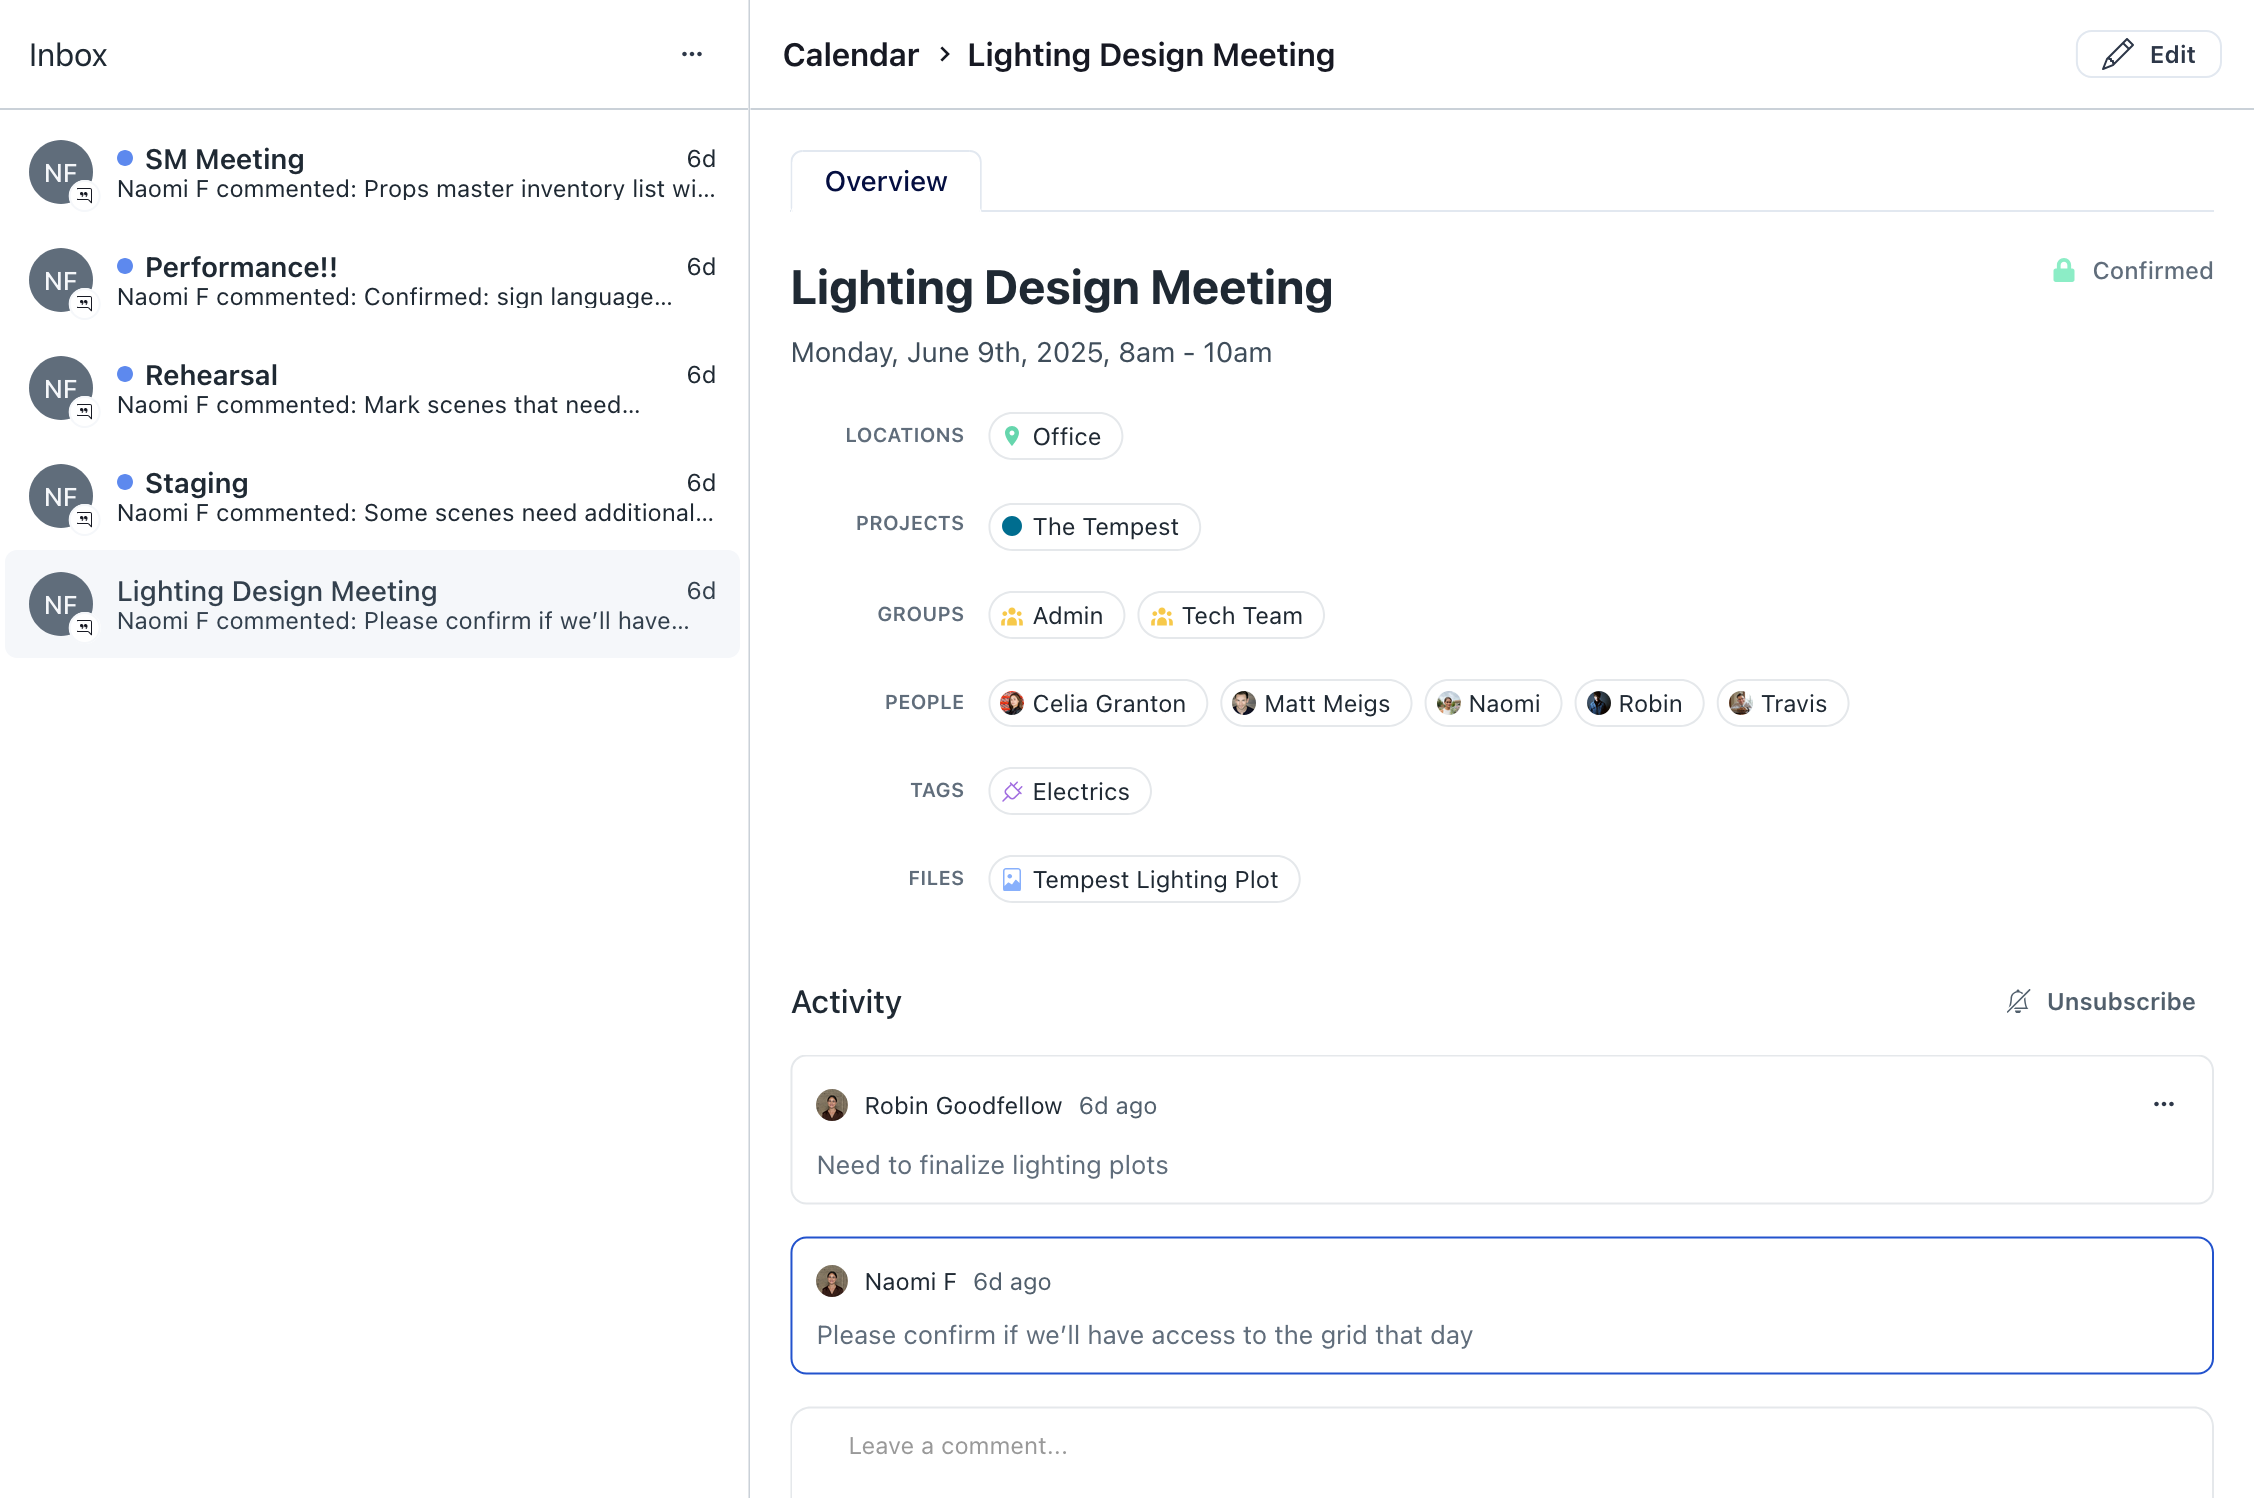
Notifications about comments from teammates are collected in your Inbox, where you can navigate to the relevant event with a single click. Contextual menus and keyboard shortcuts give you the power to quickly groom your notifications and use your inbox as a TODO list.
Improvements and fixes
- Booking portal space pages now display the times they can be booked (i.e., Mon-Fri, 9am-4pm).
- Fixed an issue where the “Expand” button was visible on event popups in view links and booking portals.
Inventory Improvements
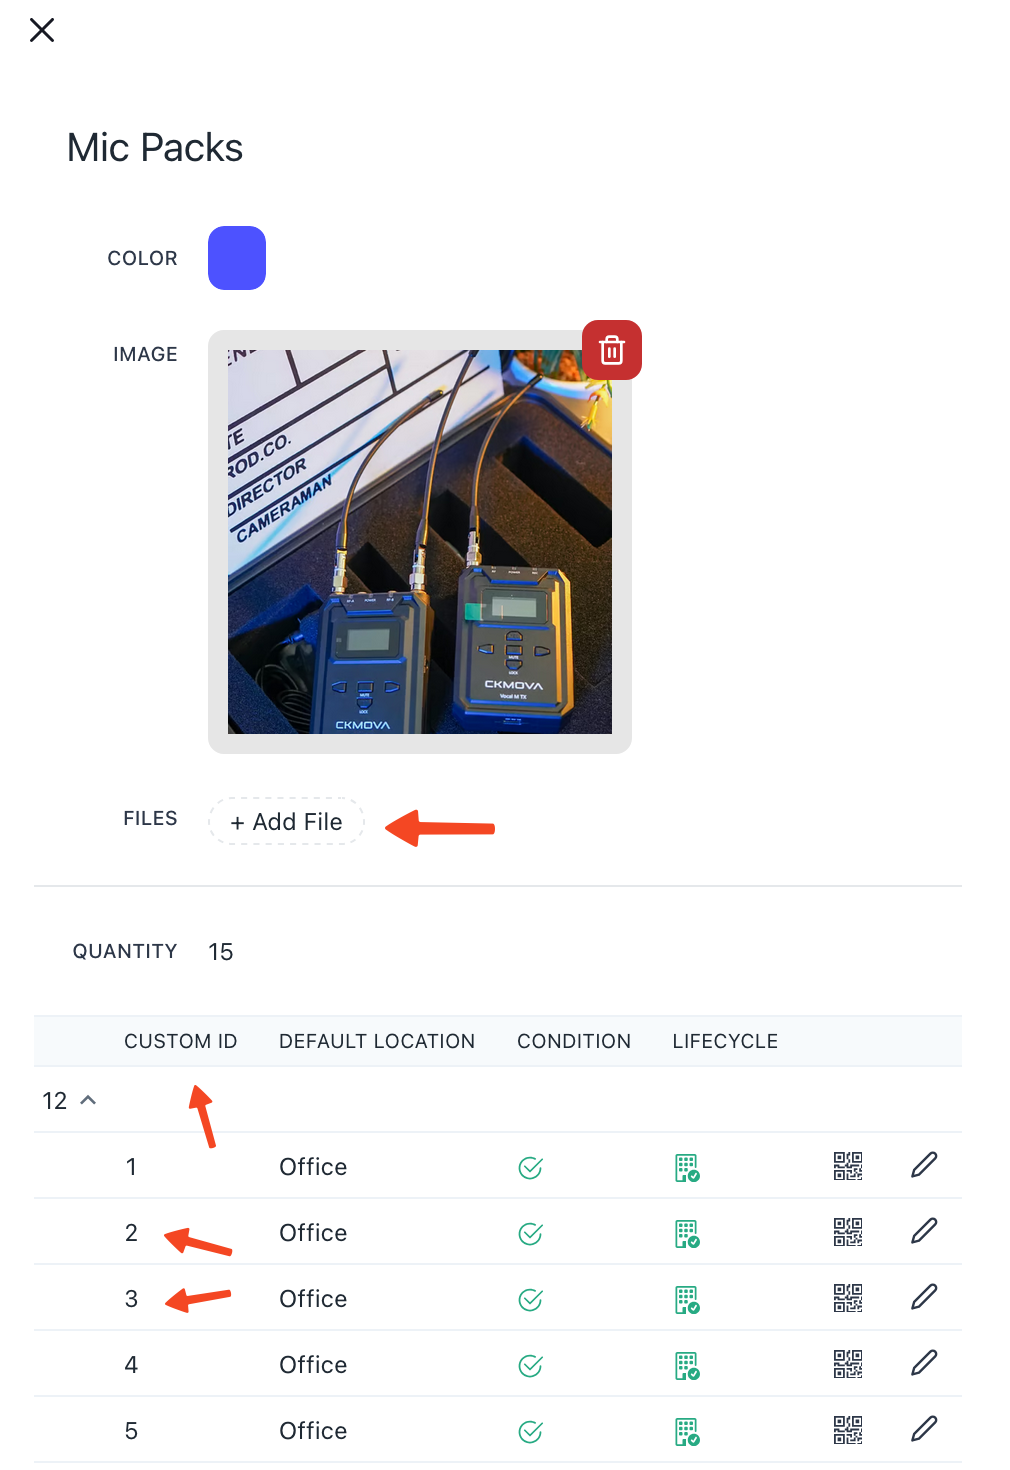
You can now add custom ids to individual items. Use vendor ids or simple numbering schemes to match specific items to real-world objects.
Attach arbitrary files to items, like manuals or spec sheets.
Improvements and fixes
- Events are loaded faster - specific improvement depends on your usage, potentially up to 20x faster.
- When duplicating events, only future dates are displayed as options.
- Bookable space hours are displayed in space pages in booking portals.
- Roles and role groups are synced to third-party event descriptions.
- Fixed a very rare issue where events would sync to third-party calendars in quadruplicate whenever a change was made.
- Fixed a typo in third-party event descriptions.
Item QR Codes
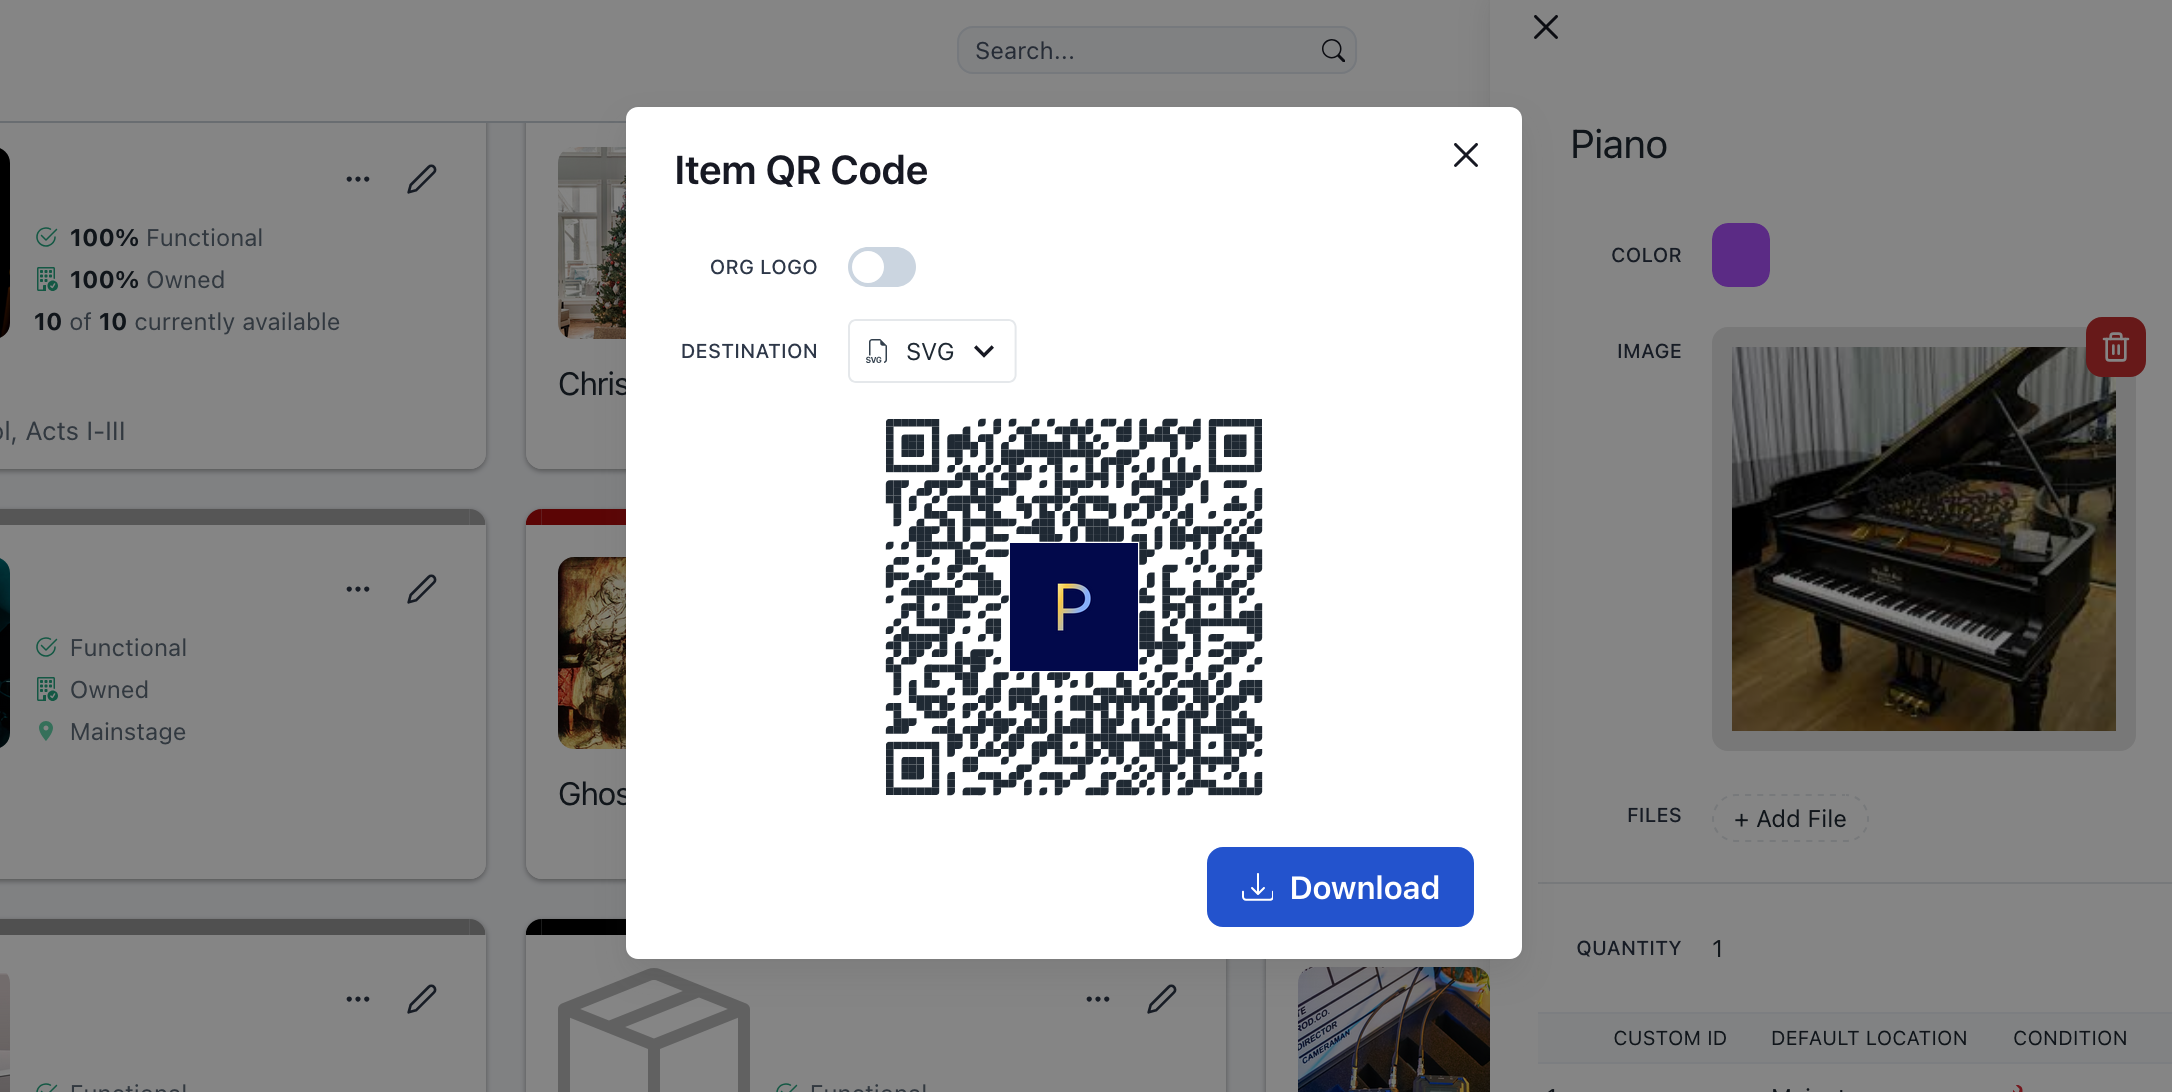
You can now download a unique QR code for each of your items! Currently, scanning an item’s QR code will take you to that item’s resource page in the admin application, where you can adjust attributes and see an asset schedule. We built flexibility directly into item QR codes so we can offer you customizable behavior in the future, like check-in/out workflows, geo-tagging, and non-admin access. Print and tag now with confidence, improve behavior in the future without re-printing!
You can use the Prospero logo or your organization’s logo in the center of your QR codes. Download as an SVG, PNG, or PDF.
This is the first of many upcoming improvements to Prospero’s inventory module. Keep your eyes peeled for a suite of improvements that unlock robust inventory management for your costume shop, props warehouse, and light & sound array.
Improvements and fixes
- For item sets with more than one item, all items in that set are displayed in a table in the item resource page.
- Items are displayed individually in the item table within the item set editor. This allows for each item to be individually edited and tagged.
- Fixed a bug where the most recent filter dropdown would be open when returning to the calendar from another page.
- Event hints no longer appear when printing week & day layouts.
Hold Statuses
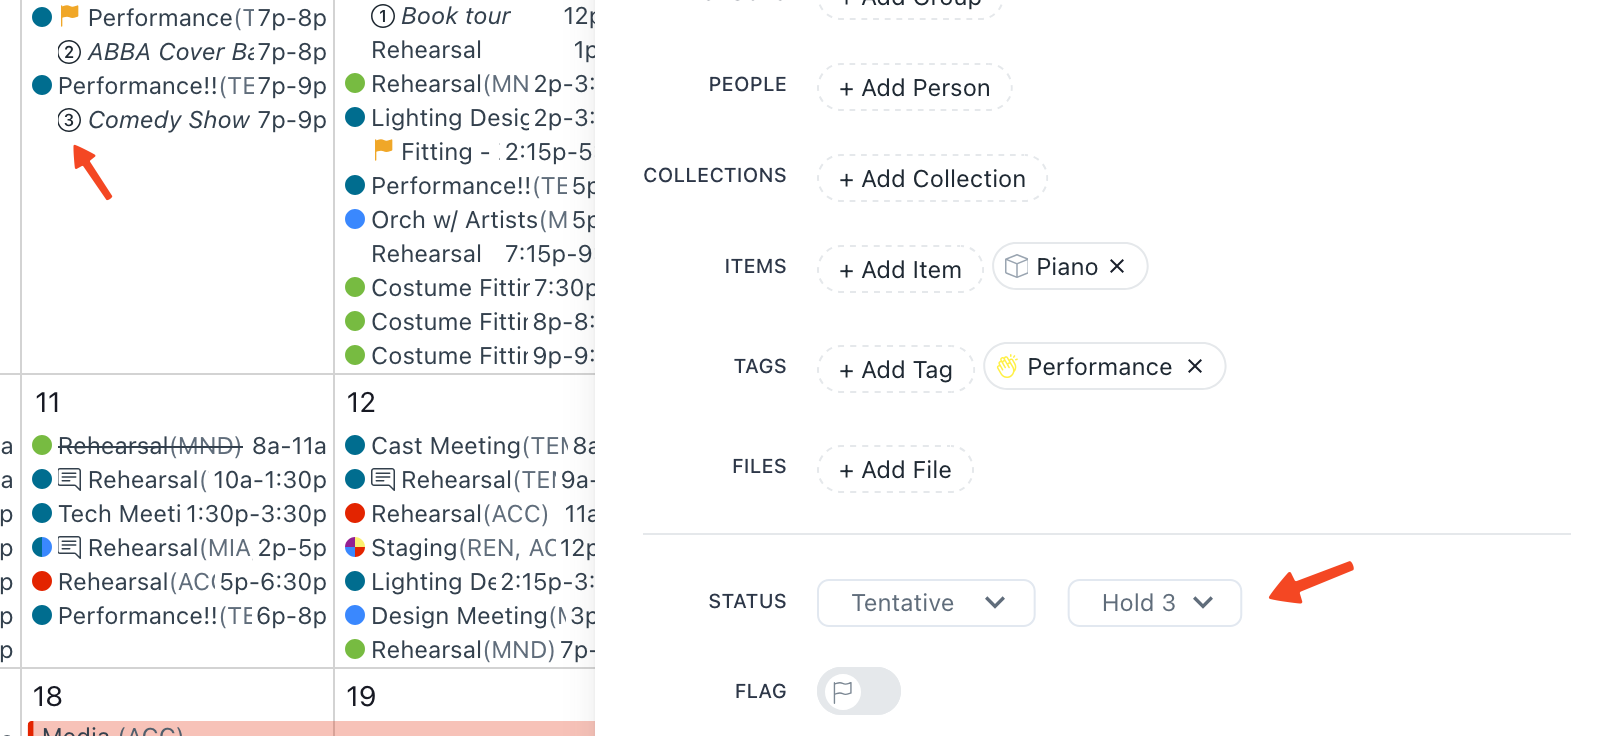
Use Prospero’s new hold statuses to clarify the priority level for tentative events that are booked during the same times. Hold statuses are commonly used in programming and event management workflows: if a lower hold chooses to confirm their event, you can reach out to higher holds and give them a final opportunity to confirm.
Hold statuses are available as sub-statuses of the Tentative status. To give an event a hold number, assign Tentative as its status, then choose the hold number from the second dropdown.
Improvements and fixes
- Dragging to create an event in split day layouts now automatically adds the resource associated with that column.
- Dragging to move an event now checks for resource conflicts.
- You can once again delete key dates on projects.
- Fixed a bug that made it impossible to delete some projects.
- Fixed an infinite loop that could occur in some booking portals.
- You can no longer access the calendar, booking form, or spaces configuration pages in booking portals until you have assigned spaces to the portal.
Disable 3rd-Party Invites
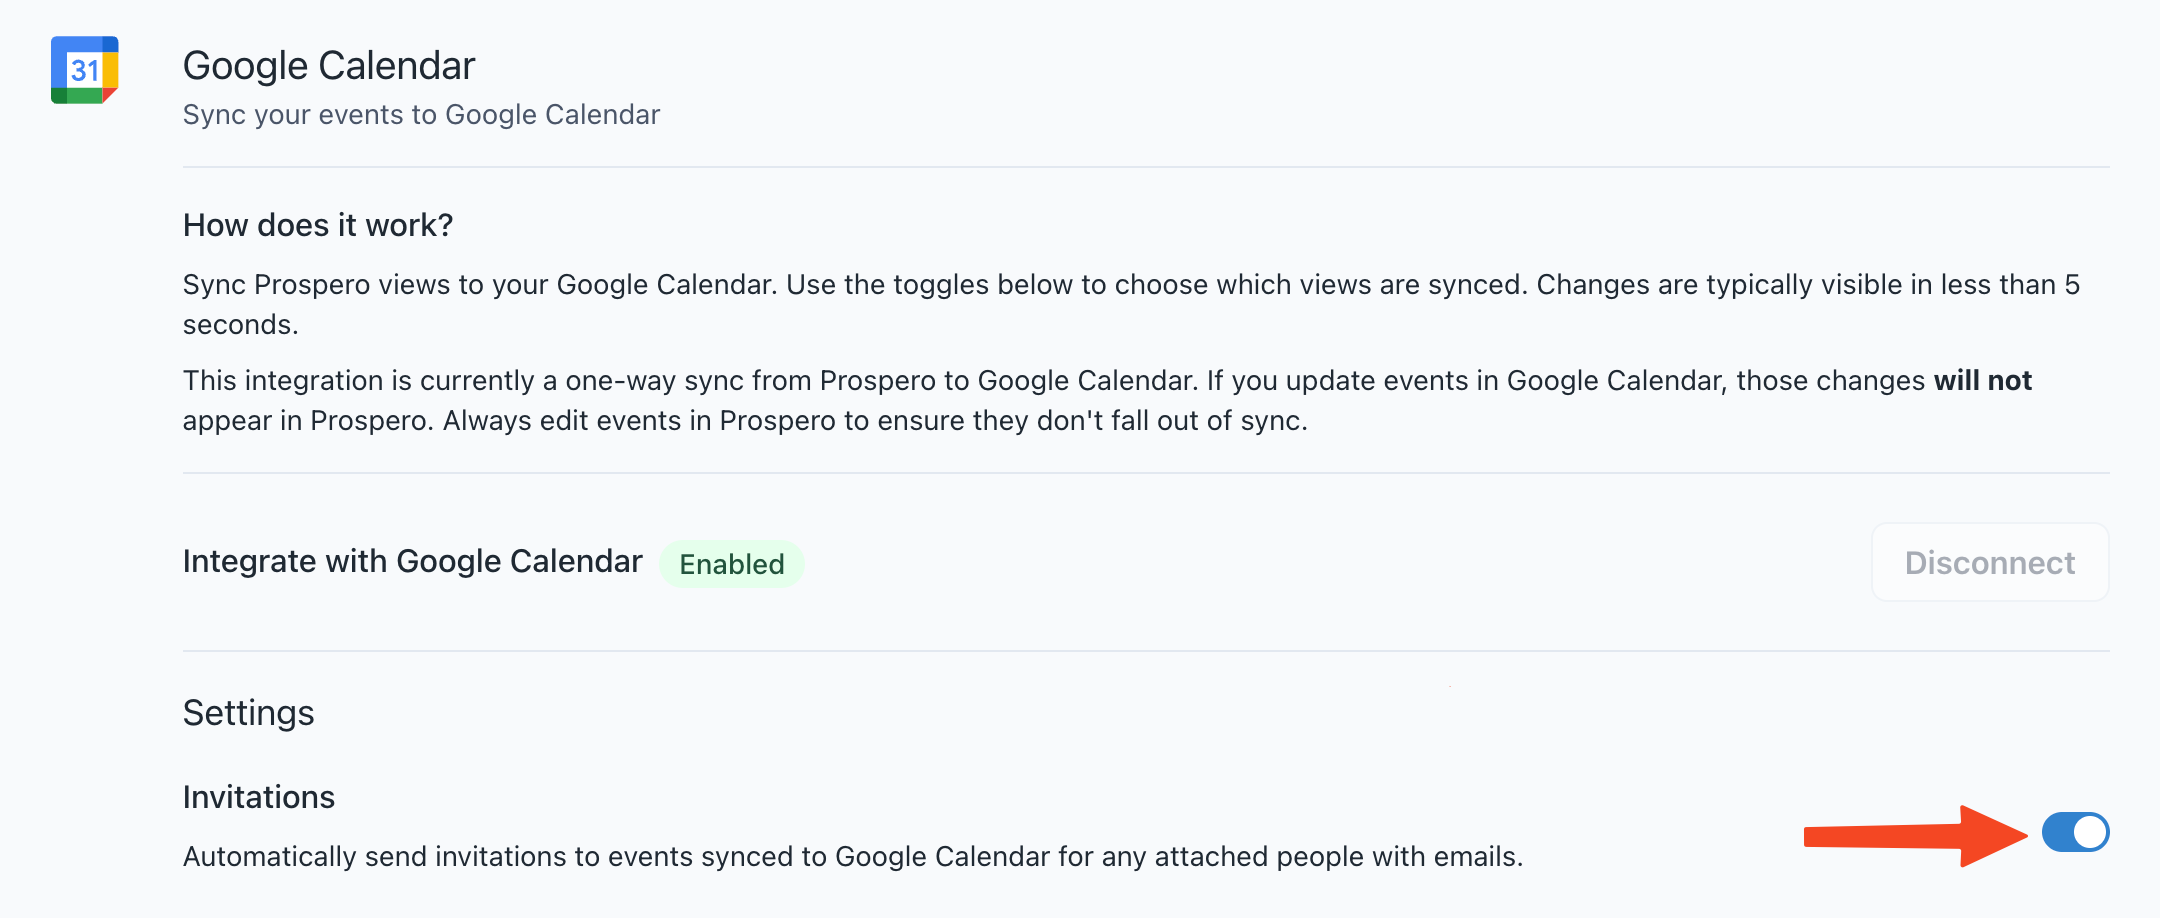
You can now choose whether or not to send calendar invites when syncing events with Google Calendar or Outlook.
This setting is available in Settings > Integrations — just uncheck the box if you’d prefer to keep things quiet. Especially useful if you're syncing to both Google Calendar & Outlook, so you can prevent double invites.
Default Calendar Layout
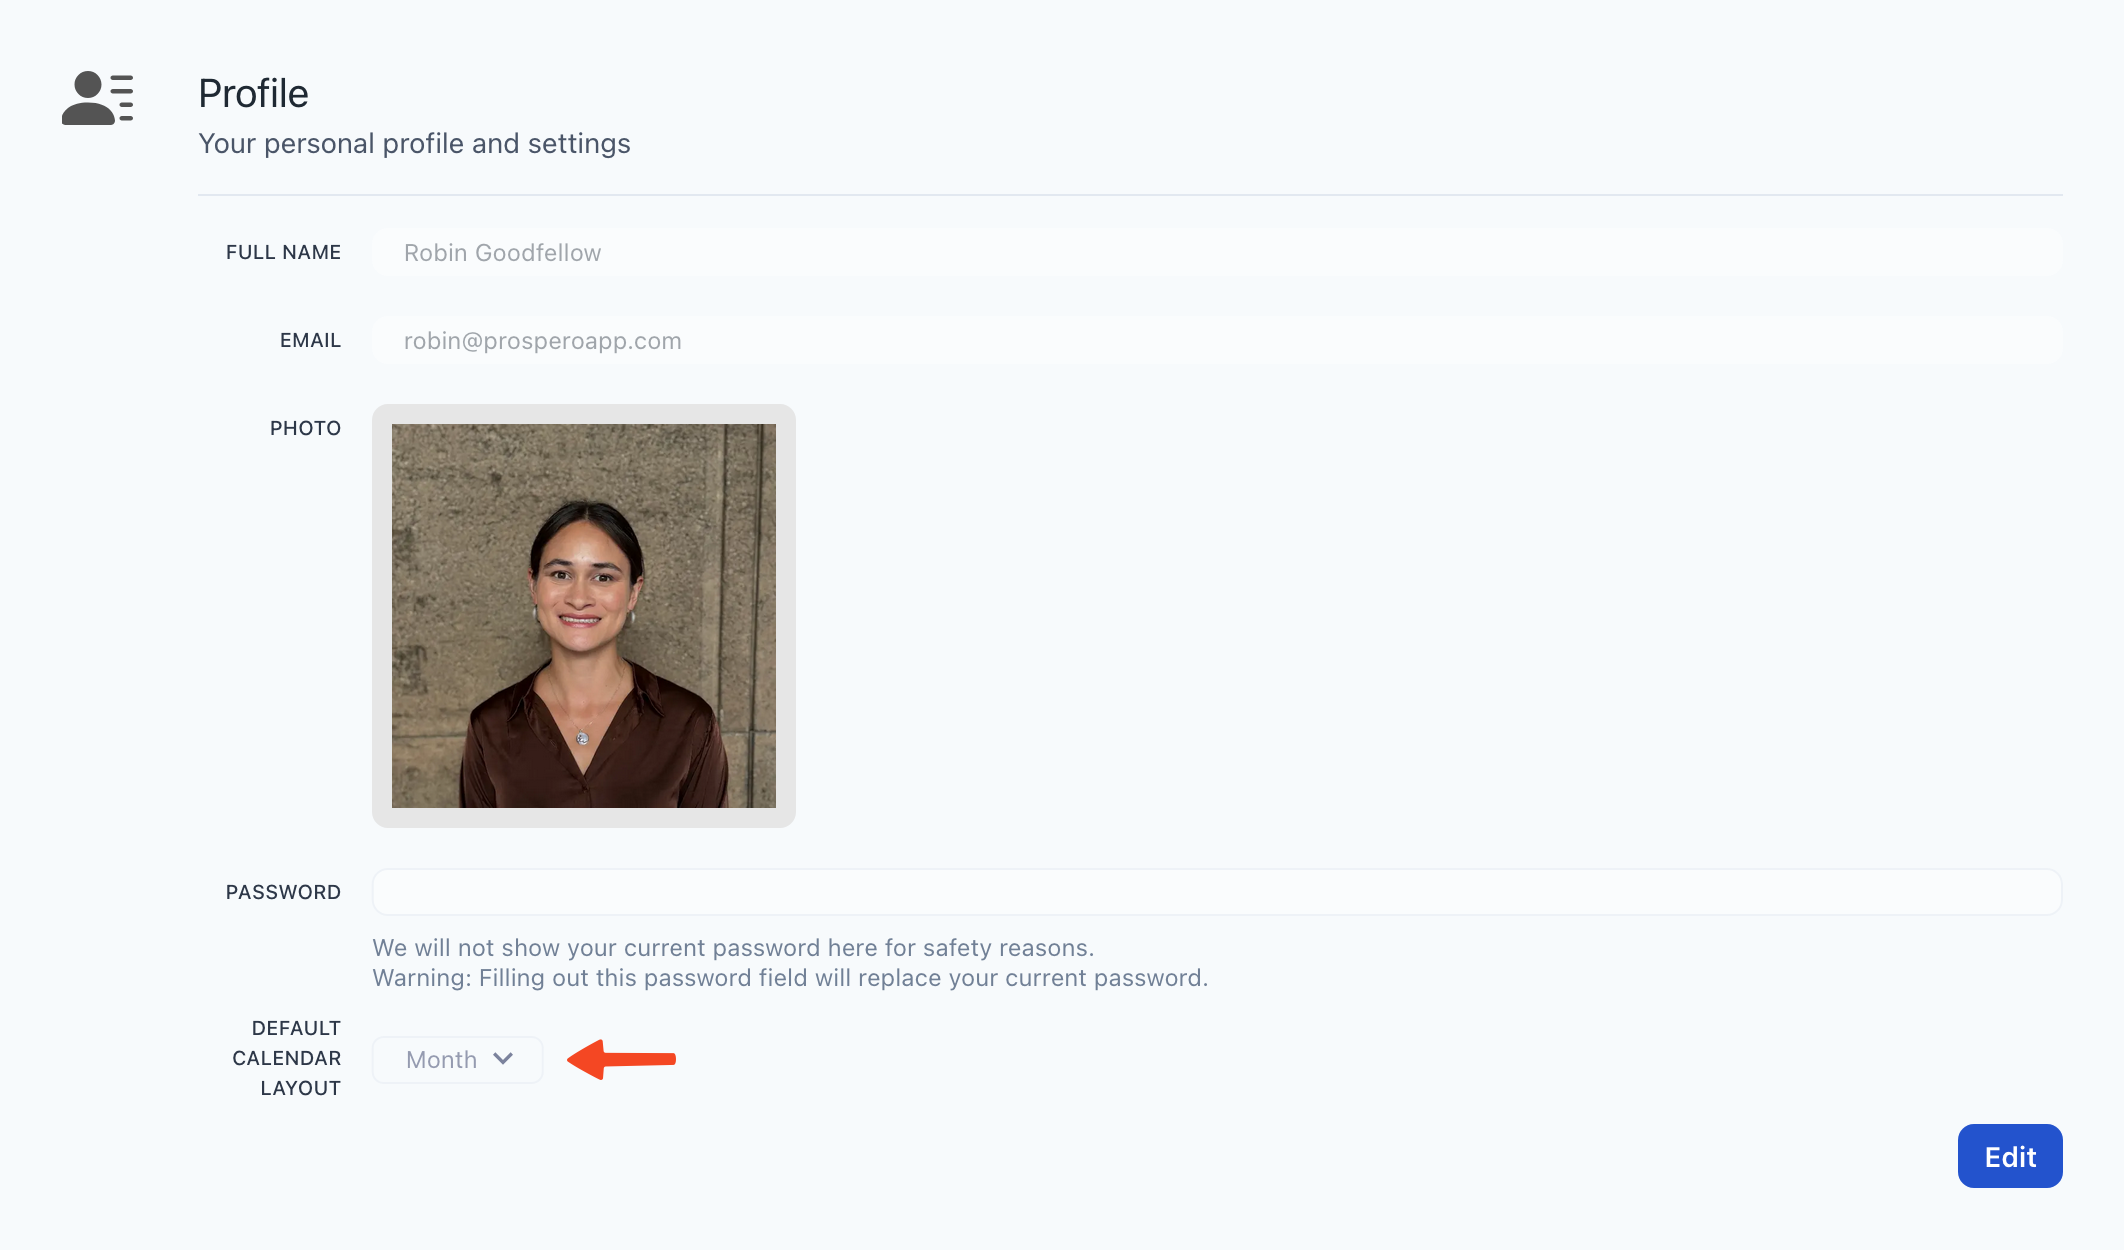
Start your day with the calendar view that works best for you. With the new default calendar layout setting, you can now choose your preferred view — Month, Week, Day or List. Whenever you click Calendar, you'll navigate to your chosen layout.
Head over to Settings > Profile to set it once, and your choice will be remembered every time you open the app in that browser. You can make a different choice on different devices and browsers.
Improvements and fixes
- Admins now get an email when someone submits a booking. 📨
- You can now adjust a person's groups in the person editor.
- You can now add extra details to roles and role groups.
- You can now set a profile picture that appears in the sidebar via Settings > Profile.
- You can now add both % and flat amount discounts to offers & invoices. 💸
- The Terms & Conditions field now has a height limit to keep things tidy (long T&Cs will now scroll).
- Fixed a crash that could happen when writing in the description of the event description field in booking forms.
- Person photos now show up properly in pills in view links.
Resource Prices
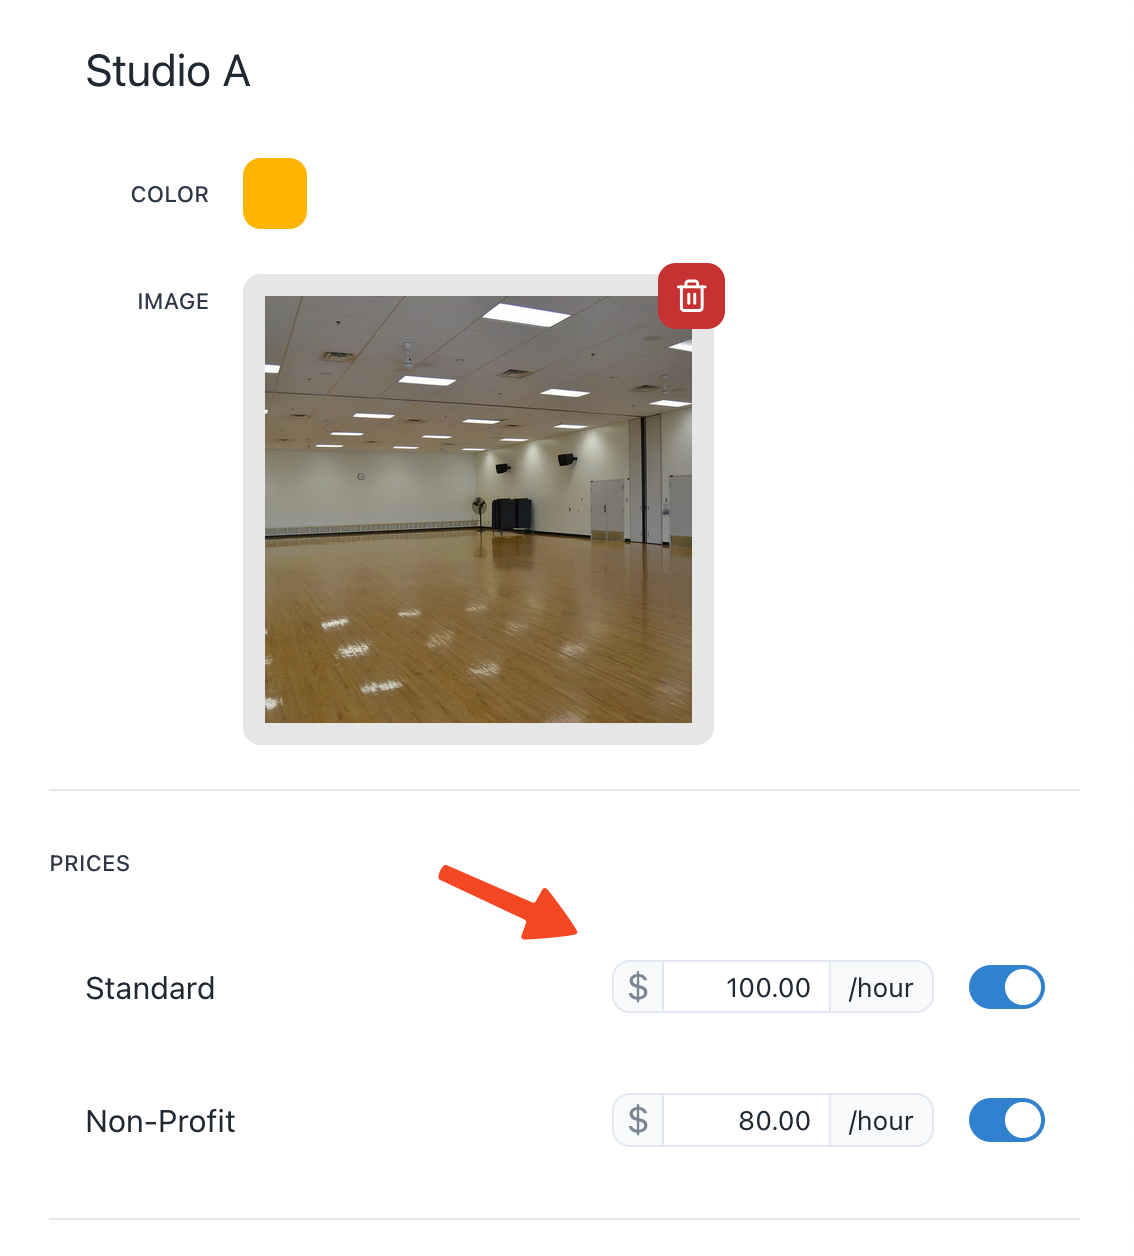
You can now add customer-facing prices to your locations, items, and roles! You can create Price Tiers in Settings > Overview for each “tier” of pricing your organization offers. For example, “Standard” and “Non-Profit.” In location, item, and role editors, you can add a price for each tier.
Improvements and fixes
- If a person has an attached photo, wherever they appear throughout the app, their photo is used in place of the standard person icon.
- Person resource pages display associated groups.
- Roles now appear in email notifications and are generated by Prospero AI.
- Tag dropdowns are now alphabetized.
Event Pages
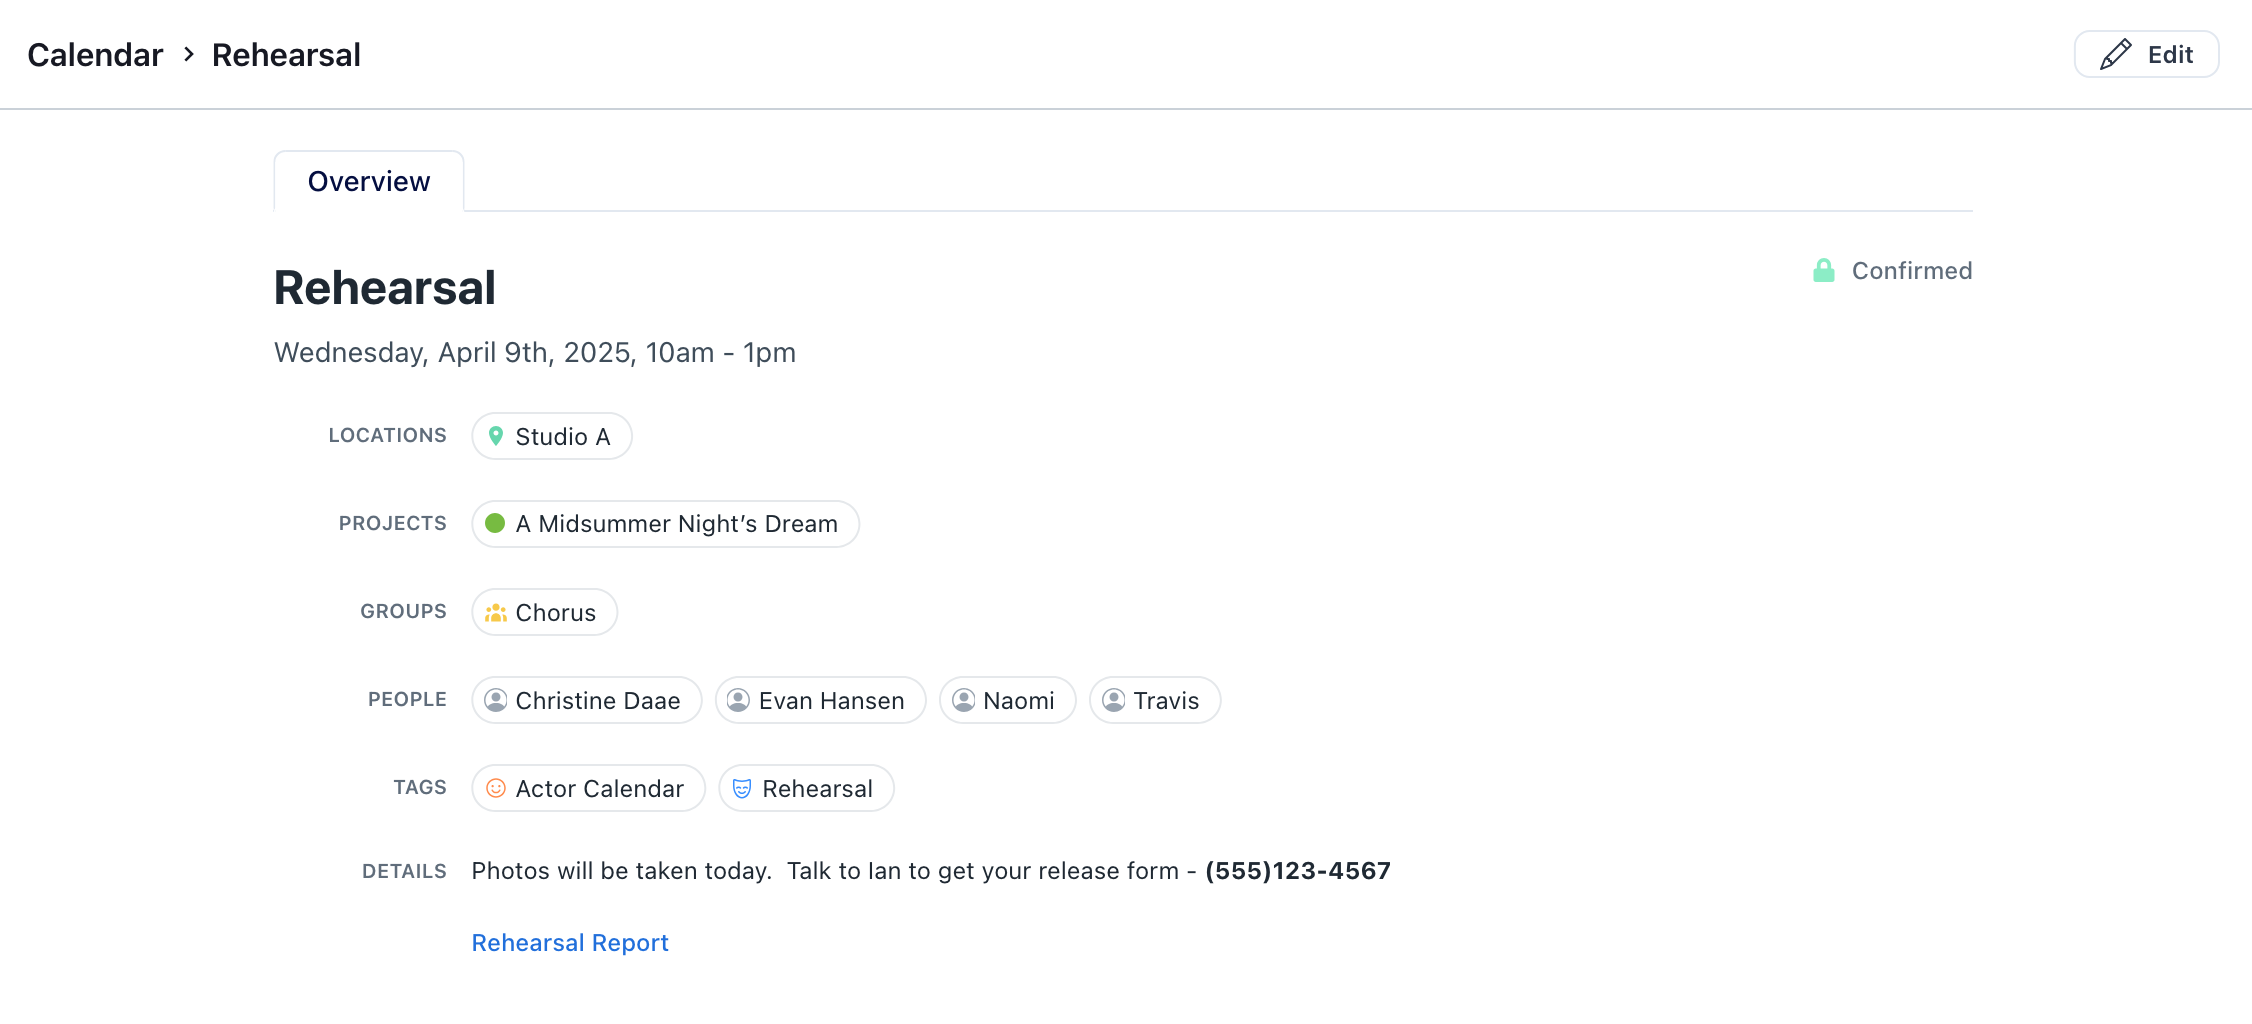
Give individual events the spotlight with Prospero’s new event pages. Event pages come with a resource overview of the event. If the event was created via a booking, the booking tab shows you the information submitted in the booking form. You can access an event’s page by opening the event popup and clicking the Expand button in the upper-left.
Keep your eyes peeled for more improvements coming to event pages in the near future. 👀
Improvements and fixes
- Exporting list layout to PDF is now much more performant (rendering in <2s on modern hardware).
- Booking custom fields are auto-added to event details when the booking is approved.
- The loading page now uses a serif font for a bit more class. ✨
- The “+” filter dropdown now includes an icon for role groups.
- Fixed a bug where the role group column would not appear in list layout.
Loading Improvements
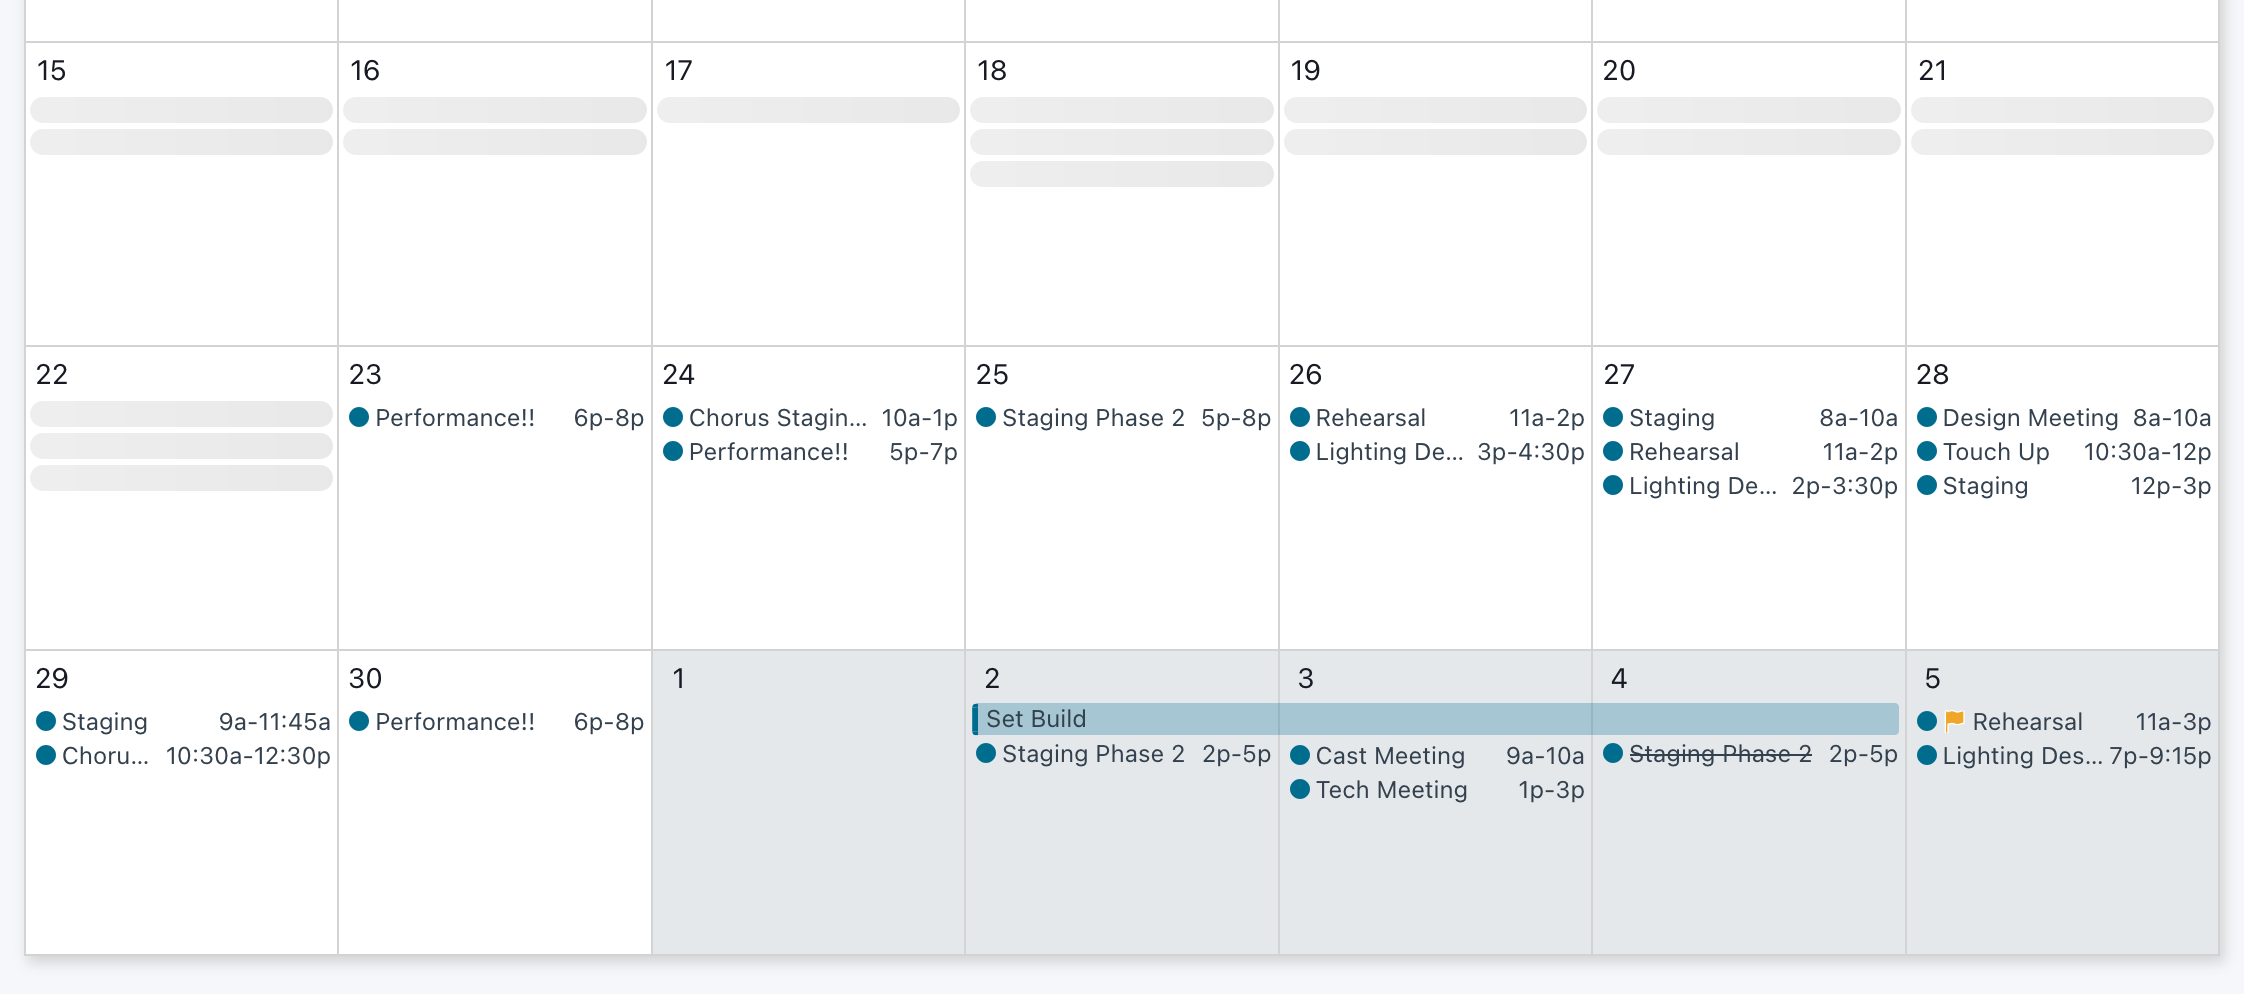
Prospero now loads in <2s across all interfaces (admin app, view links, and portals). As a result of this improvement, events now load in a “fan-out” from the current date. In most cases, this is imperceptible. If you immediately navigate backward or forward on the calendar to dates that are not loaded yet, you will see phantom events to indicate the day is still loading.
Role Groups

You can now create role groups, comprised of roles. Just like people groups and item collections, adding a role group to an event auto-adds all of its children roles to the event.
When adding & removing roles from a group, you have the option of choosing how changes should propagate to the calendar: changing future events or leaving them as is.
Improvements and fixes
- You can now favorite roles and role groups, bringing them to the top of the project page.
- Updating a people group will only propagate changes to future events.
- Fixed a bug where booking cancellation requests could not be approved.
Roles

You can now create roles for each of your projects. Roles can be created with or without an assigned person. When a person is later assigned to a role, any future events with that role attached will be updated with the assigned person. This is a great way to plan your season before casting; just assign the people once you’re finished casting, and your calendar will auto-update.
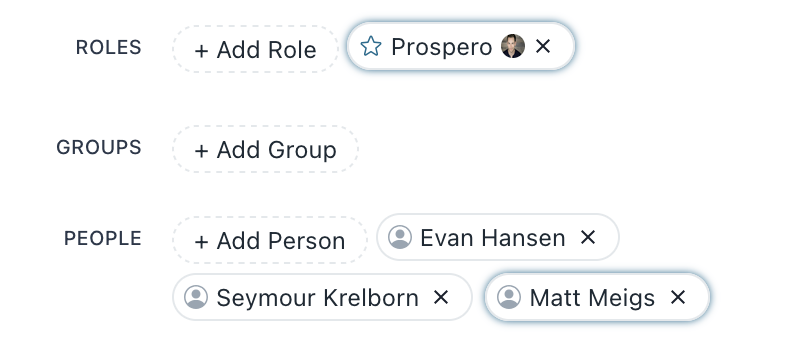
When hovering over a role in the event editor, the matching person will be highlighted. If the person isn’t assigned to the event, the role will display a “+” button for you to quickly add the person.
Improvements and fixes
- Added an explanation beside the “Admin” field in booking portal configuration.
Prospero AI
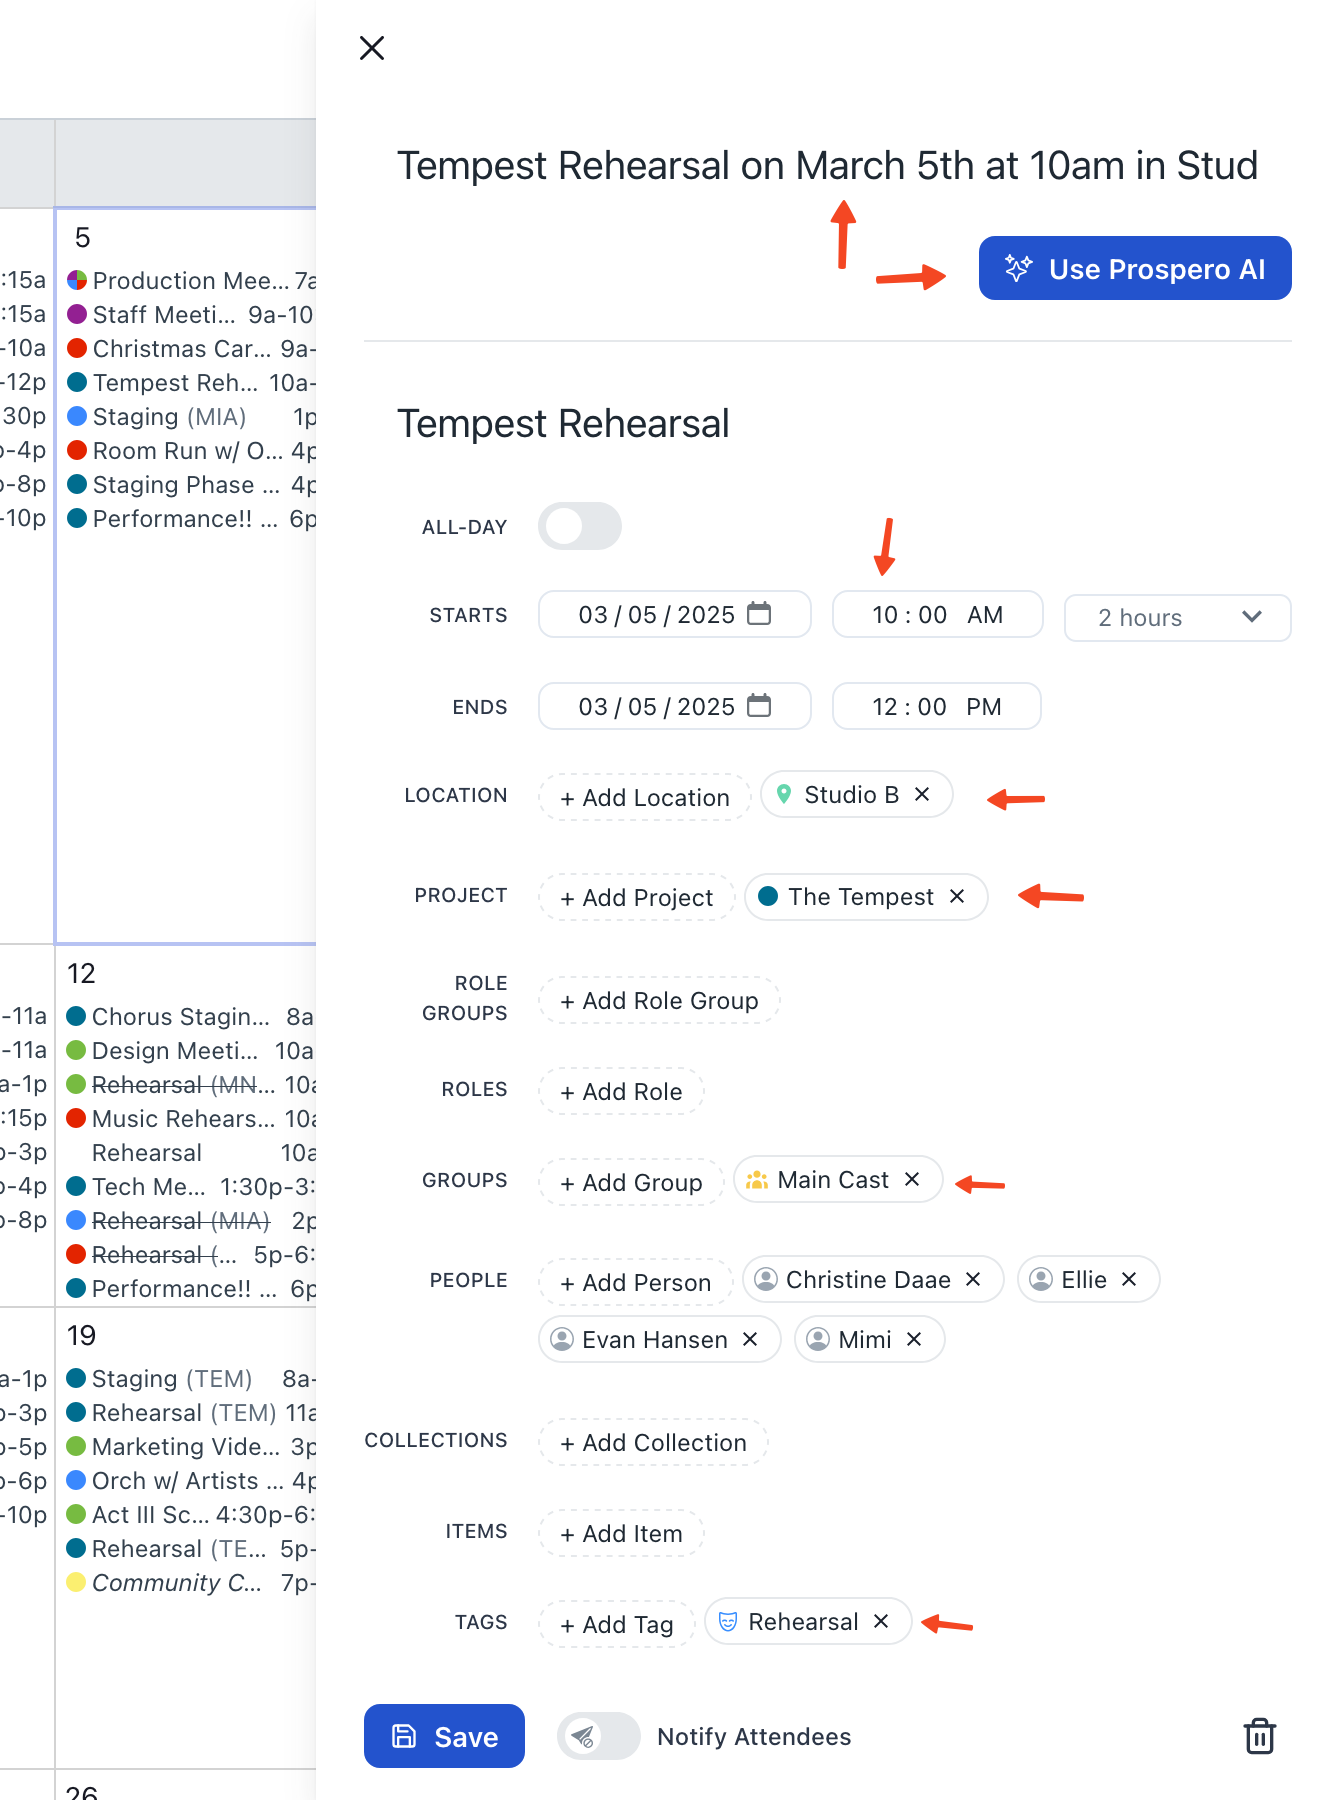
Introducing Prospero AI, the world’s first production management-specialized AI model.
Just describe the event you want to schedule in natural language: “Tempest rehearsal tomorrow at 10am in Studio B.” Prospero AI will fill out the event editor for you, so all you have to do is double-check everything looks right.
Prospero AI uses the relationships you’ve built between your resources to determine what should go on the event. For example, if you schedule a rehearsal, Prospero AI will tag the event with a “Rehearsal” tag if you have one.
Prospero AI continuously analyzes your events to make more accurate predictions over time. We will be refining and expanding the capabilities of Prospero AI in the coming months - stay tuned!
Improvements and fixes
- Your organization’s name appears in the sidebar beneath your user name.
- Fixed a bug where extra views without a name would be created while editing.
- Fixed a bug where portal permissions could not be adjusted.
Resource Pages
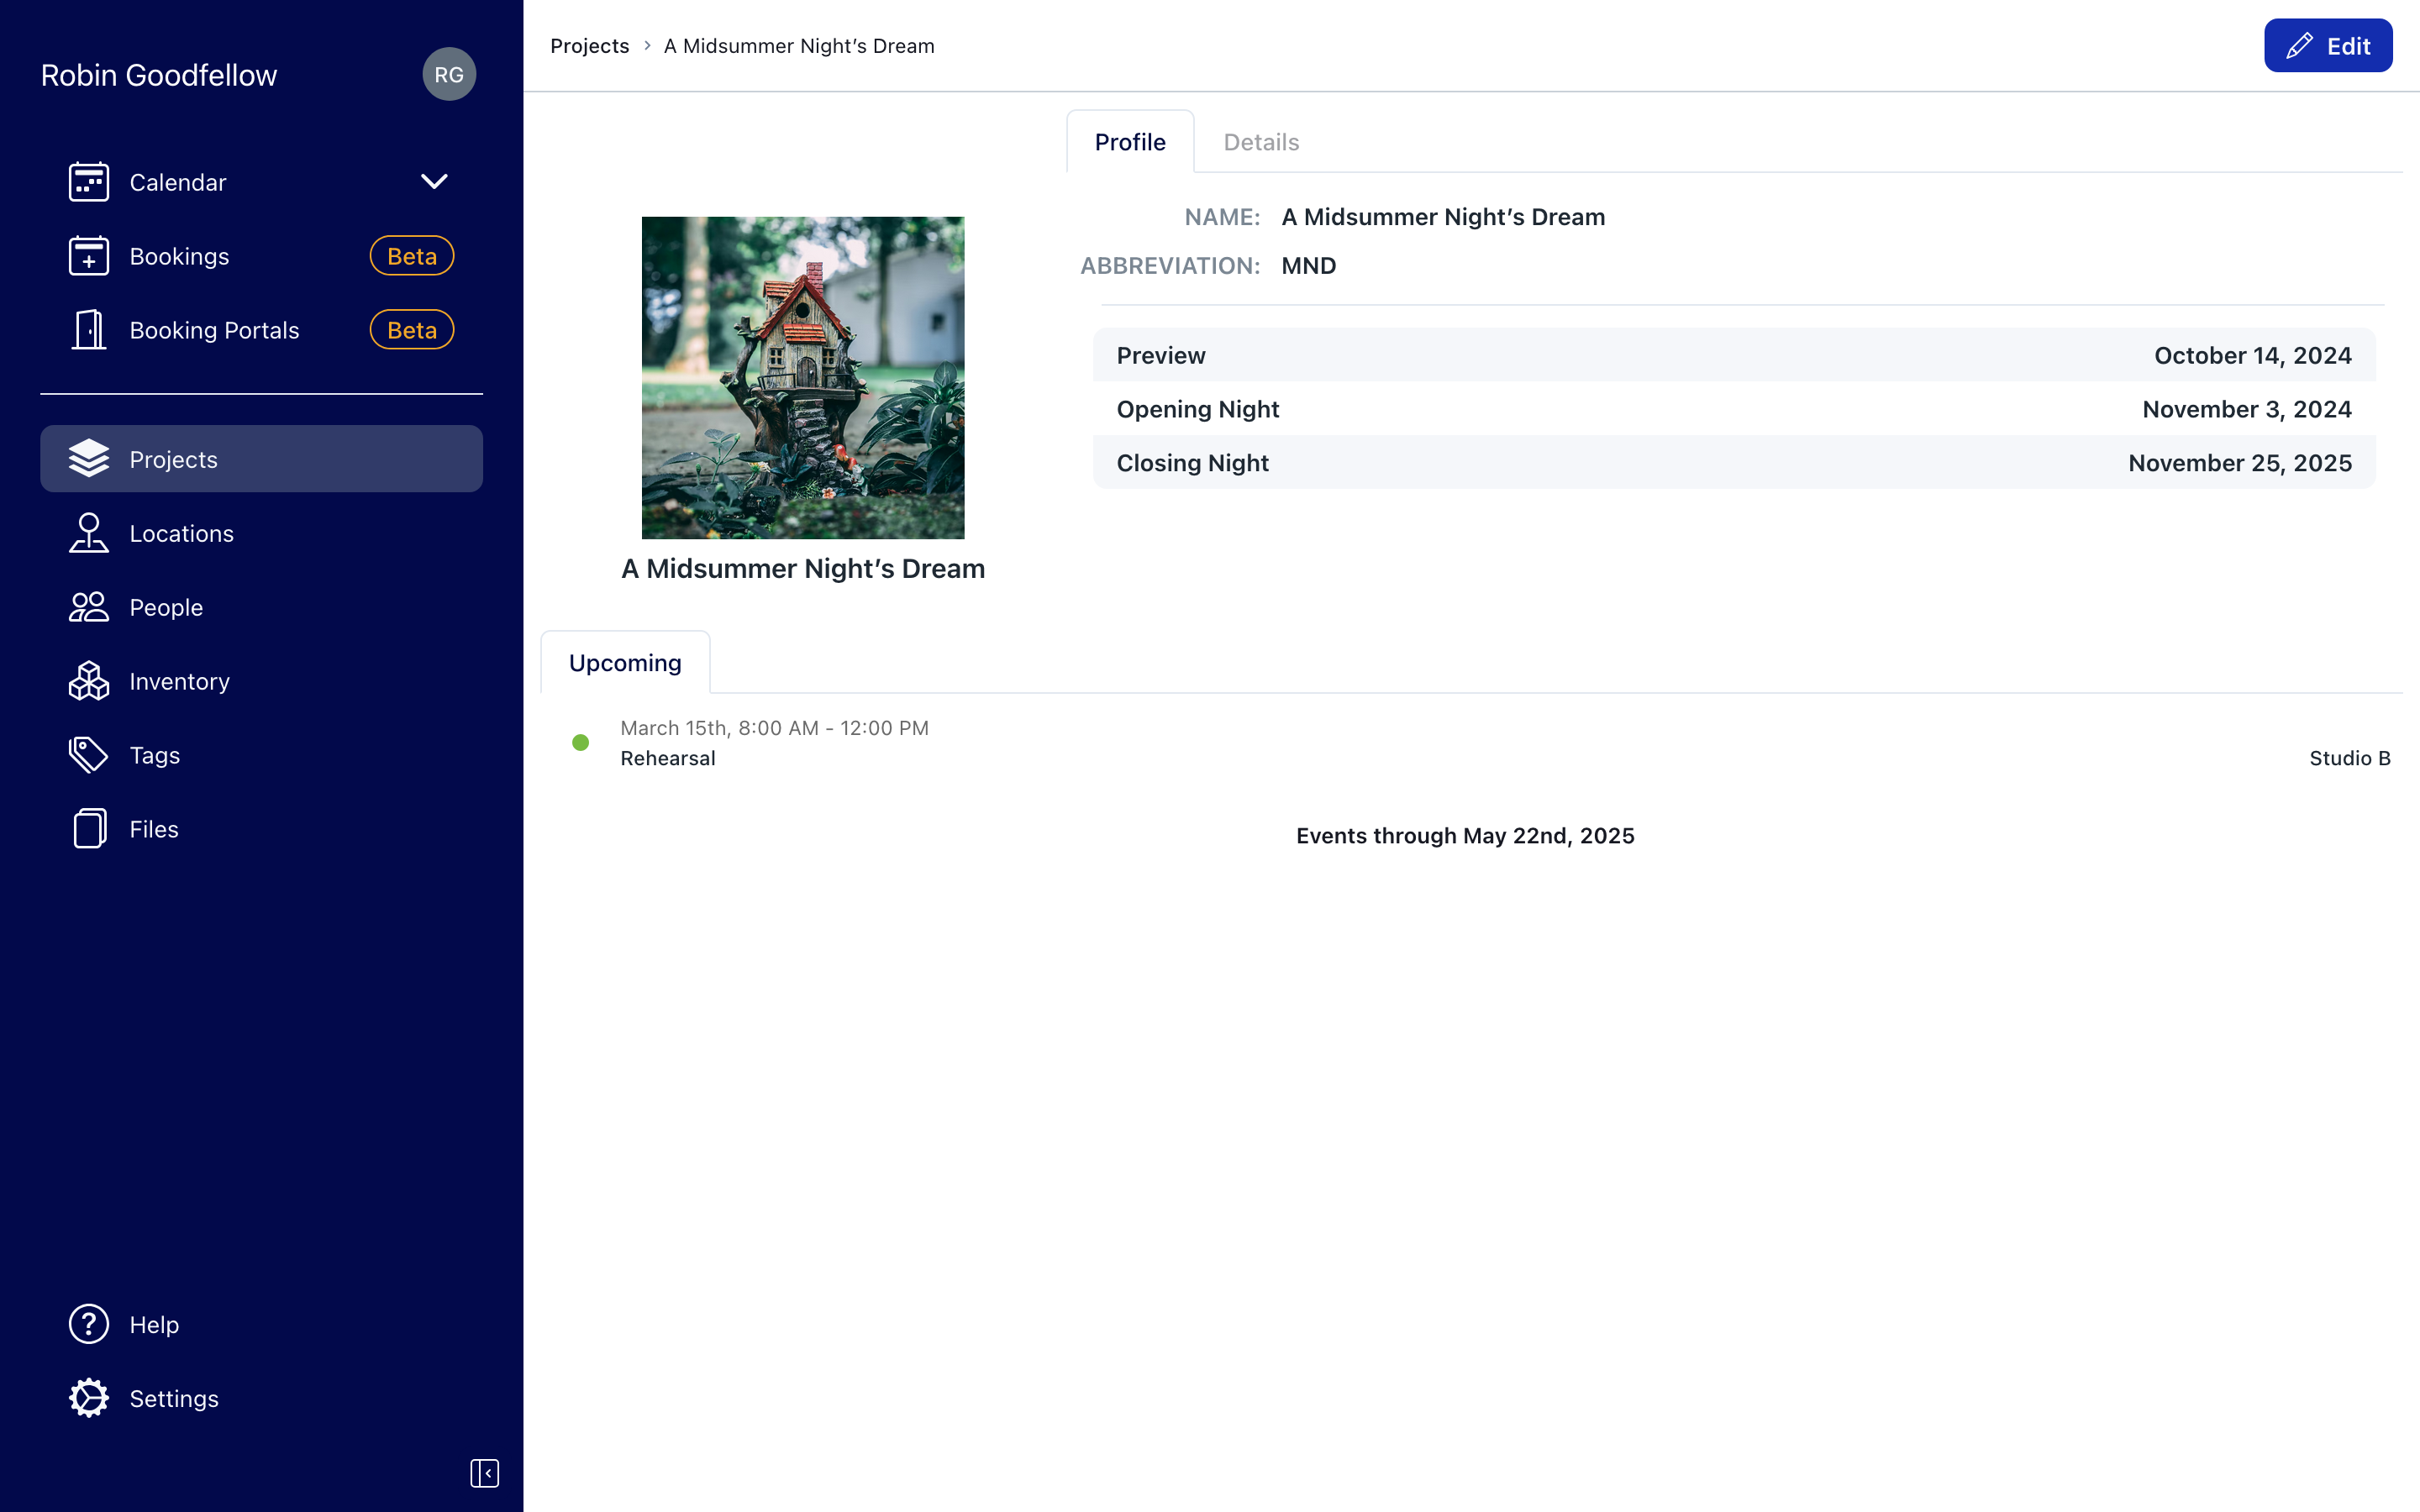
Clicking on a project, location, person, item, or tag takes you to a new resource page. Resource pages display properties alongside upcoming events for a quick snapshot of their schedule.
Improvements and fixes
- The “…” menu on resource cards now has a “Delete” option.
View & Calendar Updates
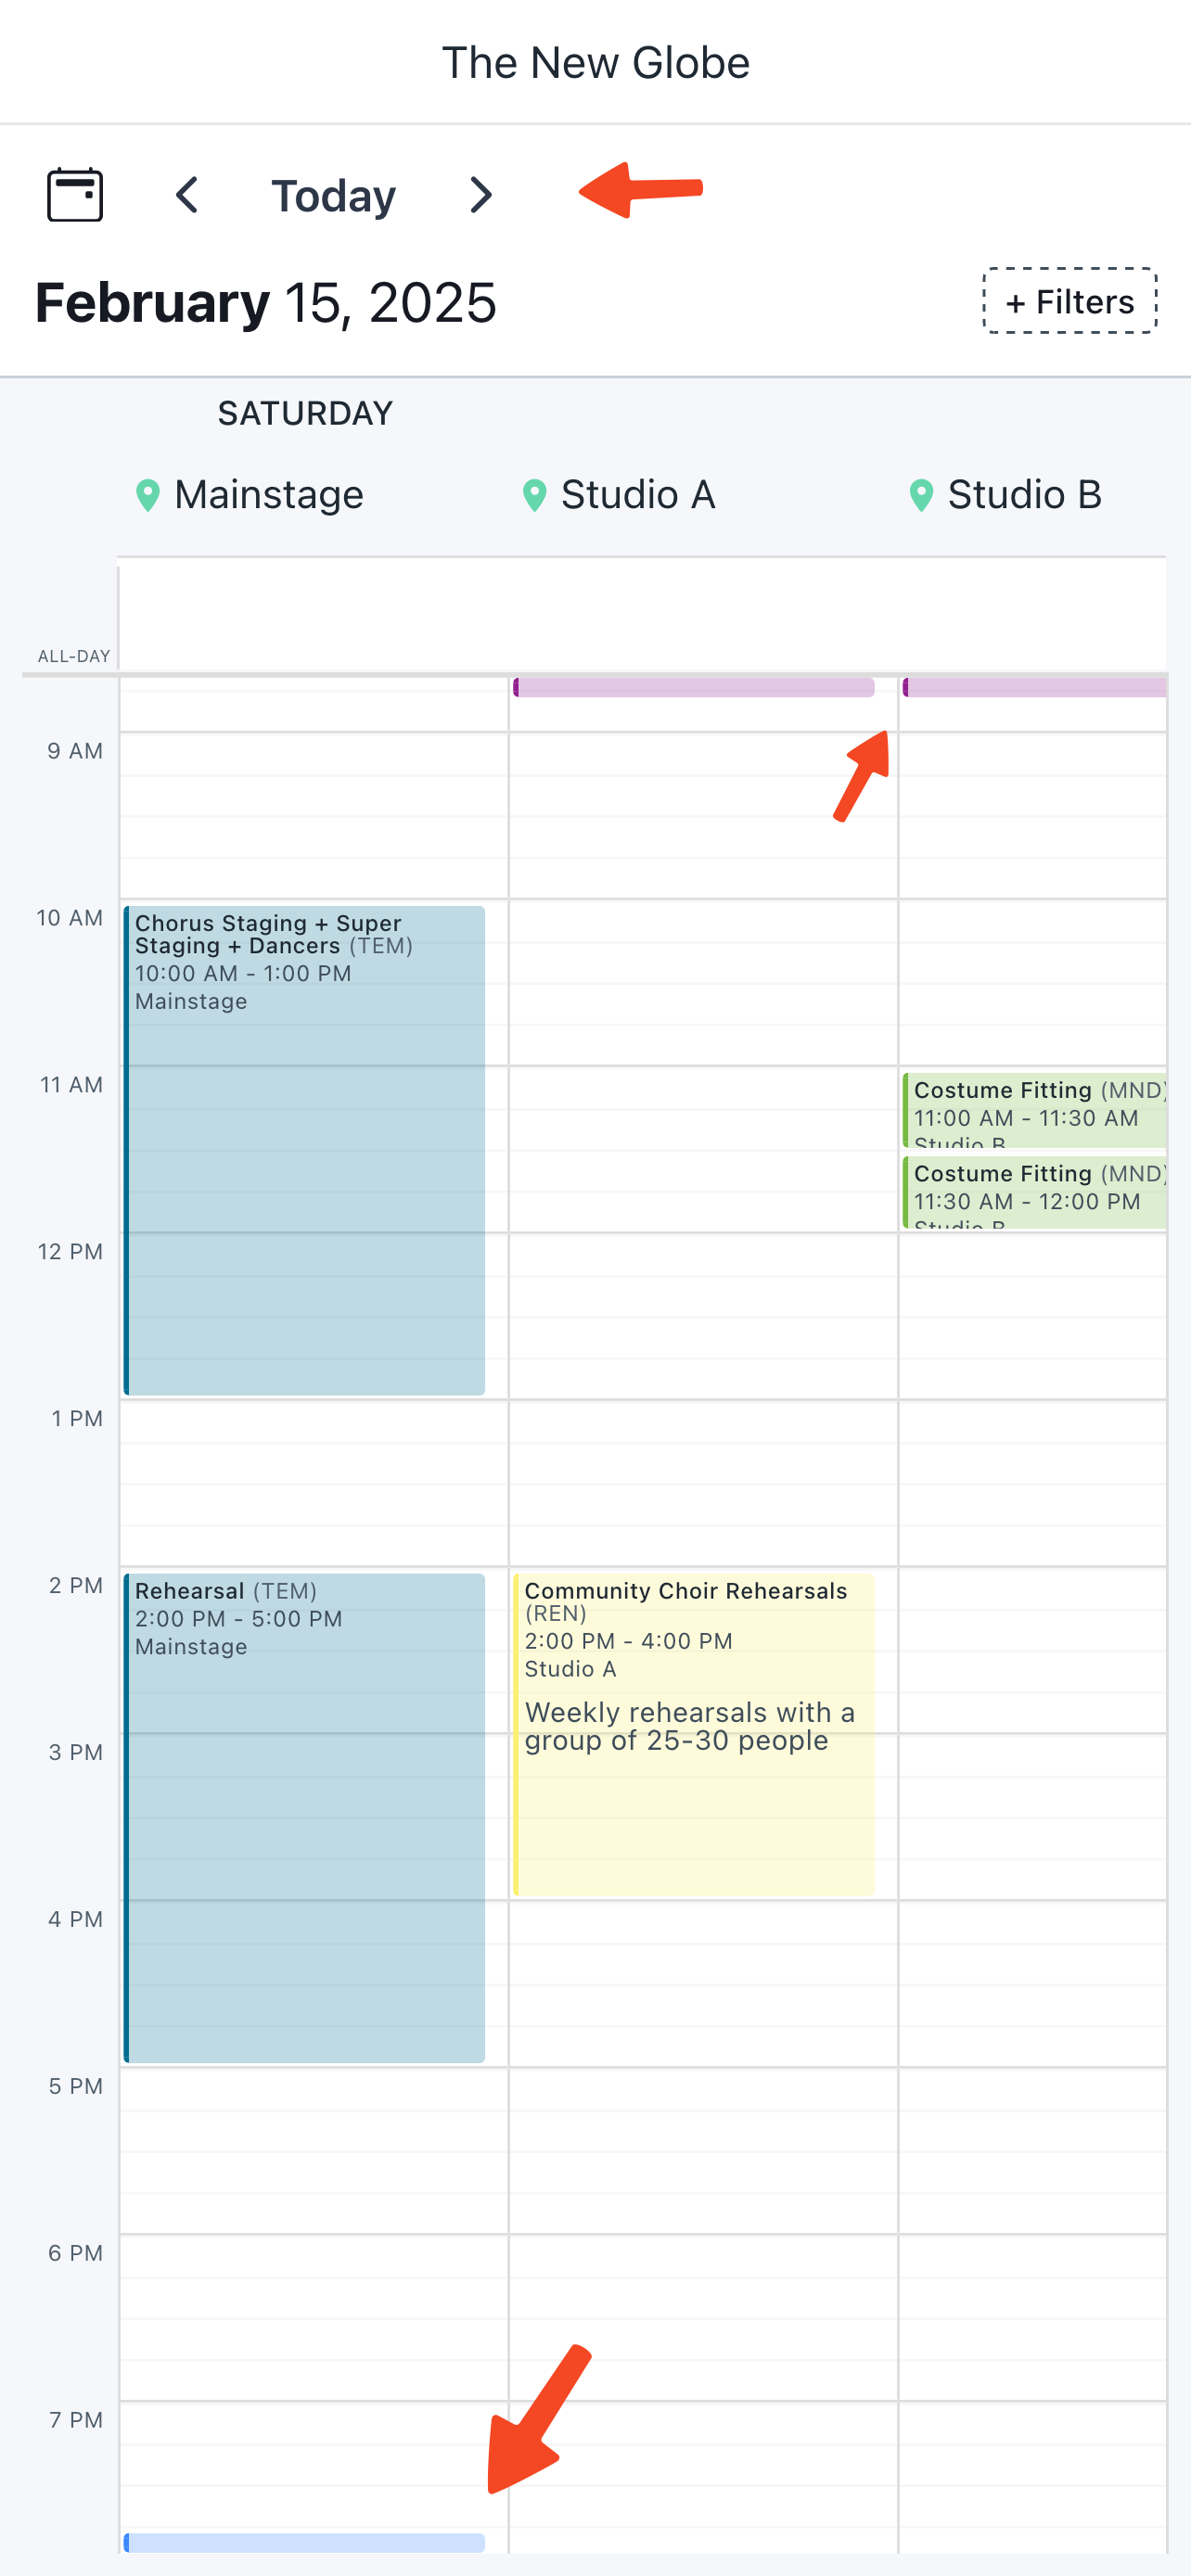
View links have received a makeover:
- Buttons in the header now have much larger click targets for easier navigation (especially on mobile devices).
- Information in the header has been condensed to provide more vertical space for the calendar.
Events in week and day layouts now "stick" to the top or bottom of the calendar when they scroll out of view, providing a visual hint that there are events out of view.
Improvements and fixes
- Links in text fields created from now onward will open in a new tab when clicked.
- Single items now display their statuses in dropdowns.
- Fixed a bug where removing or adding an item set would toggle its child items instead of adding or removing all of them.
- Fixed a rare bug where the admin app would open to a blank screen after an update.
Booking Portals
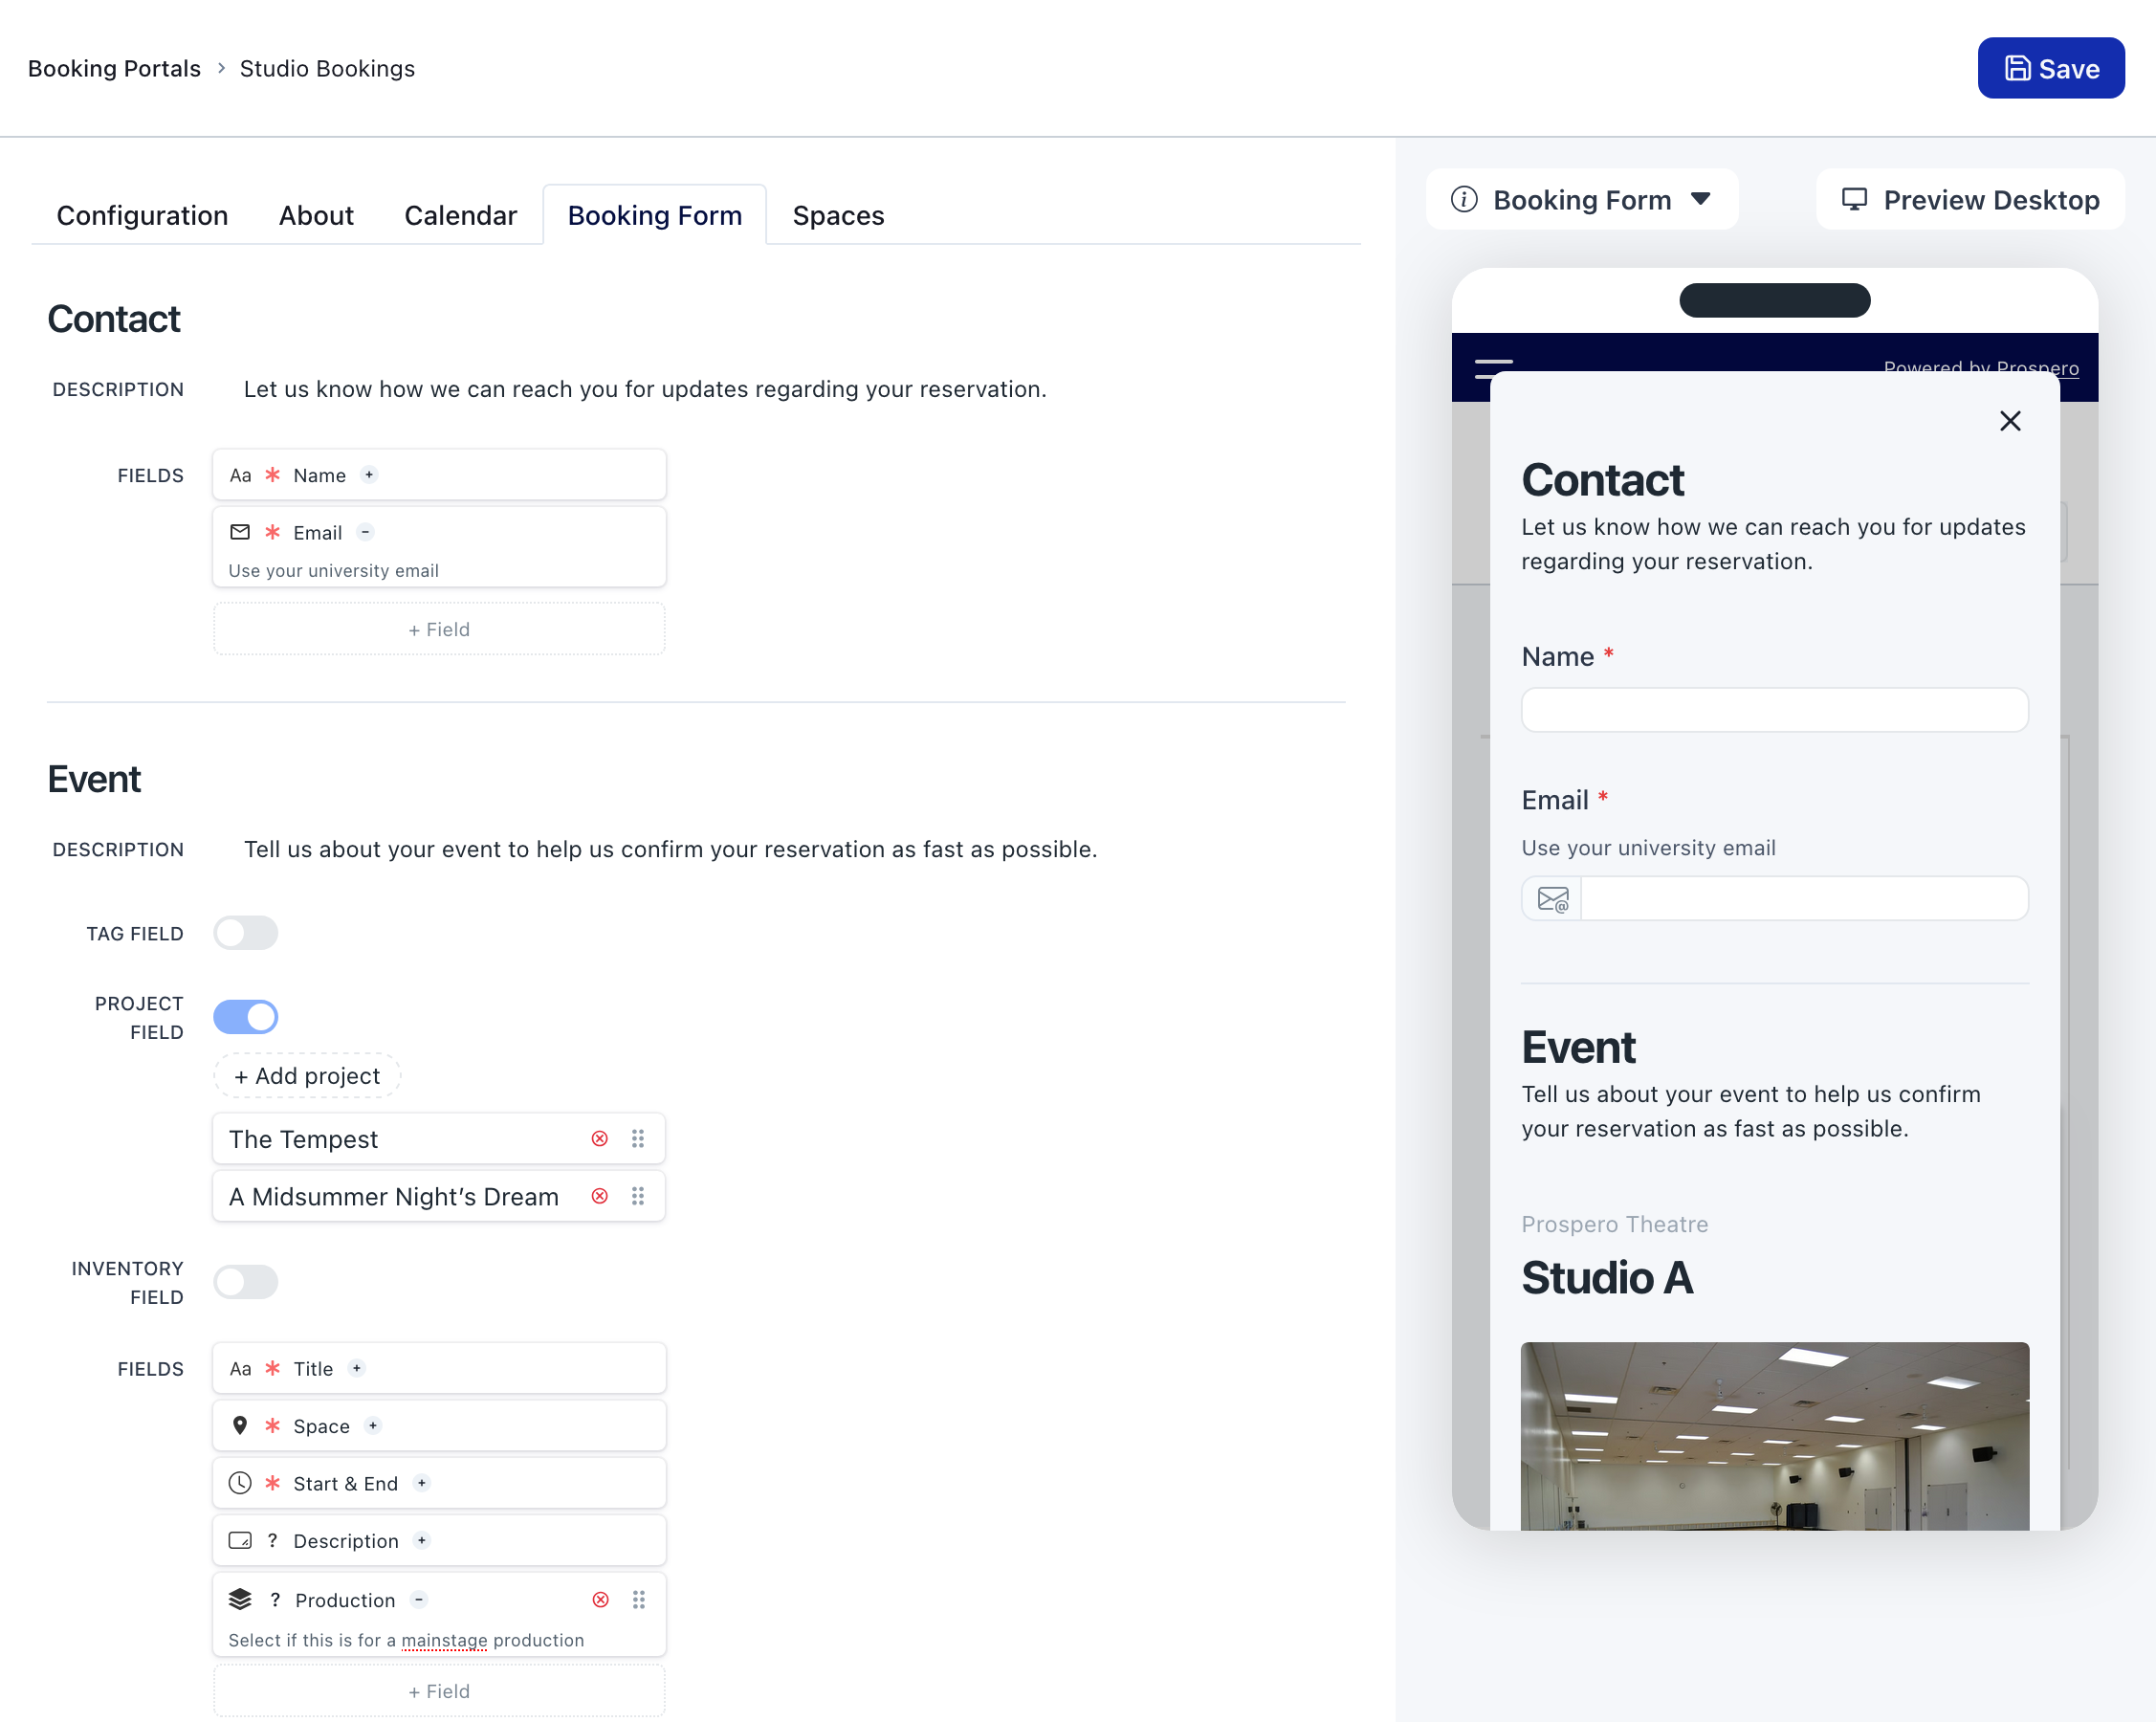
Introducing Booking Portals - triage booking requests from artists, students, community groups, or anyone else looking to use your spaces.
Bookings are deeply integrated into Prospero. Pending requests are displayed alongside your events in the calendar so you can leverage the same powerful formatting tools you already use to visually triage bookings. You can add as many custom fields as you like to the booking form, including fields for projects, tags, and items in Prospero.
When approving a booking, you can adjust resources and other details as needed. If you schedule an event in a space that was requested, you can move the booking into a different space and the booker will receive an email with a summary of your changes.
You can customize the booking portal to give your bookers a comprehensive overview of your spaces. Use the About page to describe the intended usage & rules for the portal. The Spaces pages let you showcase photos of the space, equipment lists, and other details. The Booking Calendar displays your spaces in a split day layout, with the usual color-coding options.
Your bookers can request changes or cancellations via the Manage Booking link they receive in email notifications. Change requests must be approved by a Prospero admin.
The portal is “private by default” - personally identifiable information is never sent to the portal and as much information as possible is scrubbed before it ever reaches your booker’s device. Event titles are replaced with “Booked” (though you may opt to include the true titles).
This feature is in Open Beta while we iron out final details and squash pesky bugs. If you have any feedback or find a bug, please report it to us via the Help button in the sidebar. We have several major upgrades planned for booking portals in Q1, including support for rental bookings with rates for spaces, staff, and equipment, quotation & invoice generation, and automated workflows for notifications and approvals.
We look forward to your feedback as we expand Prospero to support more of your work in venue management!
Text Formatting
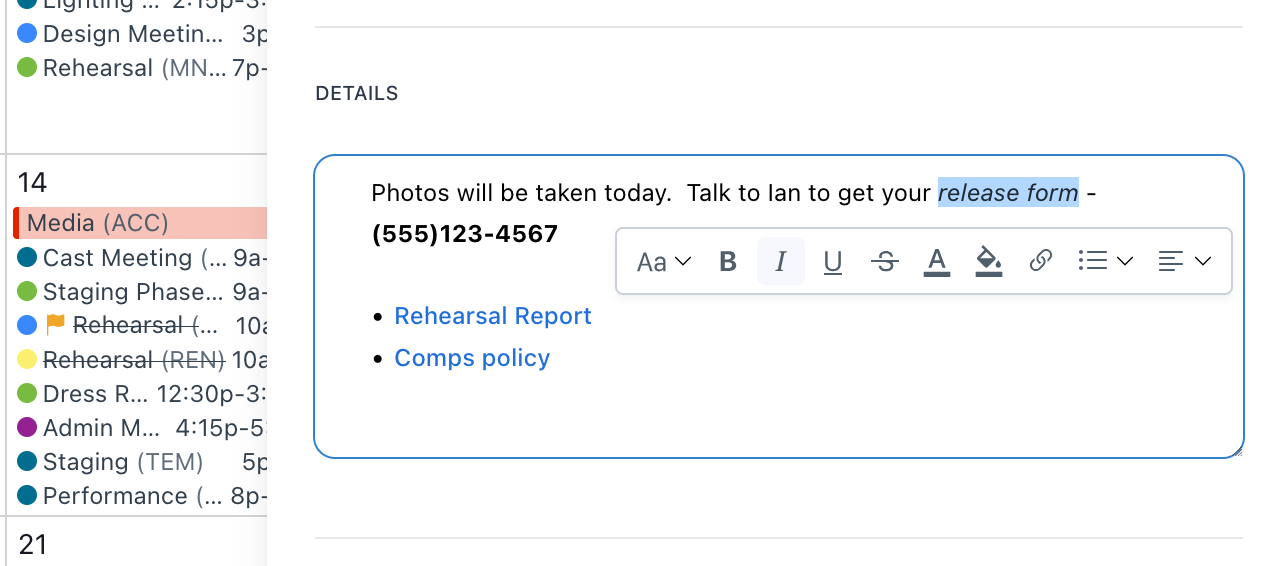
In multi-line text fields, you can now format text to your heart’s content!
You can alter the type, style, color, and background color of text. Embed links on any selection of text. Use lists (bullets, numbered, or checklists) and adjust the justification of each line. You can use the handles on the left-side of the editor to rearrange lines.
Your formatting is retained in notification emails and everywhere notes are displayed in the application, including view links.
If you’ve read this far, here’s a fun hidden feature: type a colon (:) to bring up an emoji selector. 🤪
Improvements and fixes
- In the event editor, resources that are double-booked (assigned to another event at the same time as the event being edited) are denoted with a “busy” label.
- Fixed a bug where view links wouldn’t display events in month layout that aren’t in the year in view (i.e., viewing January 2025 now correctly displays events on the final days of December 2024).
Viewer Formatting
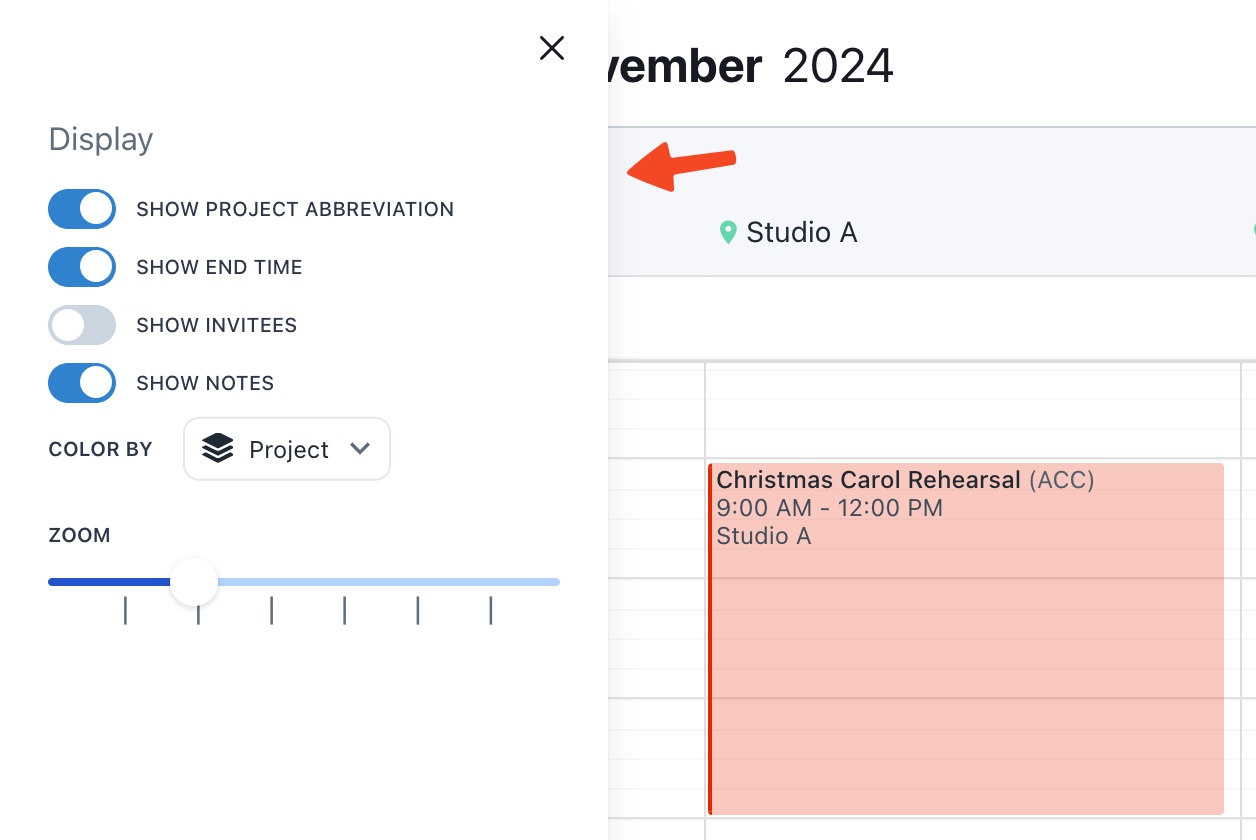
View links now include a stripped down version of the format menu. Viewers can adjust options like color by, the day the week starts on, project abbreviations, and zoom level. View links will always default to your saved format settings on page load.
Improvements and fixes
- Bulk duplicate now includes the following options: To Following Day, To Following Week, To Following Month.
- When uploading a file, the name of the system file is used as the initial name of the Prospero file. You can still alter the name of the Prospero file.
- Bulk editing items consolidates single item sets into a single line.
- Fixed a bug where exporting the list layout to PDF on days other than the default range would fail to render events.
- The default location dropdown in the item editor includes spaces as well as venues.
Auto-Split
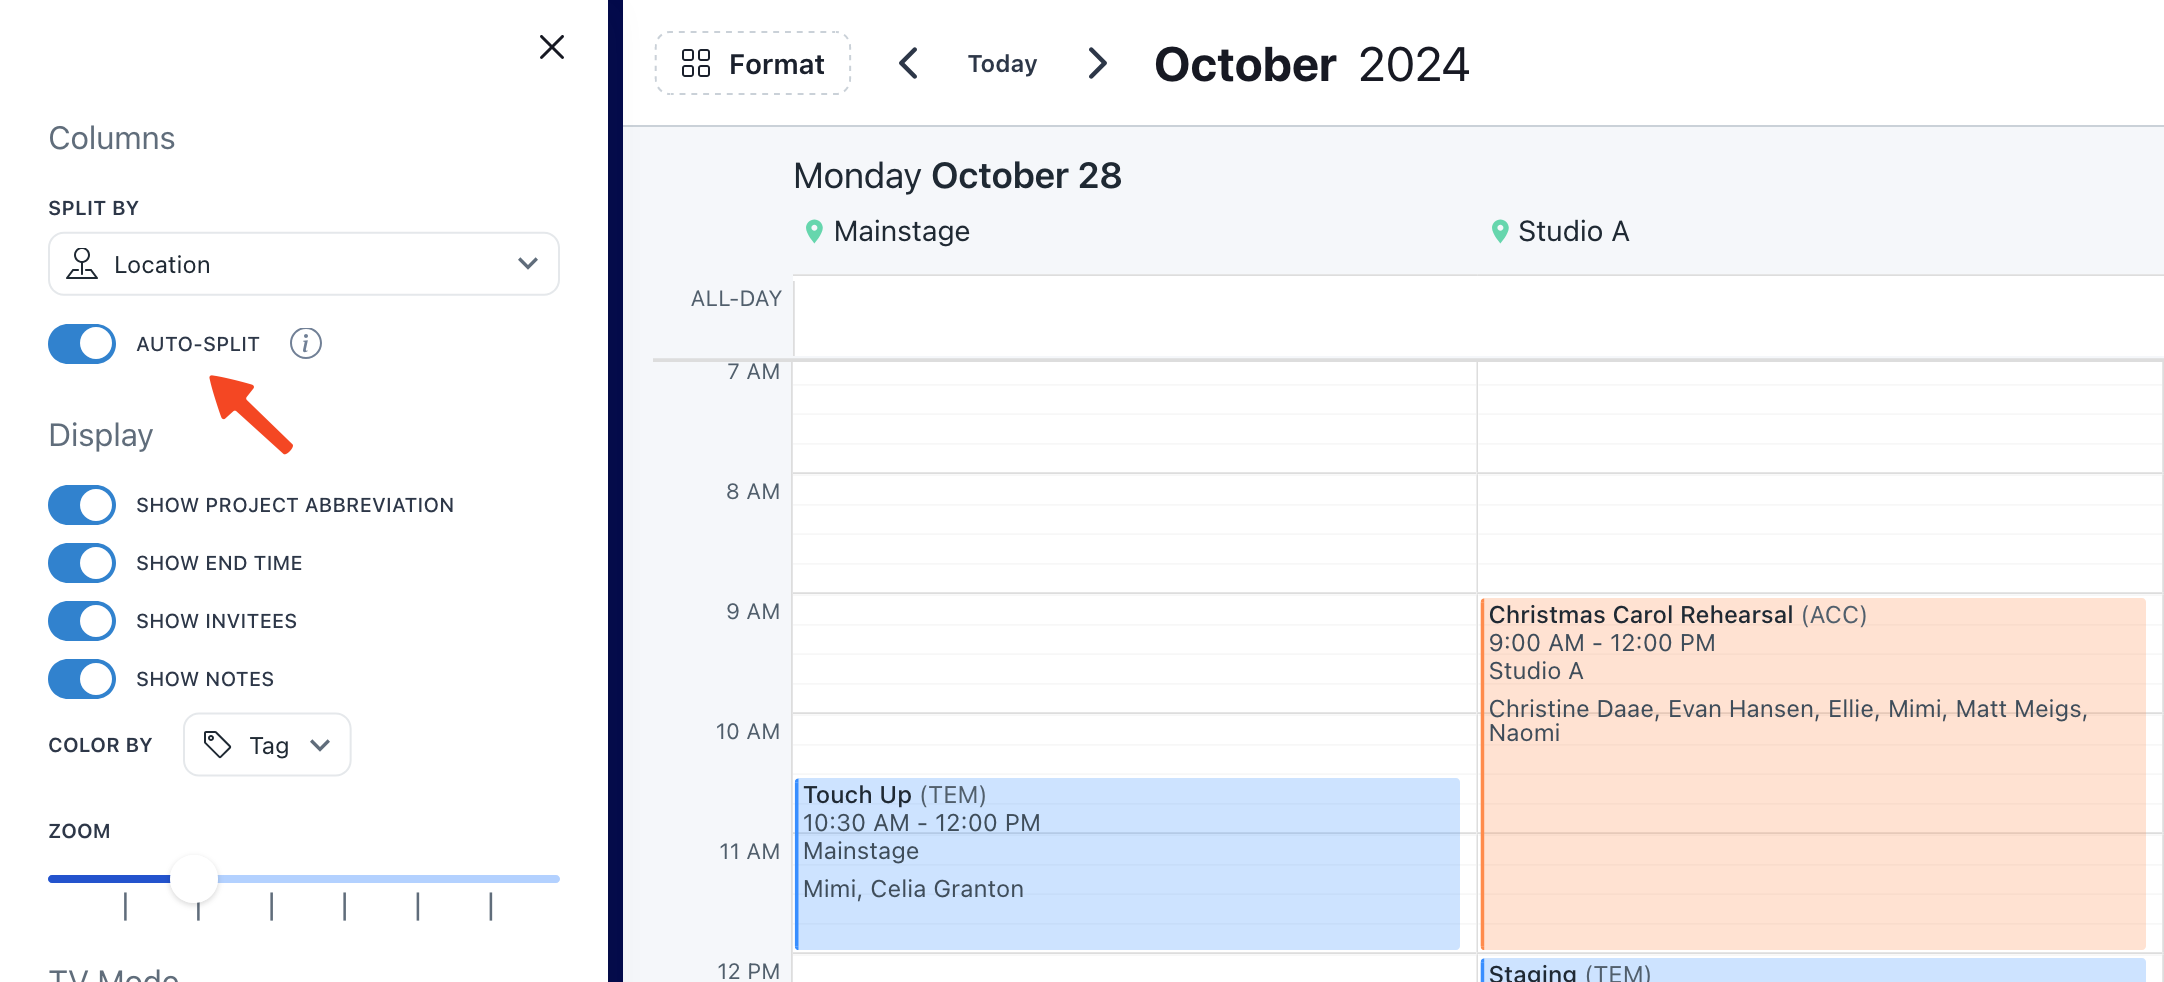
When splitting day layout, you can now elect to auto-split based on the resources of the events that day. For example, you can auto-split by location to always display columns for each location that’s in-use that day.
When auto-splitting, the column order is chosen automatically and cannot be adjusted. Columns may vary between days based on resources used.
Color By Item
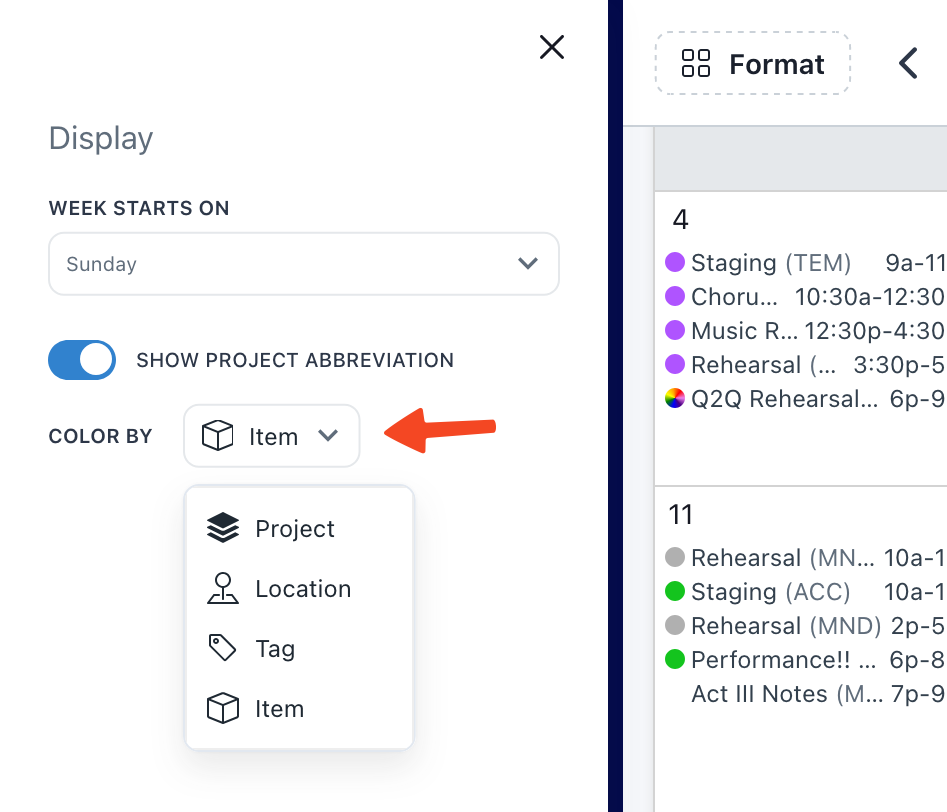
You can now color-code the calendar by item. To support this feature, items now have a color property.
Improvements and fixes
- All resources now have a “See on Calendar” action under the “…” menu that will take you to the calendar with that resource applied as a filter.
- Tentative events have their titles italicized on the calendar to make them visually distinct.
- Printing month layout now prints end times if they are included in your chosen format options.
- View links with day as their default layout properly display events on that day on initial load.
- Bulk editing projects properly applies chosen projects to all selected events.
- Fixed a rare issue where the “+” filter dropdown wouldn’t close in view links.
Performance Improvements
This week’s update includes a suite of performance optimizations for users with large amounts of data:
- If you have a large amounts of data, you’ll notice a substantial improvement to application performance. Month layout, in particular, is now just as responsive as week, day, and list.
- If you are using Prospero on lower-end hardware with a large amount of data, the browser tab should no longer freeze.
- As you create and edit data in the editors, those changes will be reflected in realtime in the area outside of the editor. If you close the editor without saving, those changes are reverted.
- When initially launching the app, a new loading screen visually indicates progress. See if you can spot all 18 time-related theatre quotes! 🔎
- Animations throughout the application are smoother.
Improvements and fixes
- Fixed an issue where view links with a default layout of day would not render events until the viewer switched layouts.
Draft Icons
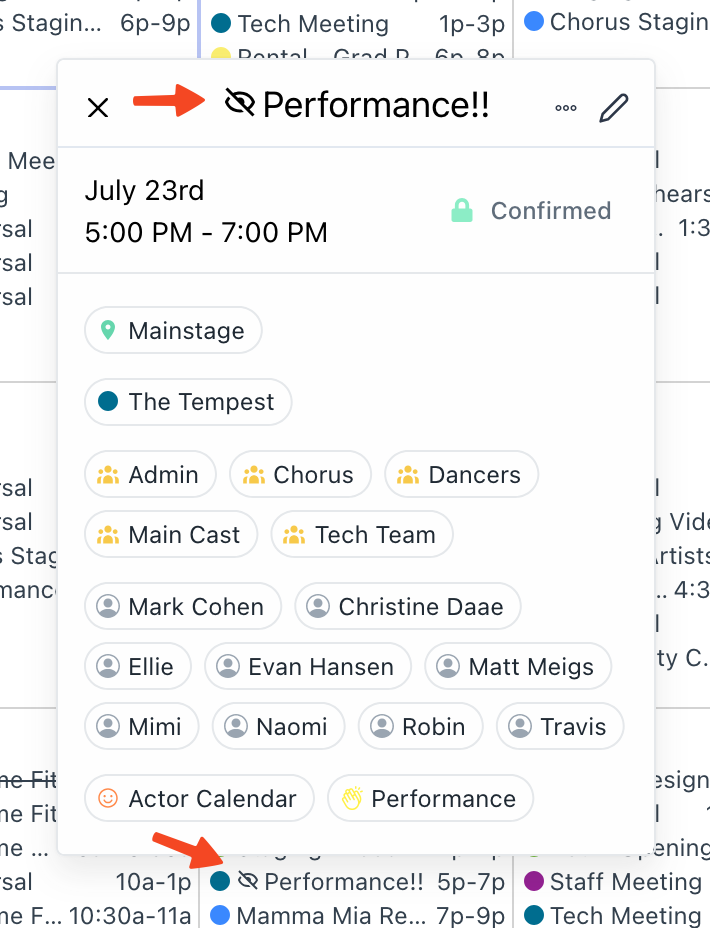
Draft events now have a draft icon next to their title throughout the app, making them easier to identify at a glance.
Improvements and fixes
- Events are now sub-sorted by duration. If two events start at the same time, the event with a longer duration will now always appear first.
- You can now view files in a separate tab without downloading them to your desktop.
- Printing week & day layouts reduces zoom so that all content fits on one page.
Export to CSV
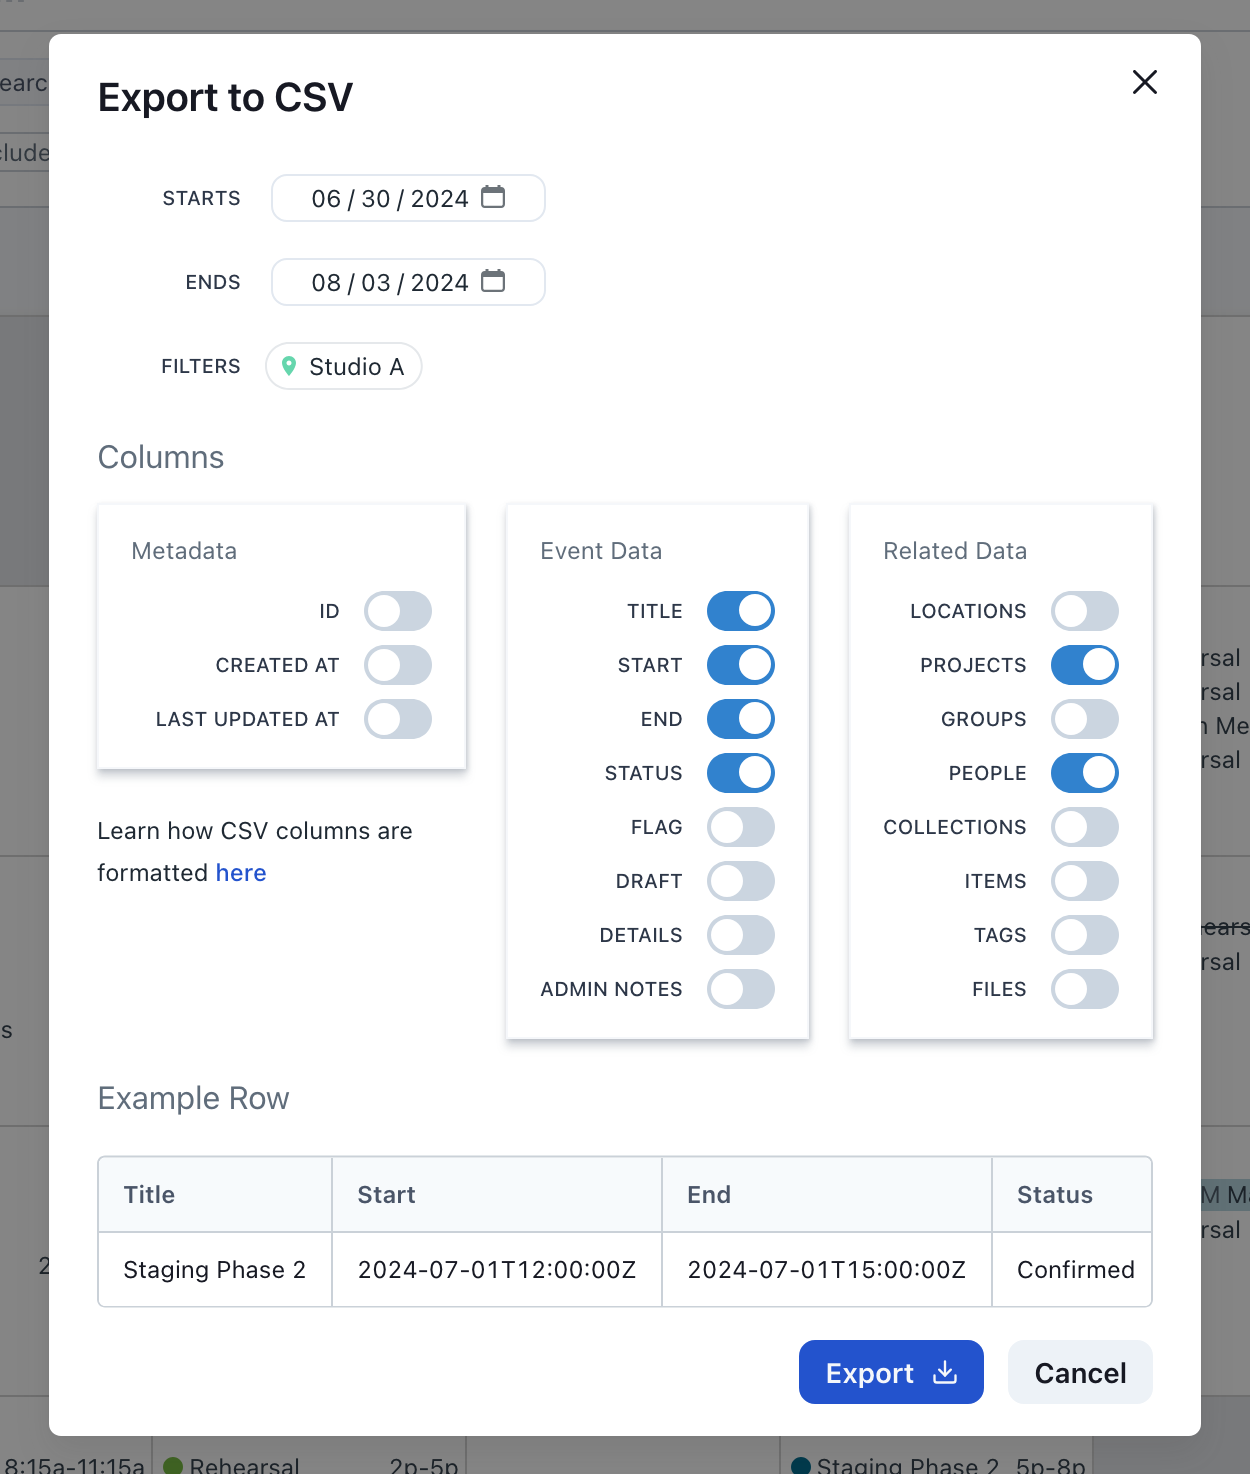
You can now export your calendar data to CSV. We built Prospero to handle as much of your scheduling workflow as possible, but sometimes you need your data in a portable format. 🎒
Navigate to any calendar layout and apply any filters you’d like to use. Click … > Export to CSV to configure your export.
Configure which columns you’d like to export, including metadata, event data, and related data, like projects and people.
Improvements and fixes
- Regular (non-all-day) events that cross midnight are now rendered directly on the timeline in week & day layouts, instead of as all-day events at the top of the calendar.
- Prospero’s Google integration now give read-only permissions to files attached to events so all attendees can view the files.
- You can now view files in your browser before downloading them. Notification emails for events with attached files link to the file viewer.
- Groups and collections now scroll when they overflow the group panel.
- Fixed a bug where day layout in view links would sometimes not use saved format options.
- Fixed a bug where selecting a parent venue or item set in the “Split By” dropdown would not correctly select all child spaces or items.
- Clicking “X” to exit the group or collection editor maintains your group or collection selection.
- Fixed a bug where accounts with significant amounts of data would fail to load event data.
Admin Notes
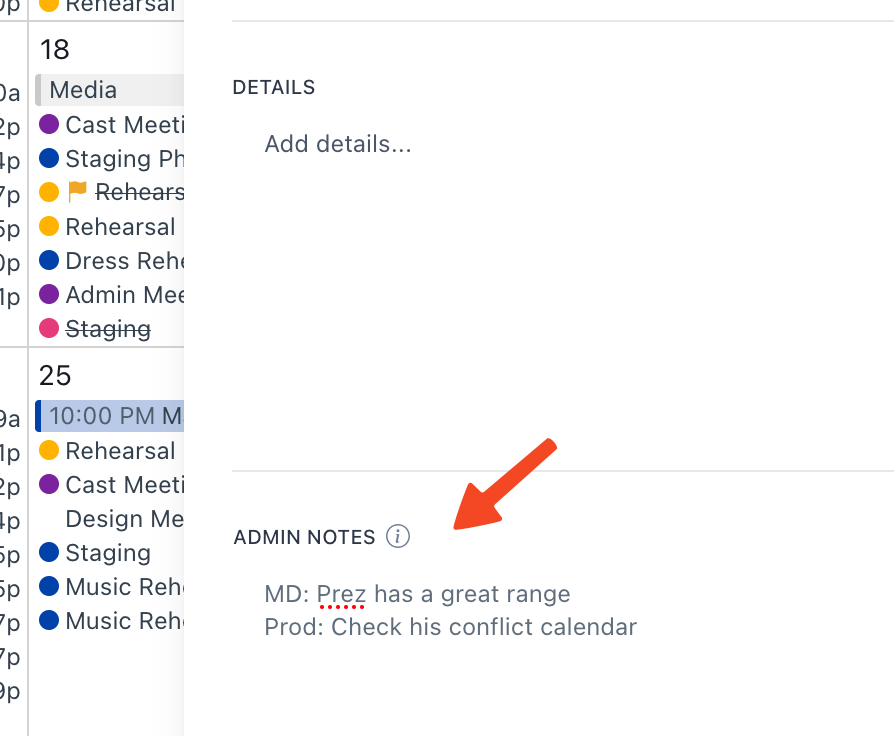
You can now attach private, admin-eyes-only notes to events. Perfect for tracking sensitive information like payroll codes, instructor notes, or casting notes. Scroll down to the bottom of the event editor to add notes. Admin notes are only visible in the admin application and are never surfaced in view links or third-party synced events.
People Visibility
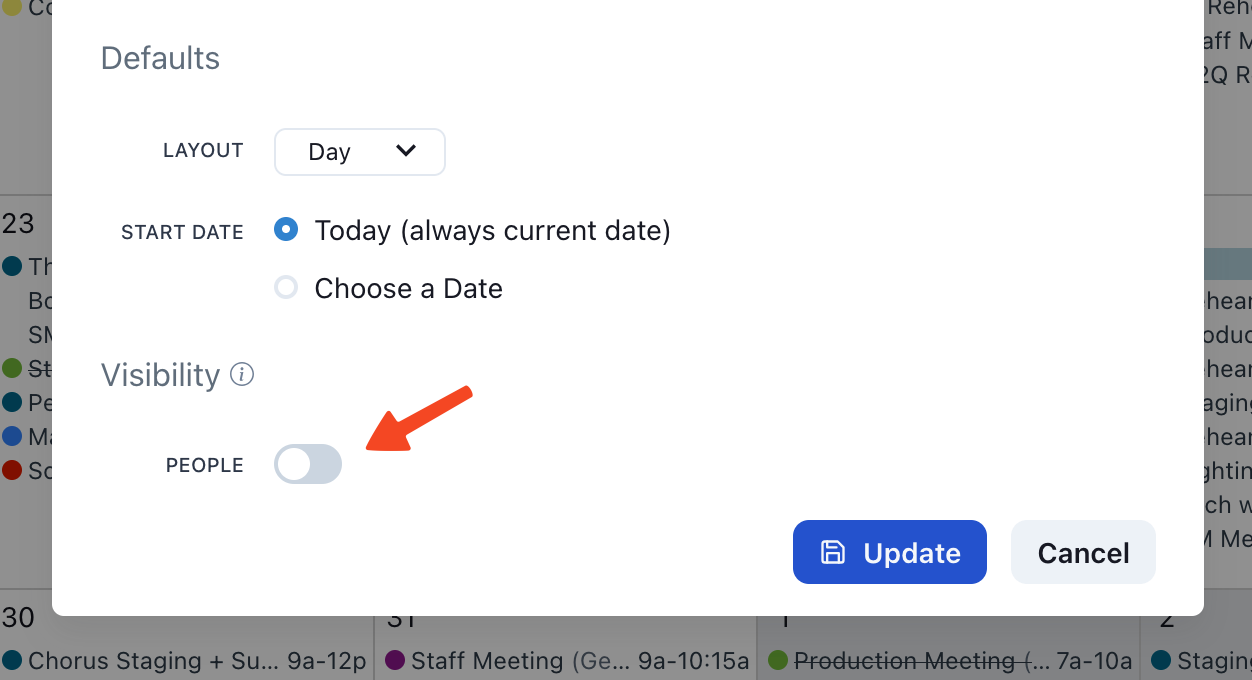
You can now elect to hide people in views. We built this feature specifically to keep student information private. Toggle off people visibility when creating a new view or by clicking Update View. If people visibility is off, people data is purged from view links and third-party synced events.
Improvements and fixes
- You can now collapse the list of views in your sidebar.
- Views in your sidebar, groups on the people page, and collections on the inventory page are now rearrangeable via drag-n-drop. The order is saved per-device, so you can have a different order on your desktop and mobile device.
- Large numbers of people are no longer collapsed into a number in the event popup, instead displaying all names.
- Groups and people are now split into separate columns in list layout.
- Updating a view no longer clears the view announcements.
- Event boxes in week & day layouts are rendered with the correct end time in print and TV mode.
- Deleting an event via the … menu now always deletes the chosen event.
- Tooltip background are always rendered with a light background to ensure text is readable.
File Attachments
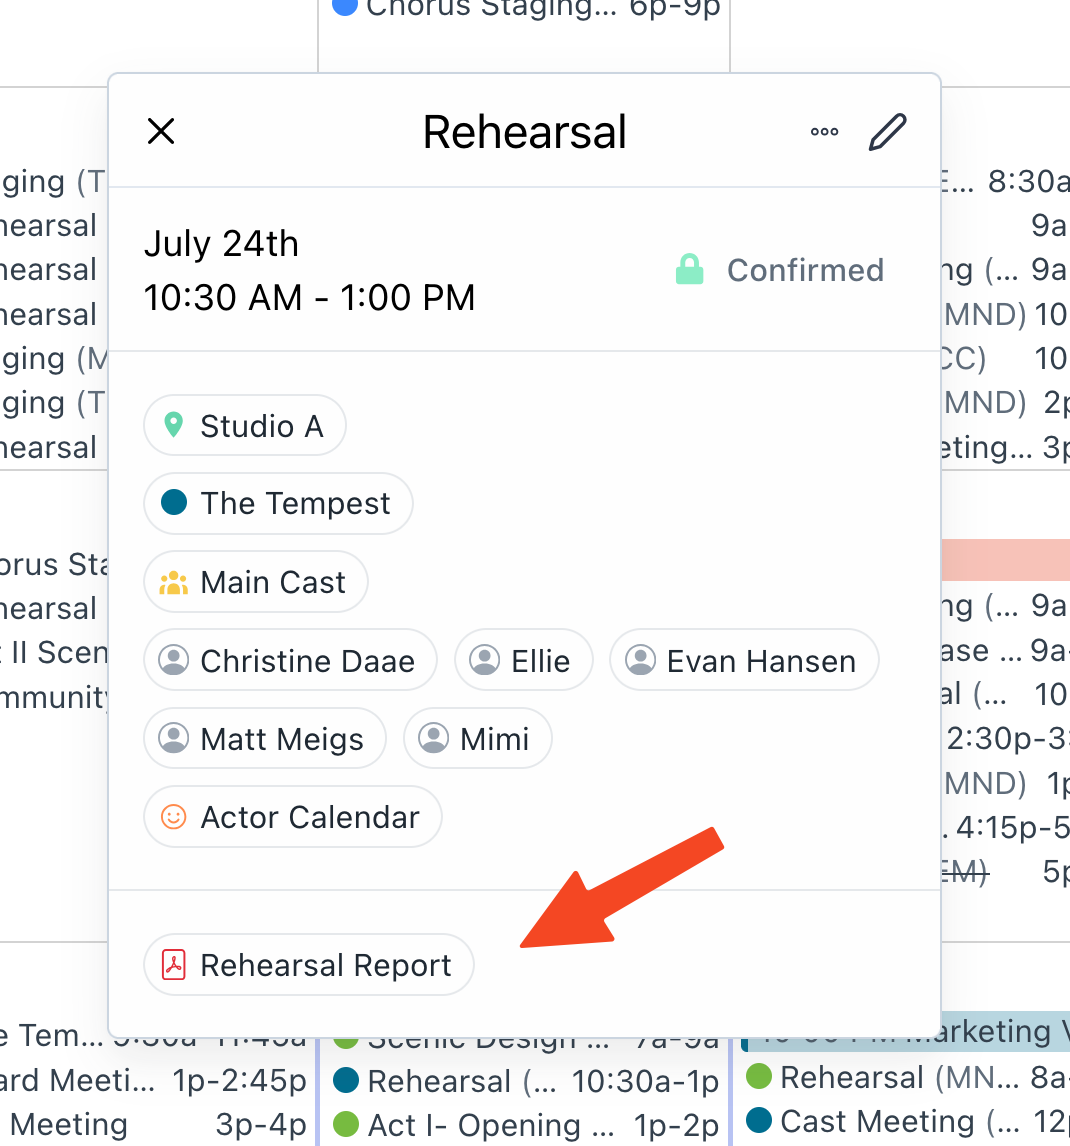
You can now upload and attach files to events. Perfect for one-sheets, rehearsal reports, or any other information you want to share with attendees. Viewers can download attached files by clicking on the file name in view links or notification emails.
Upload and attach files on the fly in the event editor. Manage your files in the new Files page, accessible via the sidebar.
We’ll be rolling out new file fields for other resources, like People and Items, in the coming weeks.
Improvements and fixes
- Viewers can now adjust the timezone of the calendar in view links.
- When editing a person, the first name field is auto-focused so you can immediately start typing their name.
- Project key dates are correctly displayed in all timezones.
Color By
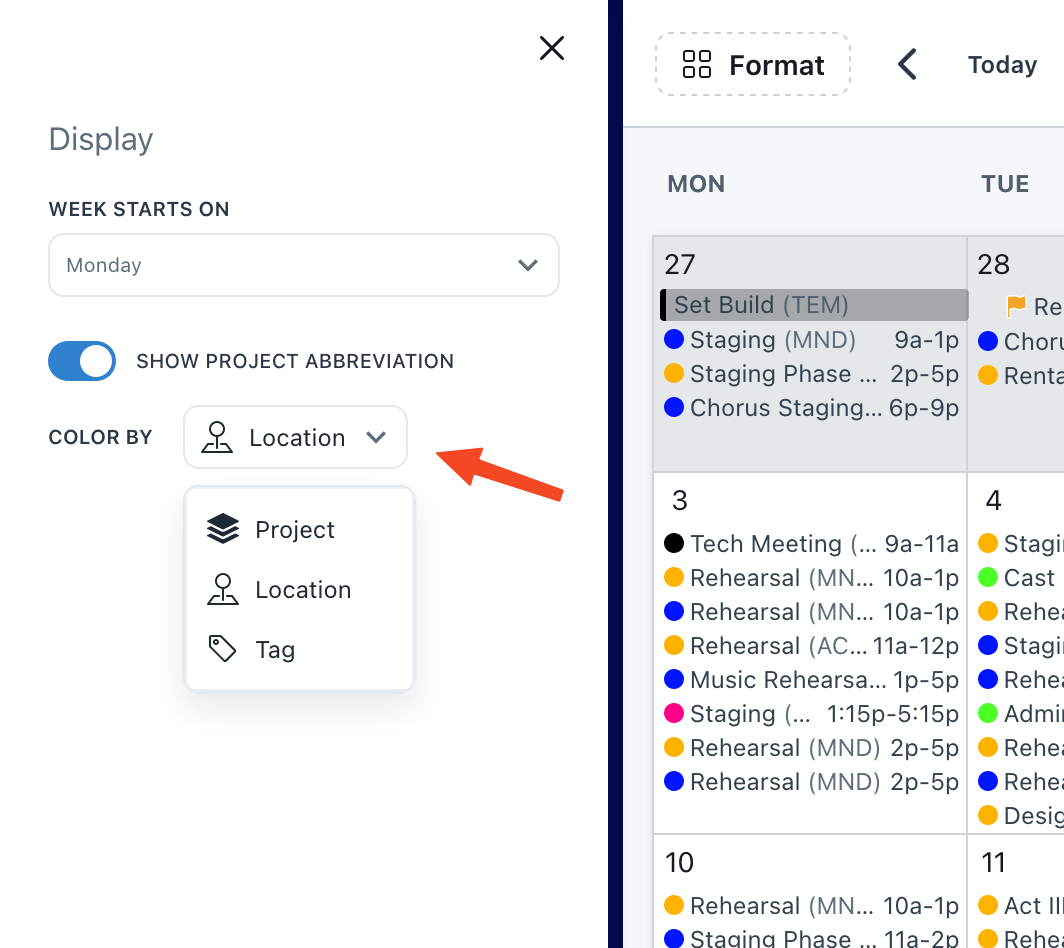
You can now color-code the calendar by Project, Location, or Tag. Use Format > Color By to select which option you prefer. Your selection is saved to your views and used in your view links. To update a view with a new color-code, select a view, choose your preferred option, then click Set as View defaults.
To support this feature, all locations now have a color property. Turn your venue into a beautiful rainbow. 🌈
All-Day Events
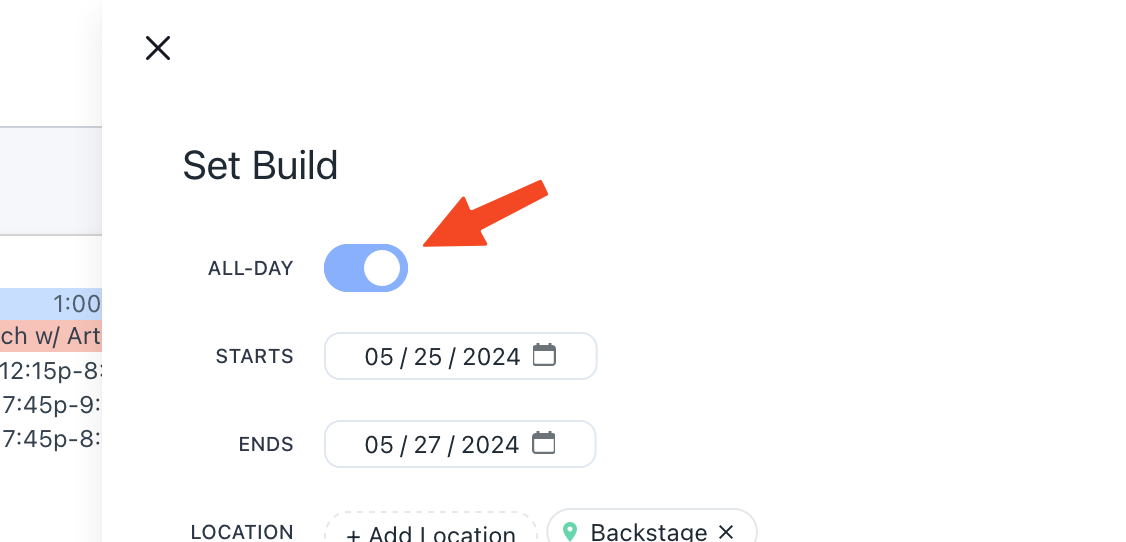
It’s finally arrived! You can now create true “all-day” events in Prospero! Simply toggle the all-day switch in the event editor when creating an event. Pick your dates and you’re done.
Events that cross midnight but are not all-day events will still be rendered as bars that cross days in the month layout. To help distinguish them from all-day events, the start and end times will appear at the start and end, respectively, of the event on the calendar.
Improvements and fixes
- Status, flag, and draft can all be set when bulk editing.
- Email notifications in older versions of Outlook for Windows (all versions prior to the recently released “new Outlook for Windows” (appreciate it if you could make this more confusing, please, Microsoft)) have improved rendering.
Event Flags
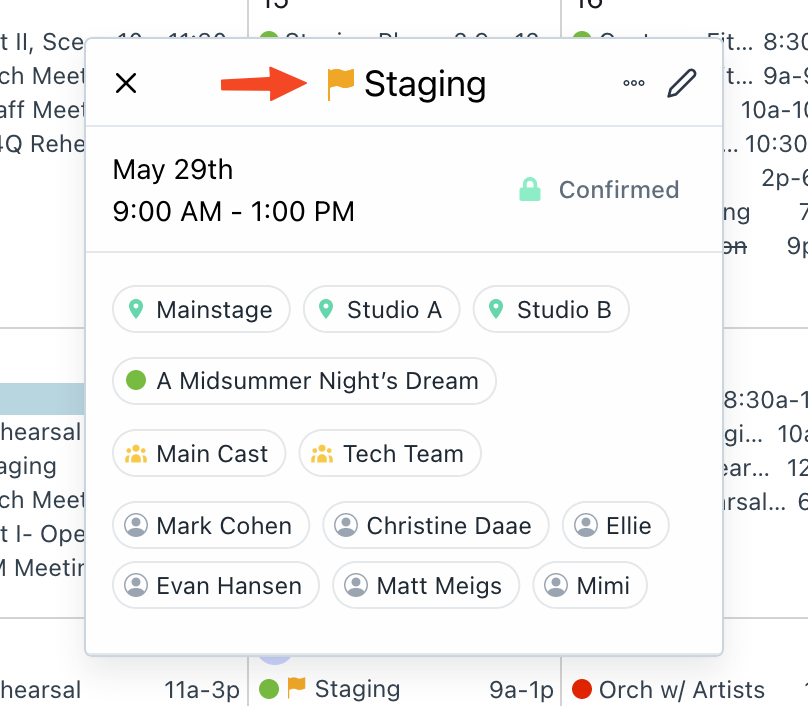
You can now flag events. Toggle the flag switch in the event editor and click Save to apply a flag. Flags appear in all calendar layouts at the beginning of the event title.
Flags are a great way to mark events that have incomplete information and need updating. One Prospero user is using flags to indicate if an event was changed last-minute to comply with their AGMA agreement. Flags are flexible- you decide what they signify!
Search Resources

You can now search in any resource page (Inventory, Locations, etc.) to find what you’re looking for.
Improvements and fixes
- The … menu in the event popup now contains all possible edit actions (Move, Duplicate, Edit, and Delete) in addition to Share.
- New keyboard shortcut: Esc de-selects all currently selected events.
- Command keyboard shortcuts like Cmd + A and Cmd + Backspace are disabled when a text field is selected.
- Cmd + A correctly selects all events in week layout when week start is set to Monday.
View Announcements
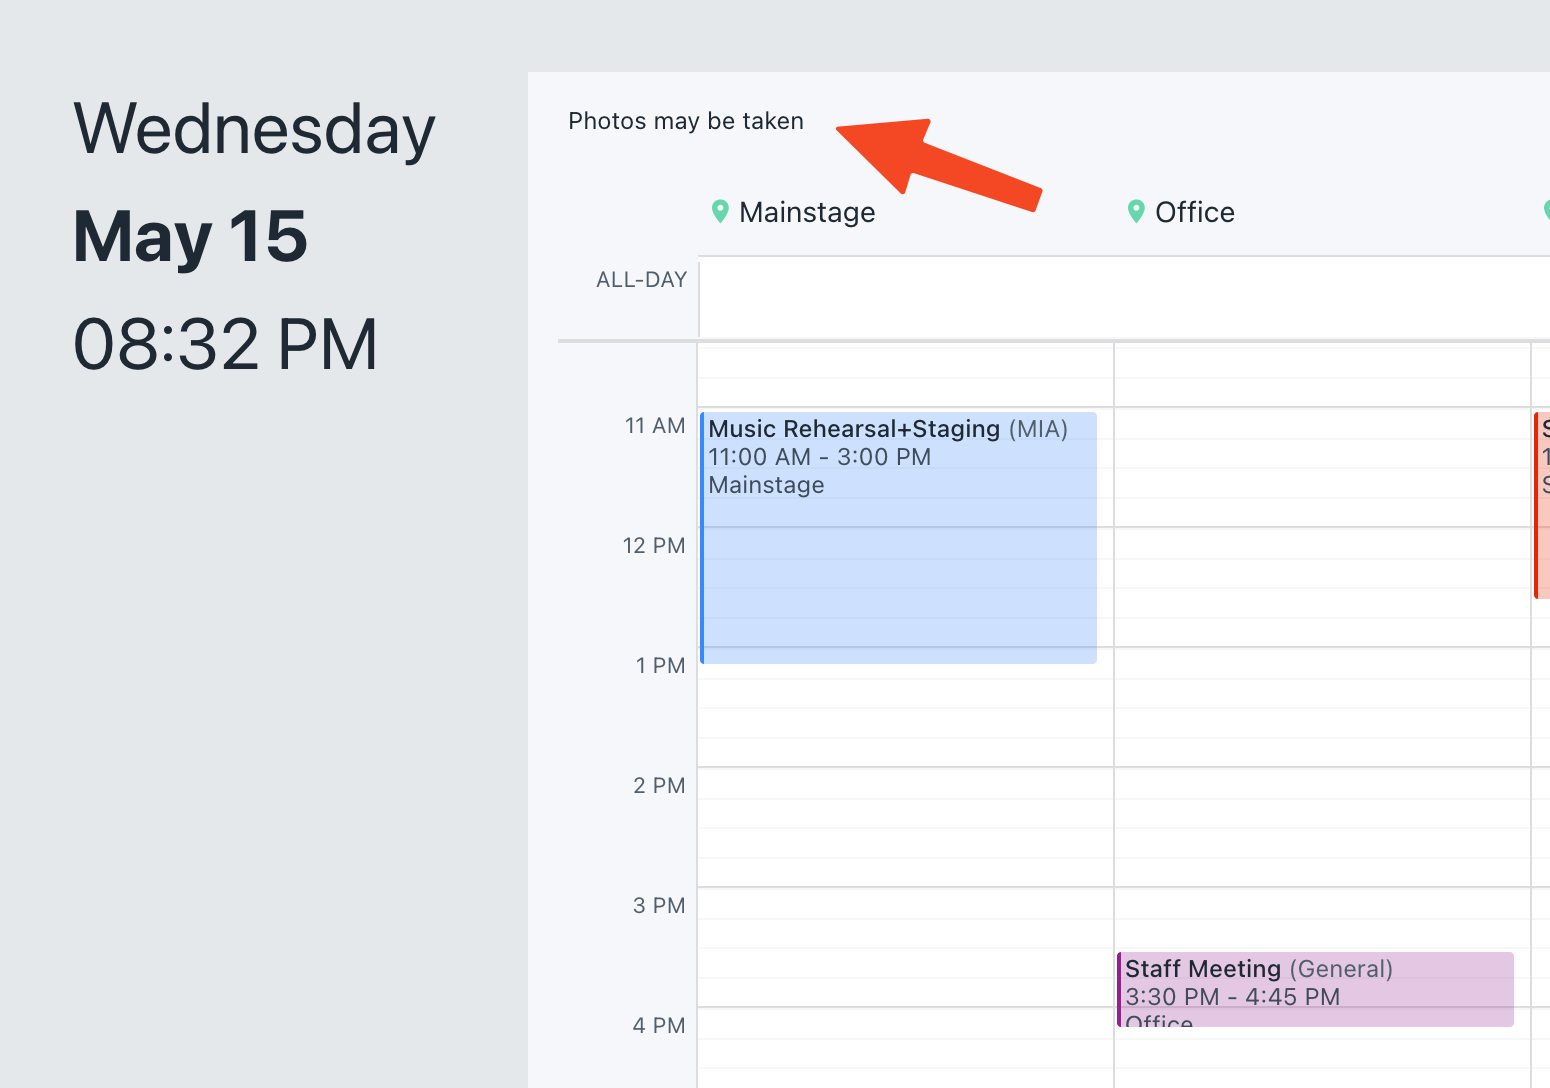
You can now add announcements to views. Announcements are a great way to communicate media presence, put-ins, or other information your cast & crew need to know. Announcements are displayed above the calendar in view links and TV mode. To edit a view’s announcements, click Update View.
Search Events

You can now search event titles to find just the event you’re looking for. Click + Filters in any calendar layout and start typing in the search bar. Viewers can search in view links (by using the + Filters button).
Improvements and fixes
- Double-clicking on an event opens the editor.
- The emails field in notification modals now suggests people based on what you type. You can also now use backspace to remove emails.
- The “three dots” menu in event previews now includes options to move, delete, and edit.
- Item conflicts are detected alongside location and people conflicts.
- If you have no resources of a given type, i.e., no tags, a button is displayed in the event editor to take you to that resource’s page to create your first resource.
Email Notifications
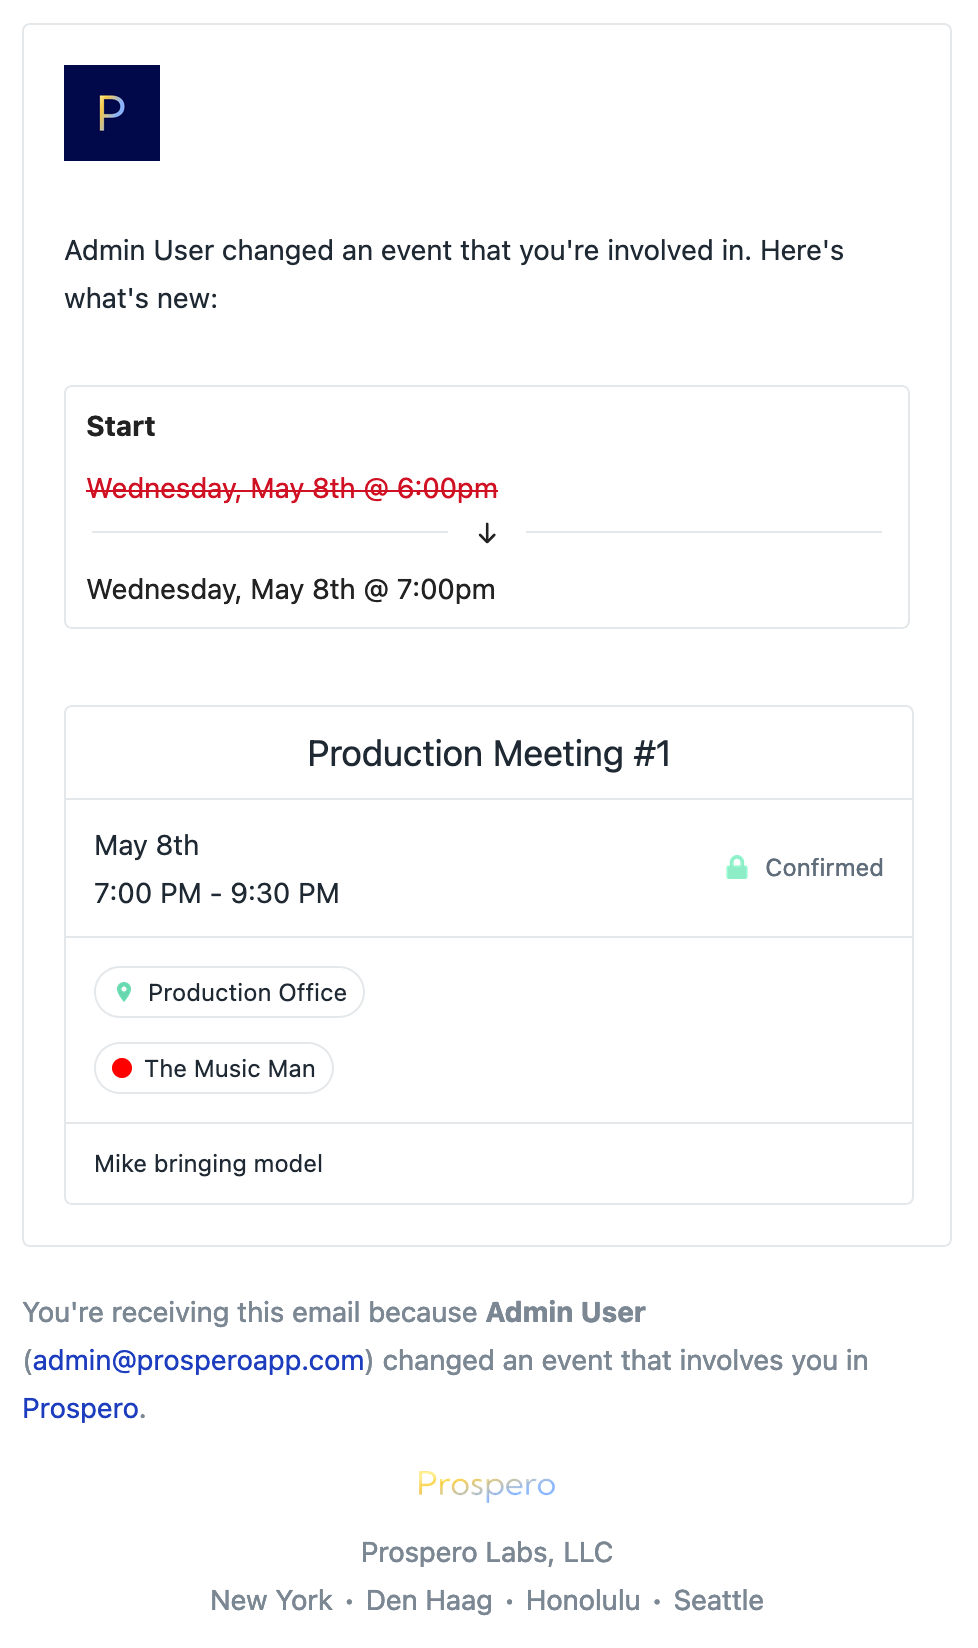
Notifications have arrived in Prospero! Keep your team updated as you make changes to the schedule, broadcast messages to everyone called to an event, and easily share your view links.
- Event Changes - Any time you create, edit, or delete an event via the editor, you can elect to toggle on “Notify Attendees”. You can edit the recipients and see a preview of the email after clicking “Save”. Prospero will intelligently modify the notification based on the recipient and the action you took. For example, if you add someone to an event, that person will receive an email that says they were added to the event, while the remaining recipients will receive an email showing the before & after of the change.
- Event Messages - You can send an email to everyone involved in an event by clicking on the event to open the popup, then … > Share. The recipients will be pre-filled with the people attached to the event. You can edit the recipients, subject, and body of your message.
- Share Views - Any time you have a view selected, click the envelope icon next to the view link in the upper-right of the page to share your view. Edit the recipients, subject, and body of your message (we pre-filled the body with some tips for viewers). The view link will be included below your message.
Every notification will display your organization’s logo in the upper-left corner of the email. If you don’t have a logo set, Prospero’s logo will be used. You can add a logo via Settings > Overview > Logo.
Improvements and fixes
- People can have custom pronouns. Select “Other” in the person editor and a text field will appear for you to enter their pronouns.
- Bulk commands now have keyboard shortcuts: Cmd/Ctrl + M to Move, Cmd/Ctrl + D to Duplicate, Cmd/Ctrl + E to Edit, and Backspace/Delete to Delete.
- All Cmd keyboard shortcuts are also mapped to Ctrl - so you can now Ctrl + Click to select multiple events. Enjoy, Windows users!
Deactivate & Reactivate Users
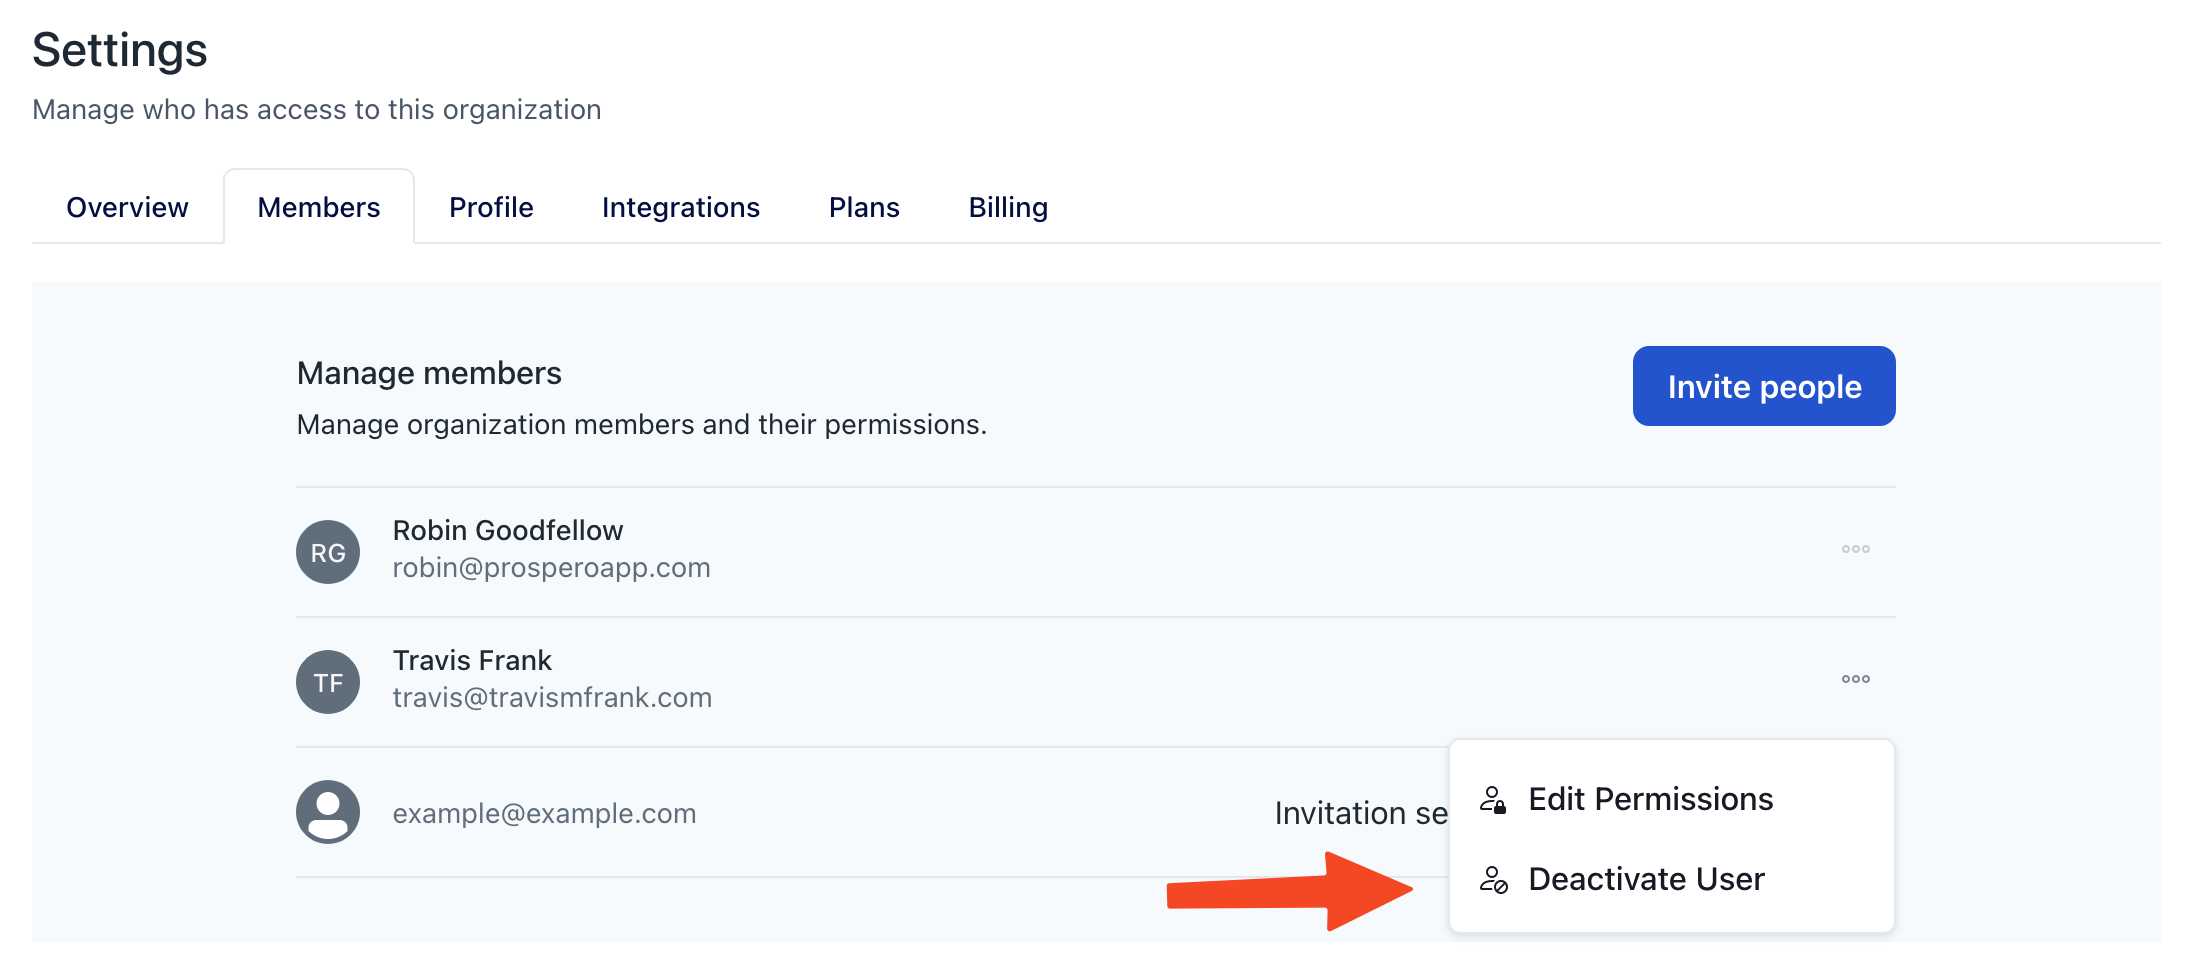
You can now deactivate users via Settings > Members > … > Deactivate. Deactivated users cannot log in and lose access to your organization. You will no longer be billed for their membership starting from the next billing period. You can reactivate a previously deactivated user via Settings > Members > … > Reactivate.
Coupled with Prospero’s recently released Permissions, this is a great way to give access to stage managers or production managers of a specific project. Provision their account with editing permission only for the project they’re involved in, then deactivate their account at the end of the project.
Improvements and fixes
- The top field of each editor (i.e., the title field for events) is auto-focused when you open the editor. Click create and just start typing!
- Fixed a bug where view links would have extra blank horizontal space
- Event end cannot be set before start
Week & Day Layout UI Updates
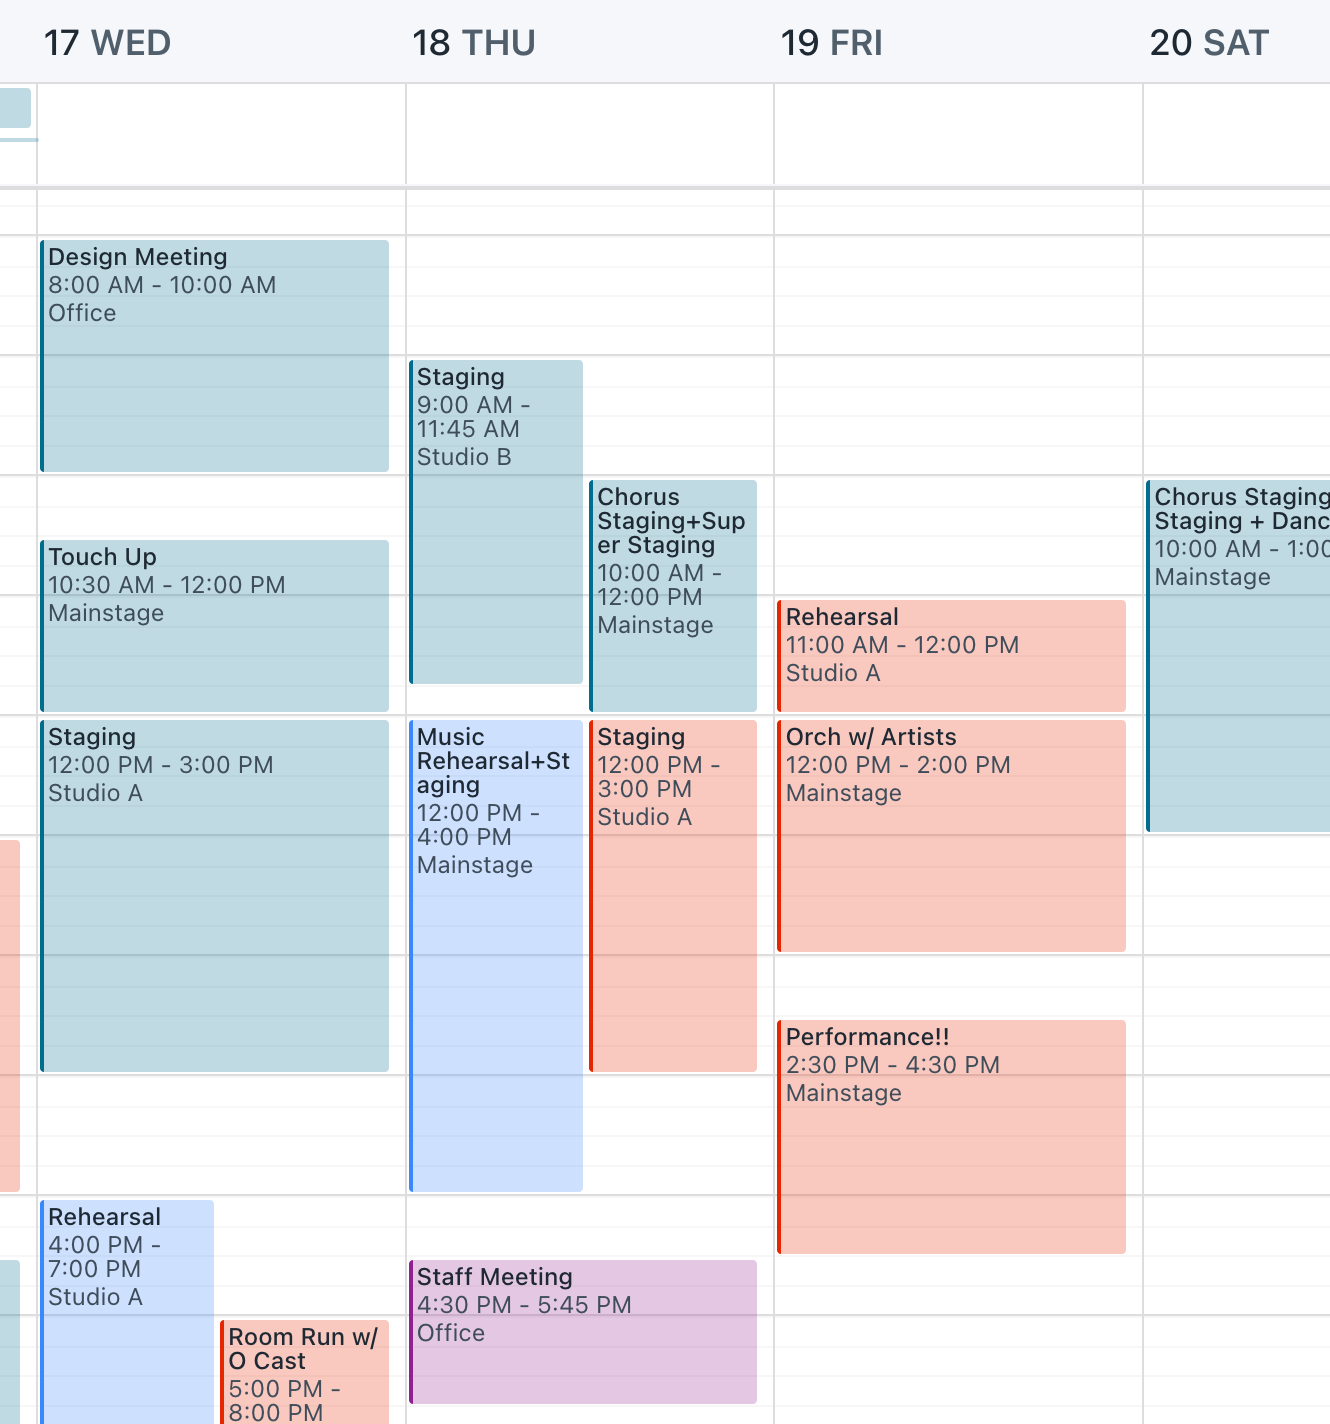
This week’s update includes a suite of improvements to the week & day layouts:
Overlapping event boxes in week & day layouts are now rendered in separate columns within the day (rather than overlapping). This prevents information from being obscured for events that occur at the same time.
Event boxes now have a very small margin, making it much easier to distinguish between back-to-back events of the same project.
Event box backgrounds are now slightly transparent for a more modern aesthetic. 💅
Improvements and fixes
- Fixed a bug where viewers in timezones west of UTC would have view links default to the day before the set start date
- Featured lists are persisted across refreshes and logins
- Cmd + A will now select only events visible on the screen, excluding events that are hidden due to your chosen filters
Editor Permissions
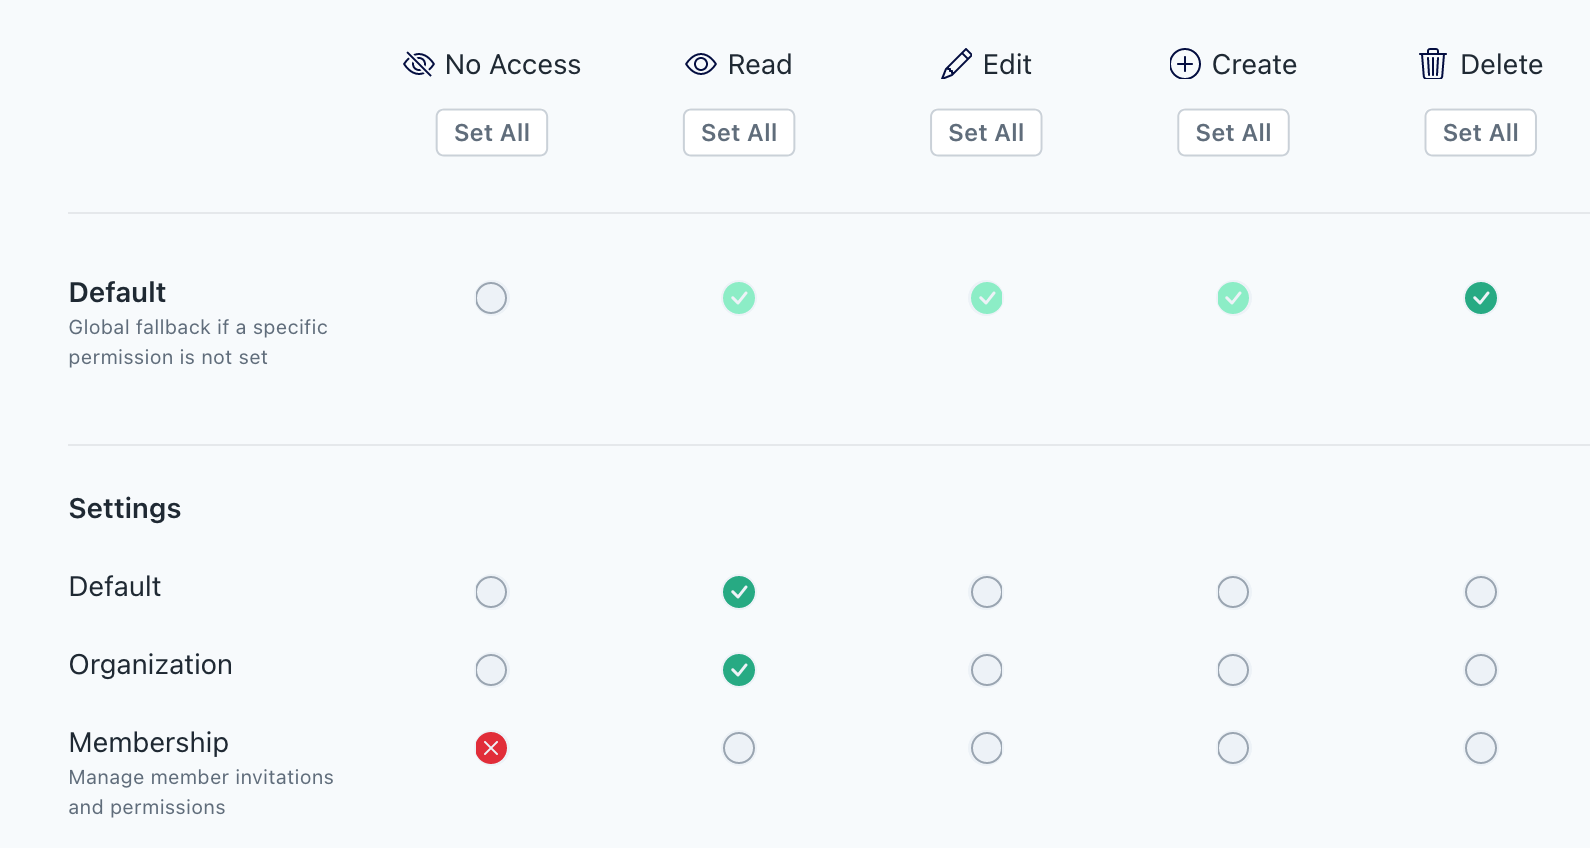
You can now set granular access controls for every part of the Prospero app. Set permissions for a user via Settings > Members > … > Edit Permissions. When inviting new members to your organization, you can select the permissions they will receive once they join the organization. Permissions are presented in a grid. Each row indicates a section of the Prospero app, like “Locations” or “Billing”. Columns represent the permission levels, from least permissive to most permissive.
No Access - Block access to this section of the app.
Read - Allow access to this section of the app, but no action can be taken.
Edit - User can edit existing data already in this section of the app.
Create - User can edit existing data and create new data in this section of the app.
Delete - User has full access to this section of the app: editing, creating, and deleting data.
Under Events, each Project has an access level. Use these to give users access to only the projects that are relevant to them. For example, a stage manager might have Read access by default, and Delete access for the production they’re currently working on.
Search in Dropdown Menus

After opening a dropdown menu, start typing to narrow the list of options. For super speed, use Tab to navigate to a checkbox, Space to (de)select a checkbox, then Shift + Tab to navigate back to the search box. The text is already selected, so you can immediately start typing to keep searching.
Improvements and fixes
- You no longer need to re-login every hour! We tightened security and your access is now maintained for 7 days, so you only have to log in once per week on each browser you use.
- People, Groups, and Tags are now sorted alphabetically (People by last name) in dropdown menus and displays.
- The Event editor always defaults duration to one hour (unless creating an Event by dragging on the calendar).
Bulk Editing
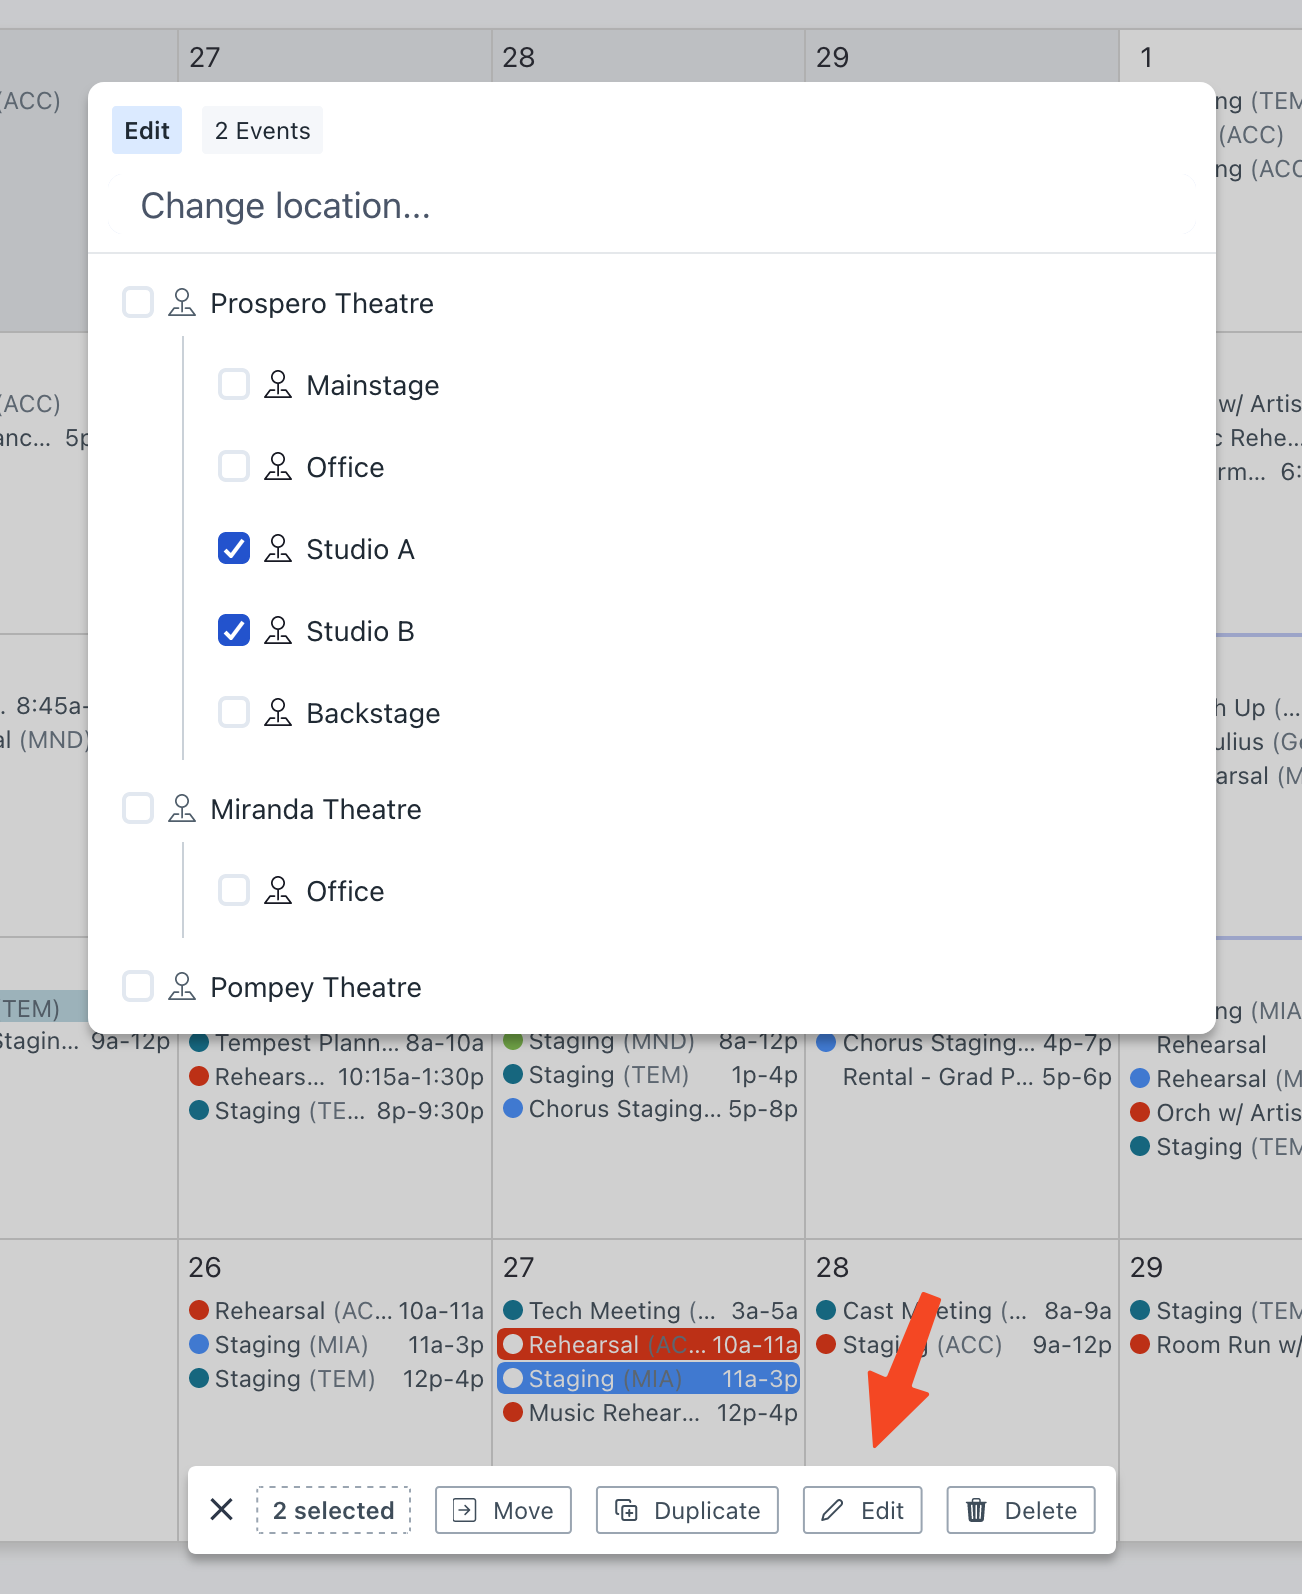
You can now edit Event properties in bulk from any layout. Select Events (Cmd/Shift + Left Click or Cmd + A to select all), then select Edit from the menu at the bottom of the screen. Choose the property you’d like to edit- type to narrow the list of available options. Options vary based on the nature of the property you’re editing.
For times, you can type the same time interval options from bulk move & duplicate into the menu. For example, “1 hour later.” For text fields, type the new content of the field. For associated properties (Locations, People, etc.), type to narrow the list of available options.
Improvements and fixes
- Cmd + A selects all Events visible on screen in any calendar layout
- Chosen Split By options in day layout are persisted across refreshes and logins
- List layout always starts with dates selected
Mass Move, Duplicate, & Delete
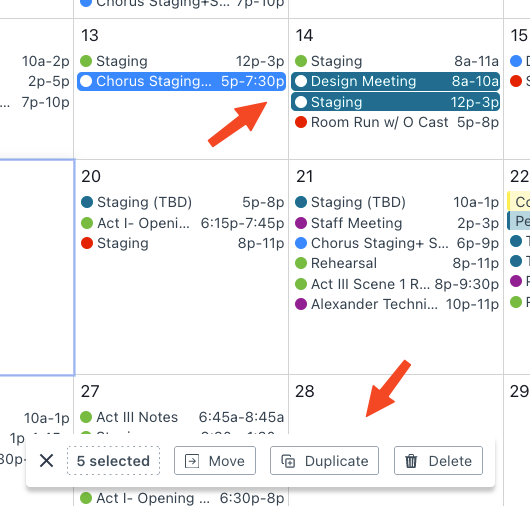
You can now move, duplicate, & delete Events in bulk from any layout. Select Events by holding CMD or SHIFT and left-clicking on an Event. Use the menu at the bottom of the screen to choose an action. When moving or duplicating Events, you can select a default option, or type a date or time interval into the menu. For example, “Feb 21” or “3 hours later” or “3/12/26."
View Link Format Customization
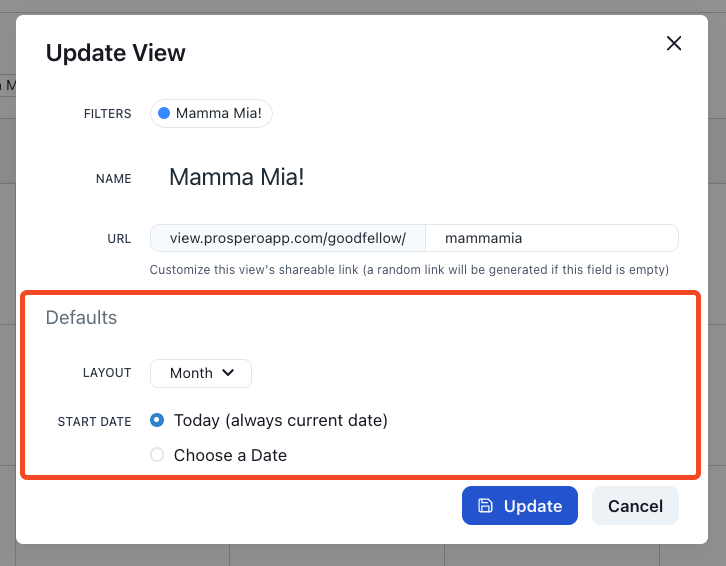
You can now set default layout & format options on your View links. When saving a View link, select which layout (month, week, day, or list) you would like displayed by default. Choose what day you want the link to start on. “Today” is always today, whenever the viewer views the link. To change the default format options, open the Format menu and make your adjustments. Click Set as View defaults at the bottom of the format menu to save your defaults.
Mobile & Desktop App
You can now install Prospero as an app on your mobile or desktop device! Instructions vary based on your browser and operating system. To start, open Prospero in your browser. On iOS, select Share > Add to Home Screen. On Android, select … > Install App (or Add to Home Screen). On desktop, Chrome & Edge display an install icon in the top-right of your browser, near the “Favorite” button. The app works identically to the version on the web. We’re looking forward to bringing push notifications and other native features to the app soon!
Improvements and fixes
- Events in the month layout don’t have unnecessary scrollbars
- Fixed a bug where the filter “+” button would occasionally not work
- Column dividers are fully drawn in list layout
Featured Lists
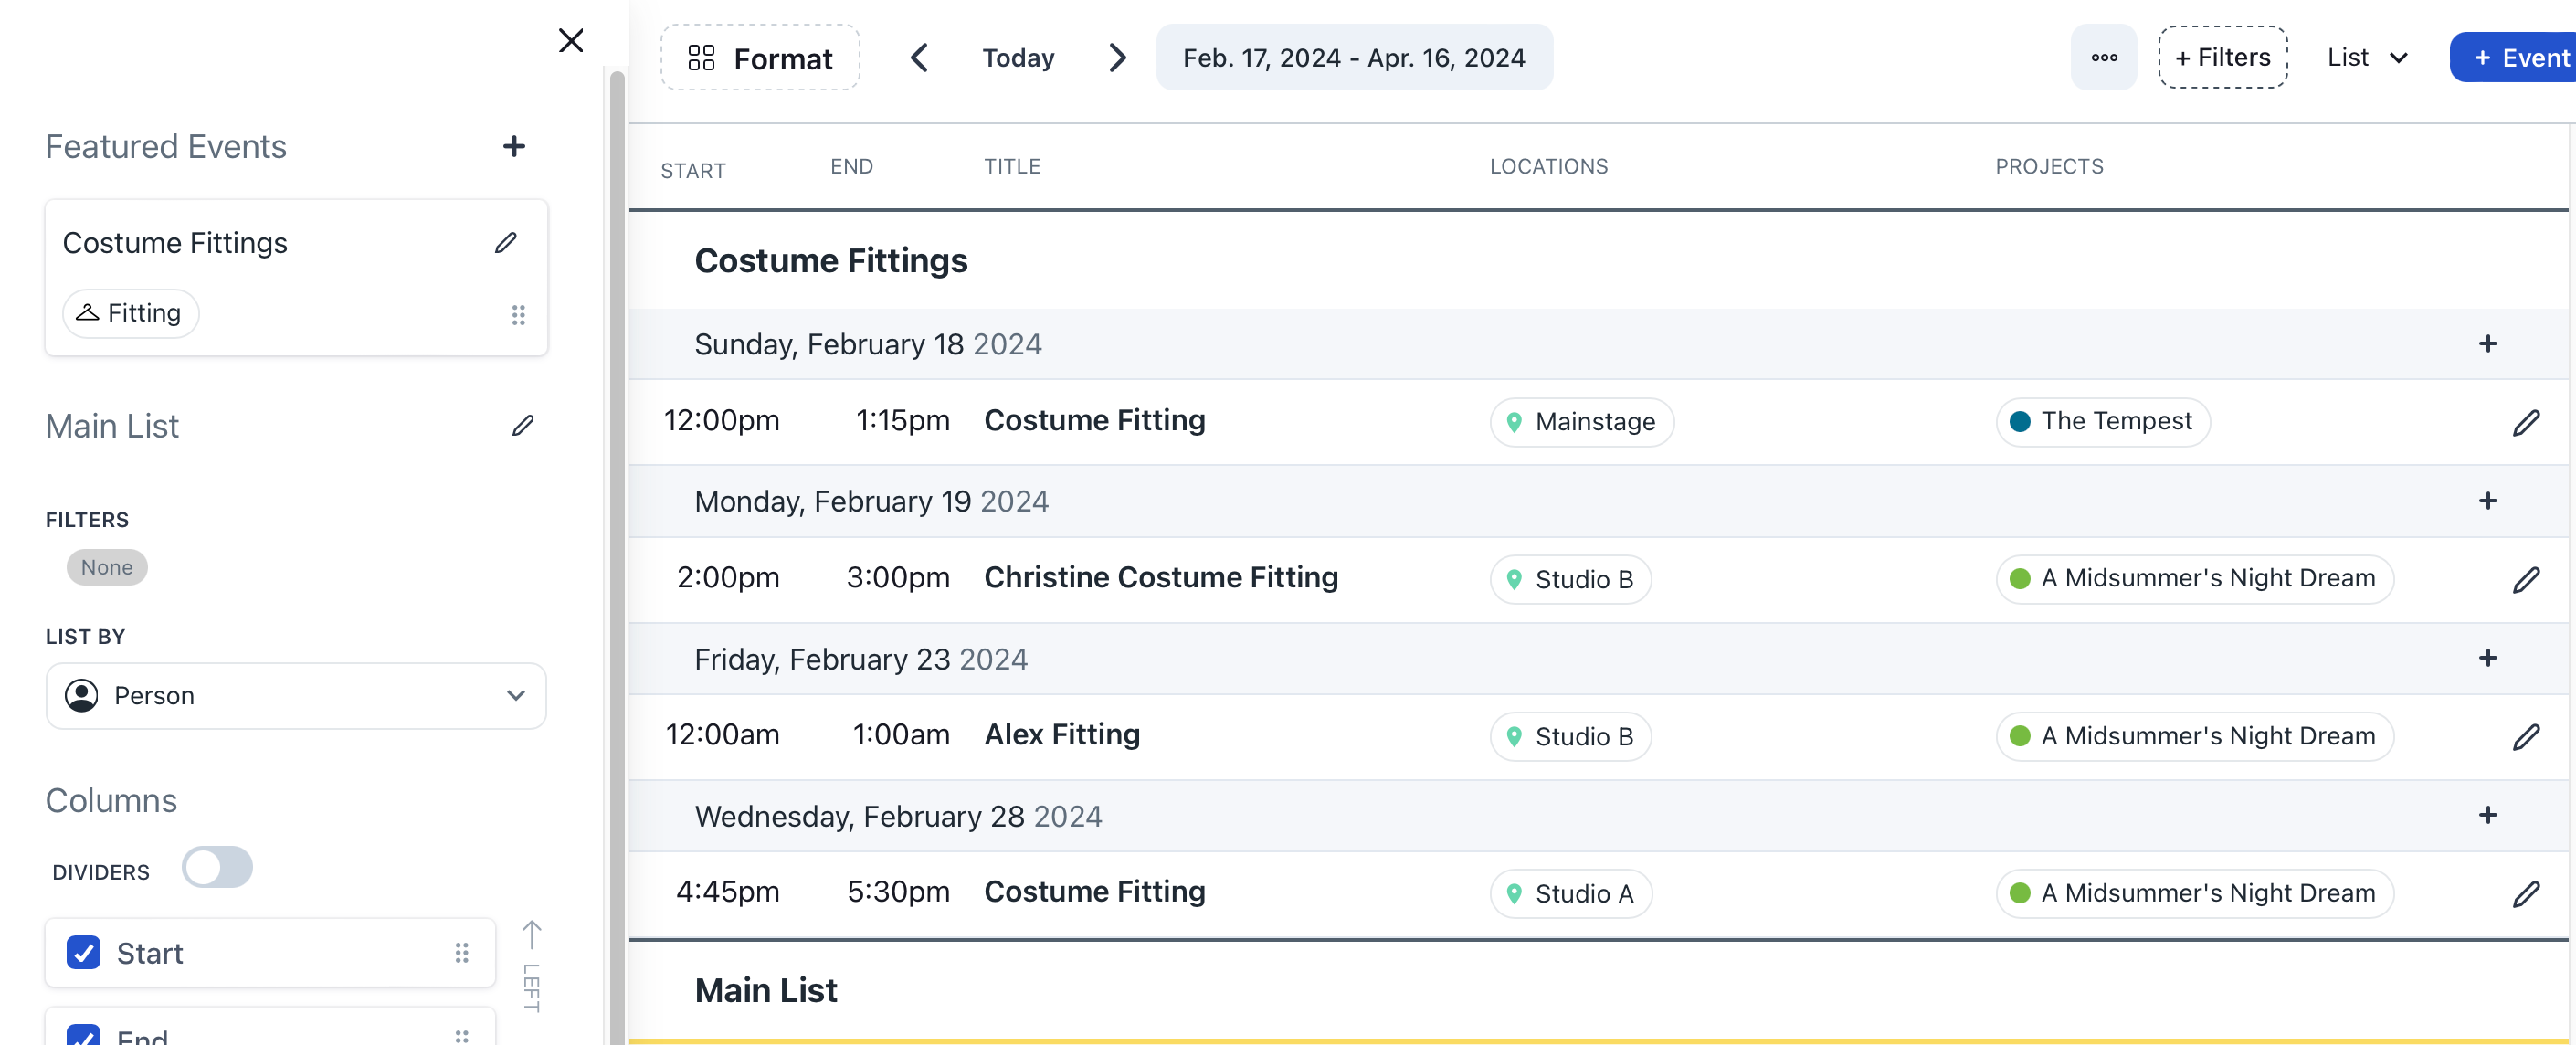
You can create lists of featured Events to display at the top of the list layout - great for fittings, crew calls, or highlighting specific Events in the list. Create featured lists in list layout via Format > Featured Lists > +. Name your list, choose the filters you want to use to narrow your Events, and decide if you want these Events to appear in the main list. You can re-arrange the order of featured lists with the “draggable” area on each list. By default, the main list is titled “Main List” when featured lists are present. You can rename the main list with the pencil button in the format menu.
Improvements and fixes
- Pre-filled fields in Event Editor. When you create a new Event while you have filters selected, those categories are now pre-filled in the Event editor
Week Start on Monday
You can now adjust the month & week layouts to start the week on Monday! Use the format menu to choose your preferred starting day: Sunday or Monday.
Project Abbreviations
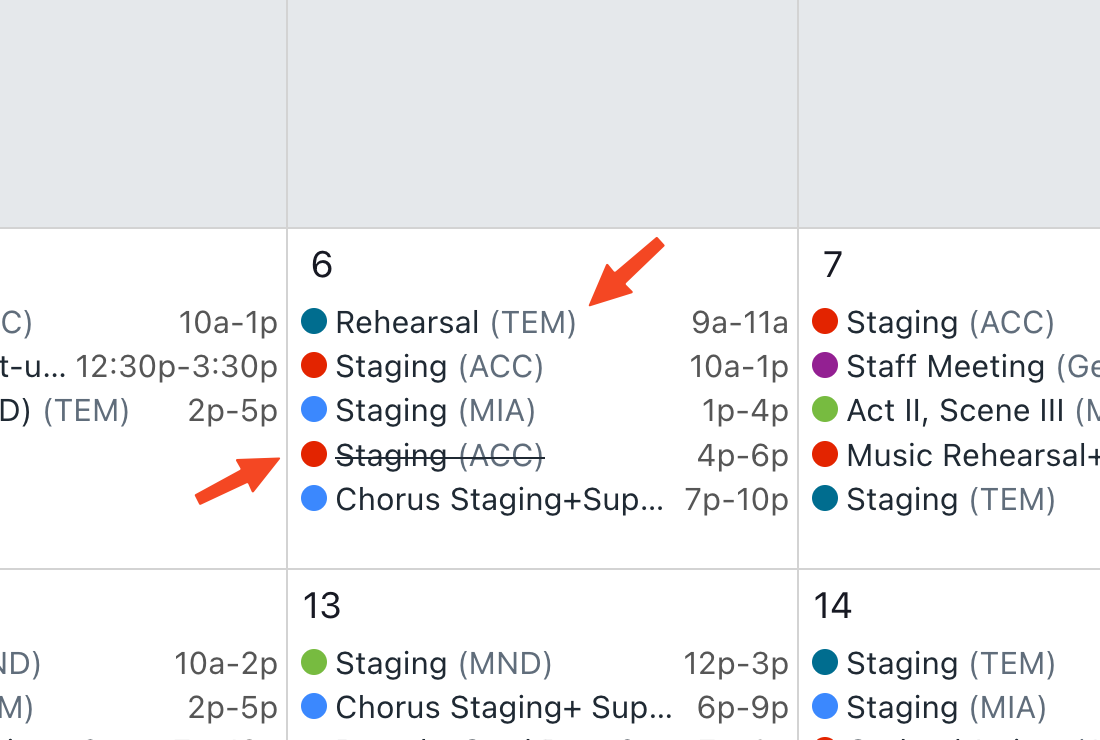
Added a new “Abbreviation” field to Projects. In month, week, and day layouts, you can opt to have the Project abbreviation displayed next to Event titles. This is a great way to accommodate those with colorblindness or tell projects with similar colors apart.
Improvements and fixes
- The error screen now prompts you to submit feedback to the team so we can better track down and squish any pesky bugs
- Canceled Events have their title ~~struckthrough~~ to make their status as obvious as possible
- Project key dates are properly sorted by date wherever they appear
- Split by People allows you to select People from the “+ Add Person” menu
- Week & day layouts display the correct start & end times in the Event boxes based on your selected timezone
TV Mode
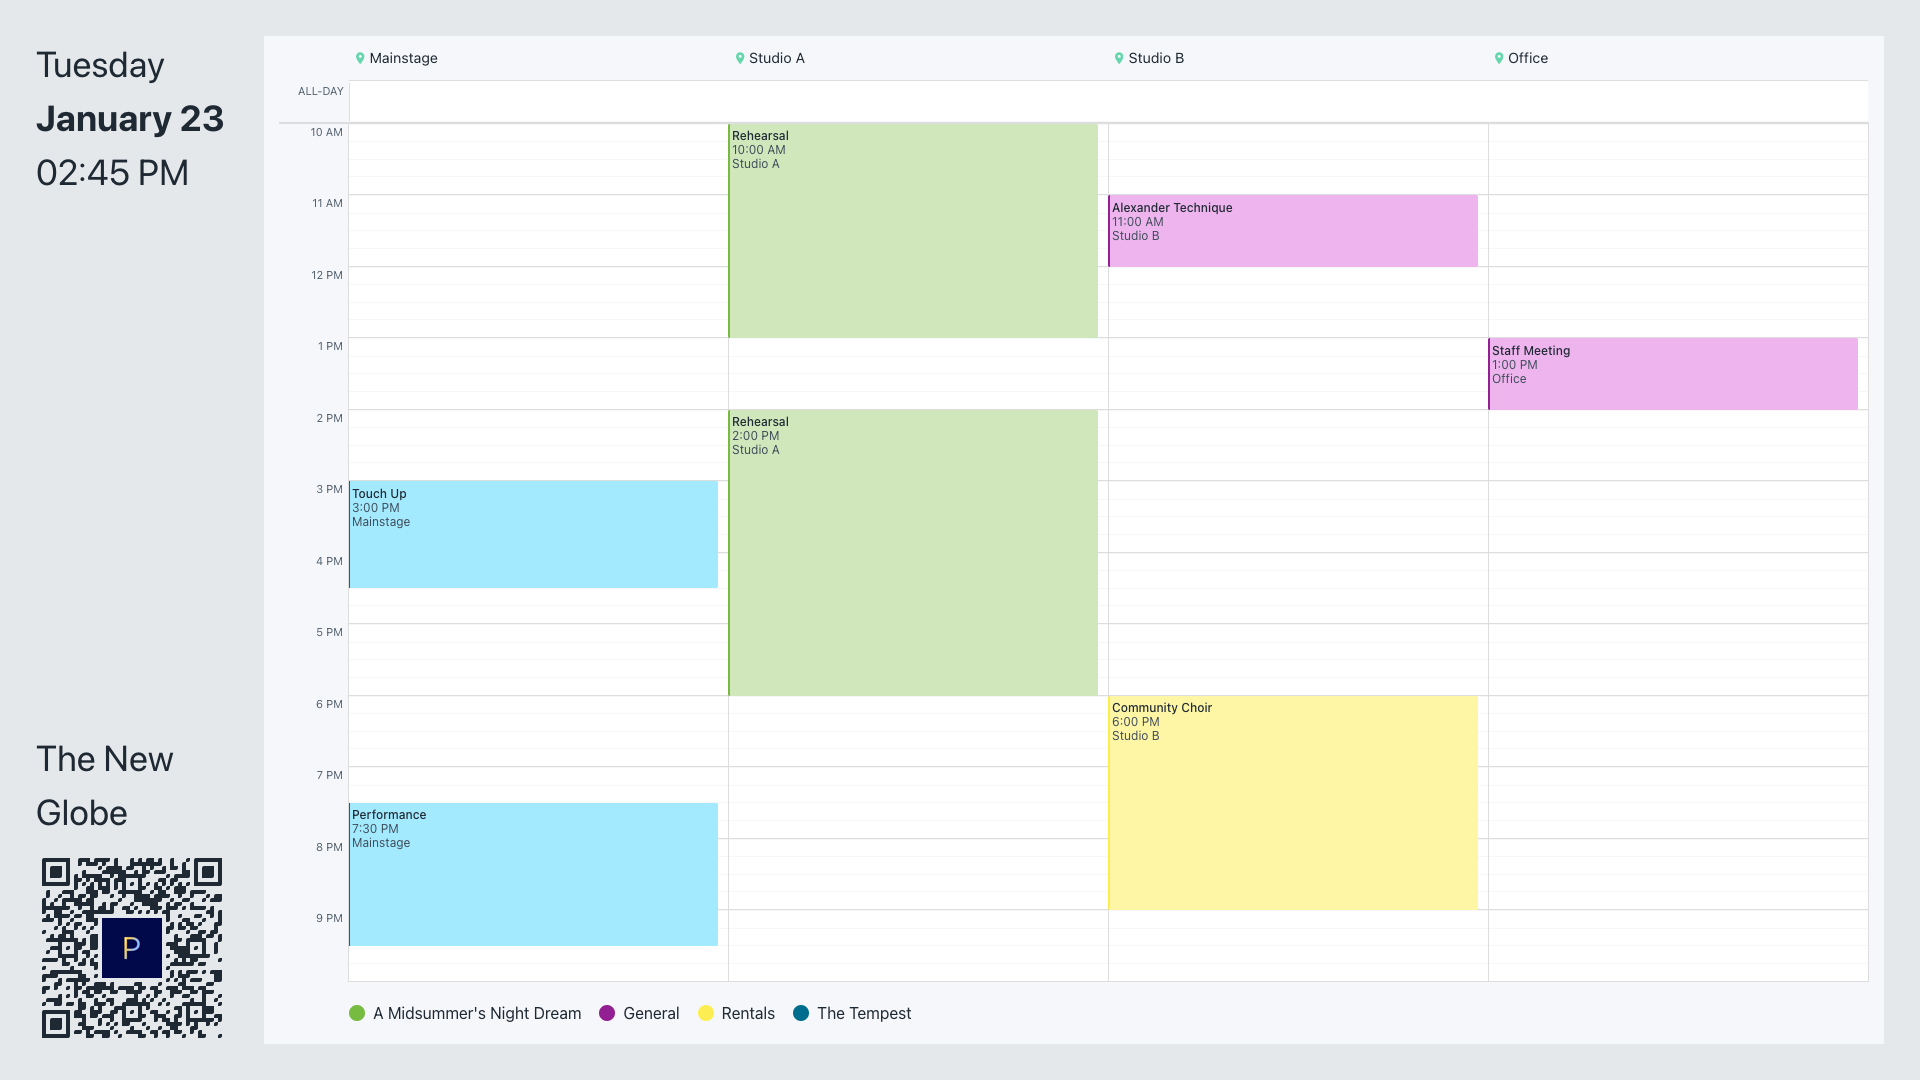
Introducing Prospero’s TV mode, purpose-built for displaying your schedule in lobbies, hallways, and offices. Turn on TV mode in any calendar layout via … > TV Mode. Your organization name & logo are displayed in the bottom-left. Change your organization name & logo in Settings > Overview. Entering TV mode while in a View will instead display the View name and a QR code linking to the View link. Give staff and actors the power to view the schedule on the go!
Day Split By & Format Options
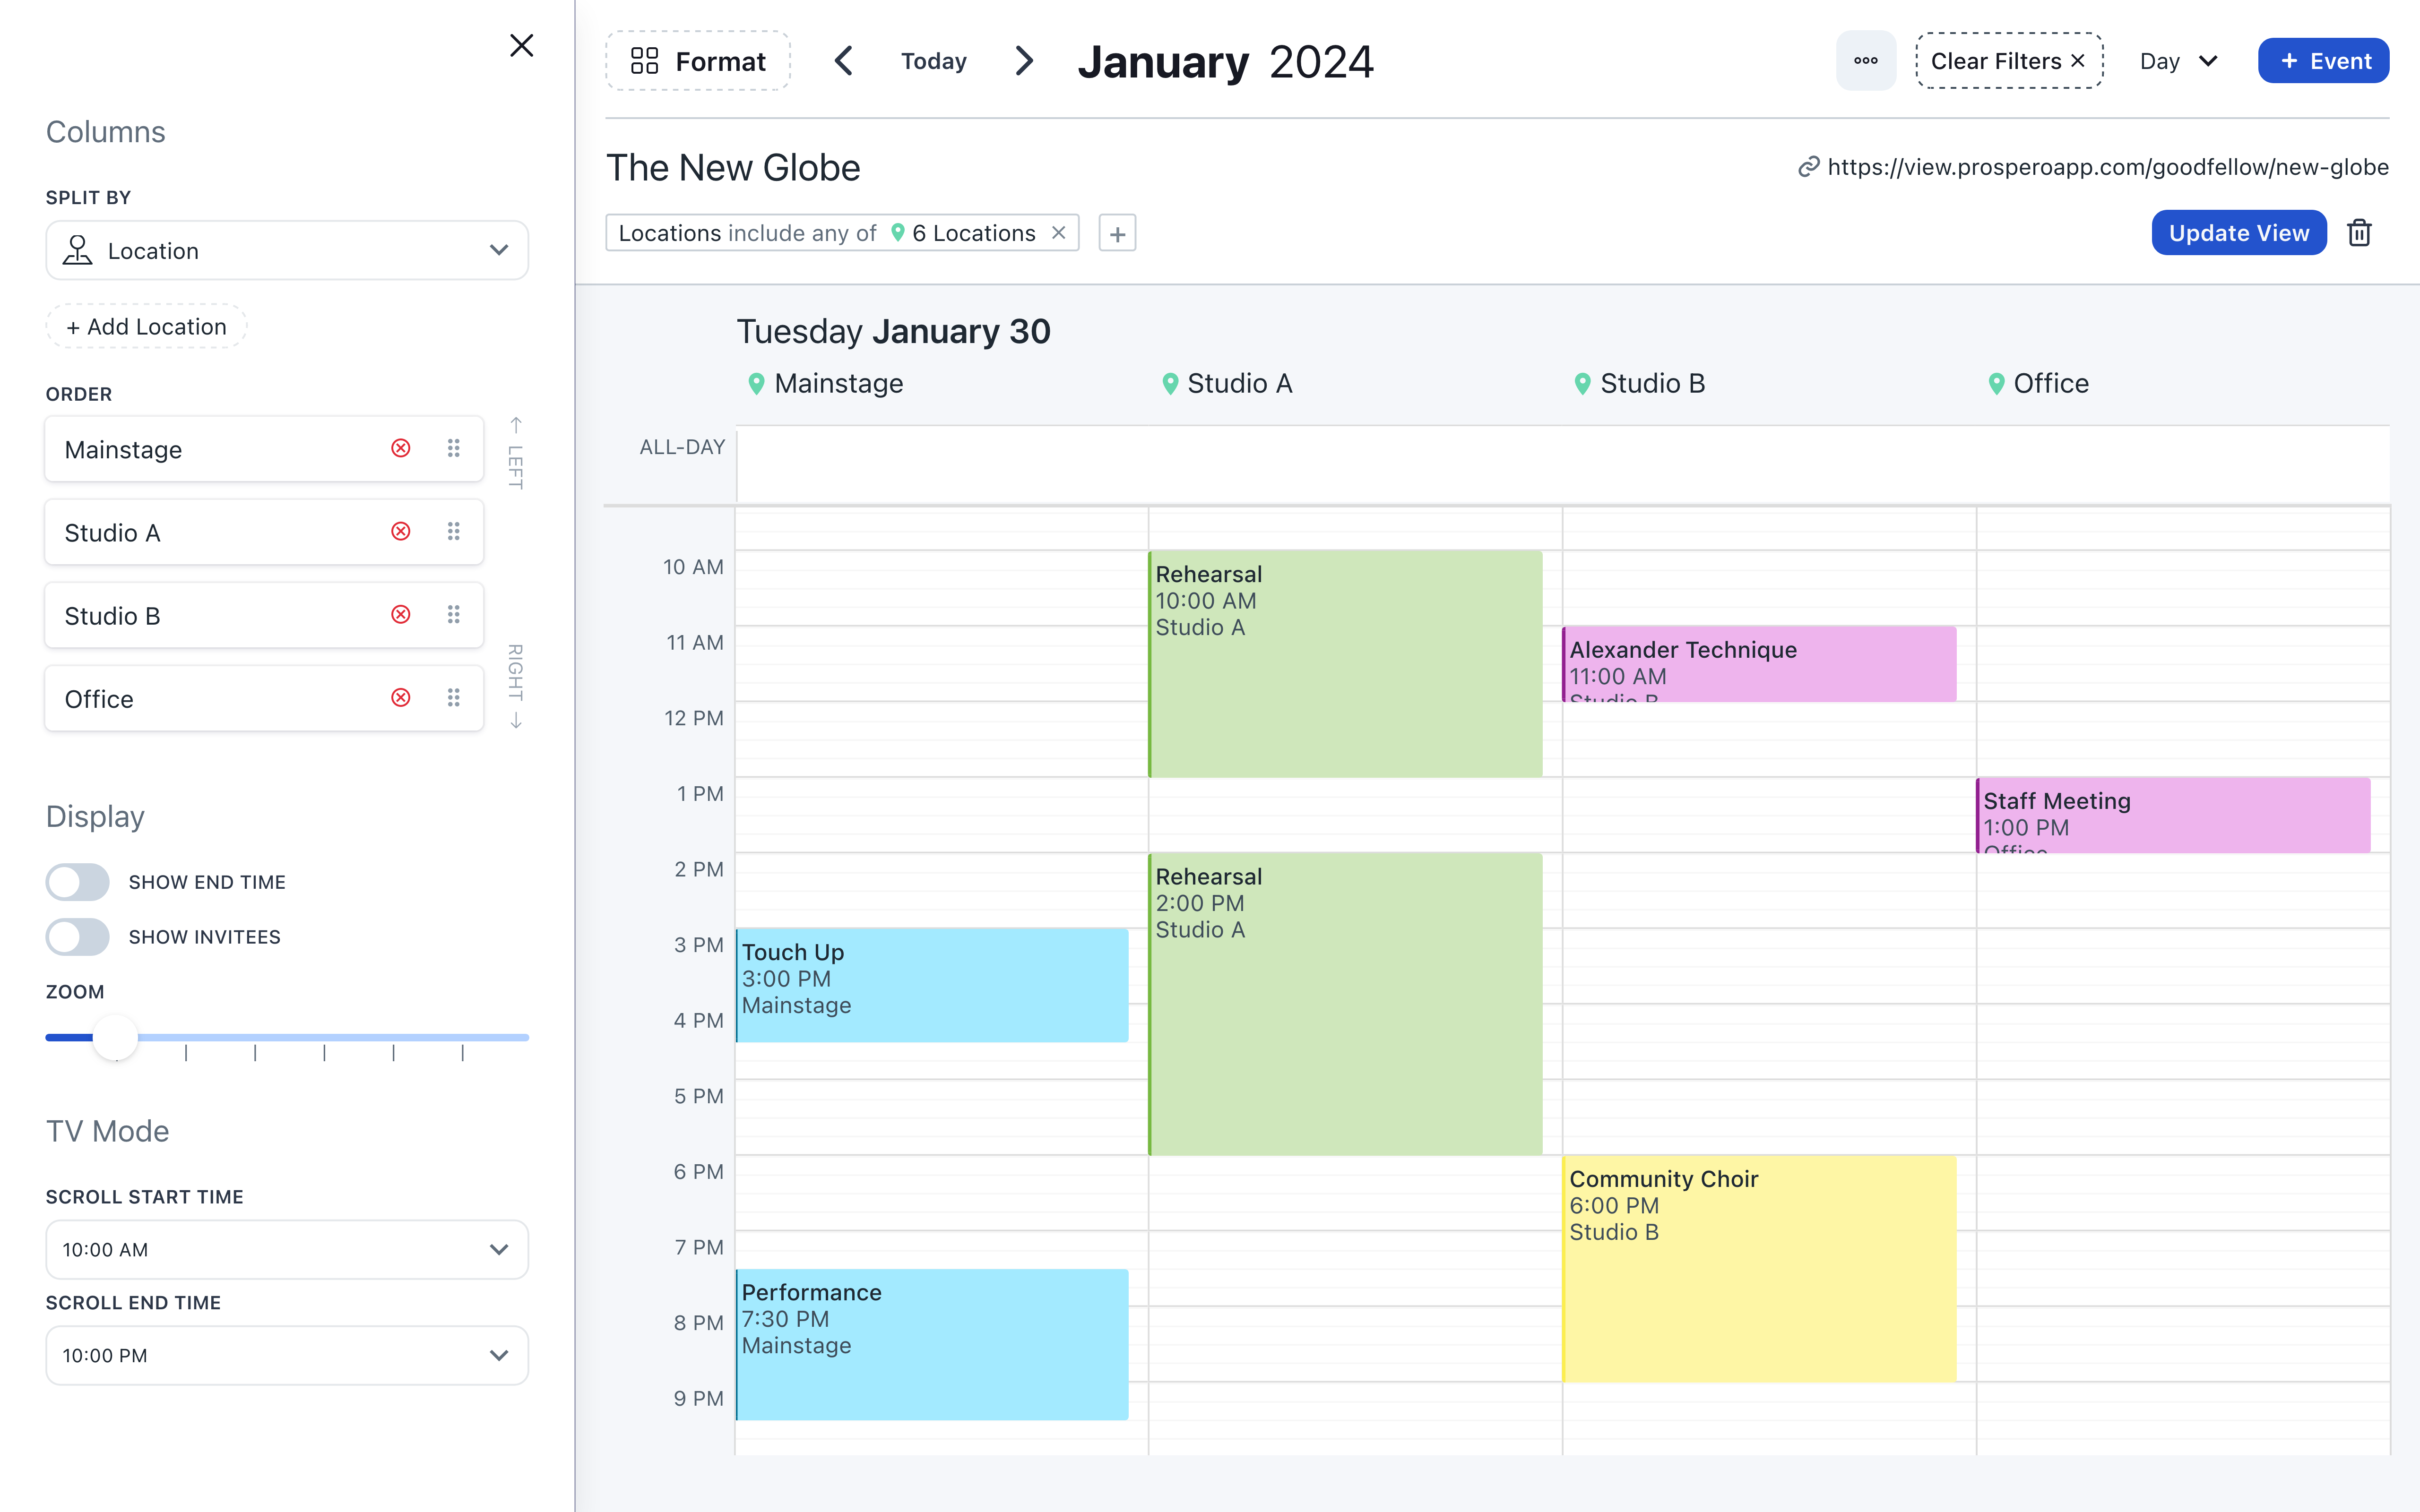
You can now split the day layout into columns based on any detail, like Location, Project, or Tag. Perfect for seeing what’s happening in each space of your venue. Select how you’d like to split the layout via Format > Split By. Choose the specific columns with the + Add button. Drag-n-drop columns to choose the order they’re displayed in. Via Format > Display, customize what’s displayed in the Event boxes on the layout. You can choose to display the Event end time and/or attendees. Adjust the zoom level of the layout with the slider. Adjust the scrolling behavior of TV mode to start & stop at a specific time of day via Format > TV Mode.
Improvements and fixes
- The app no longer freezes when manually entering the year in the time window
- View list layout displays Events as expected
List Events by Category
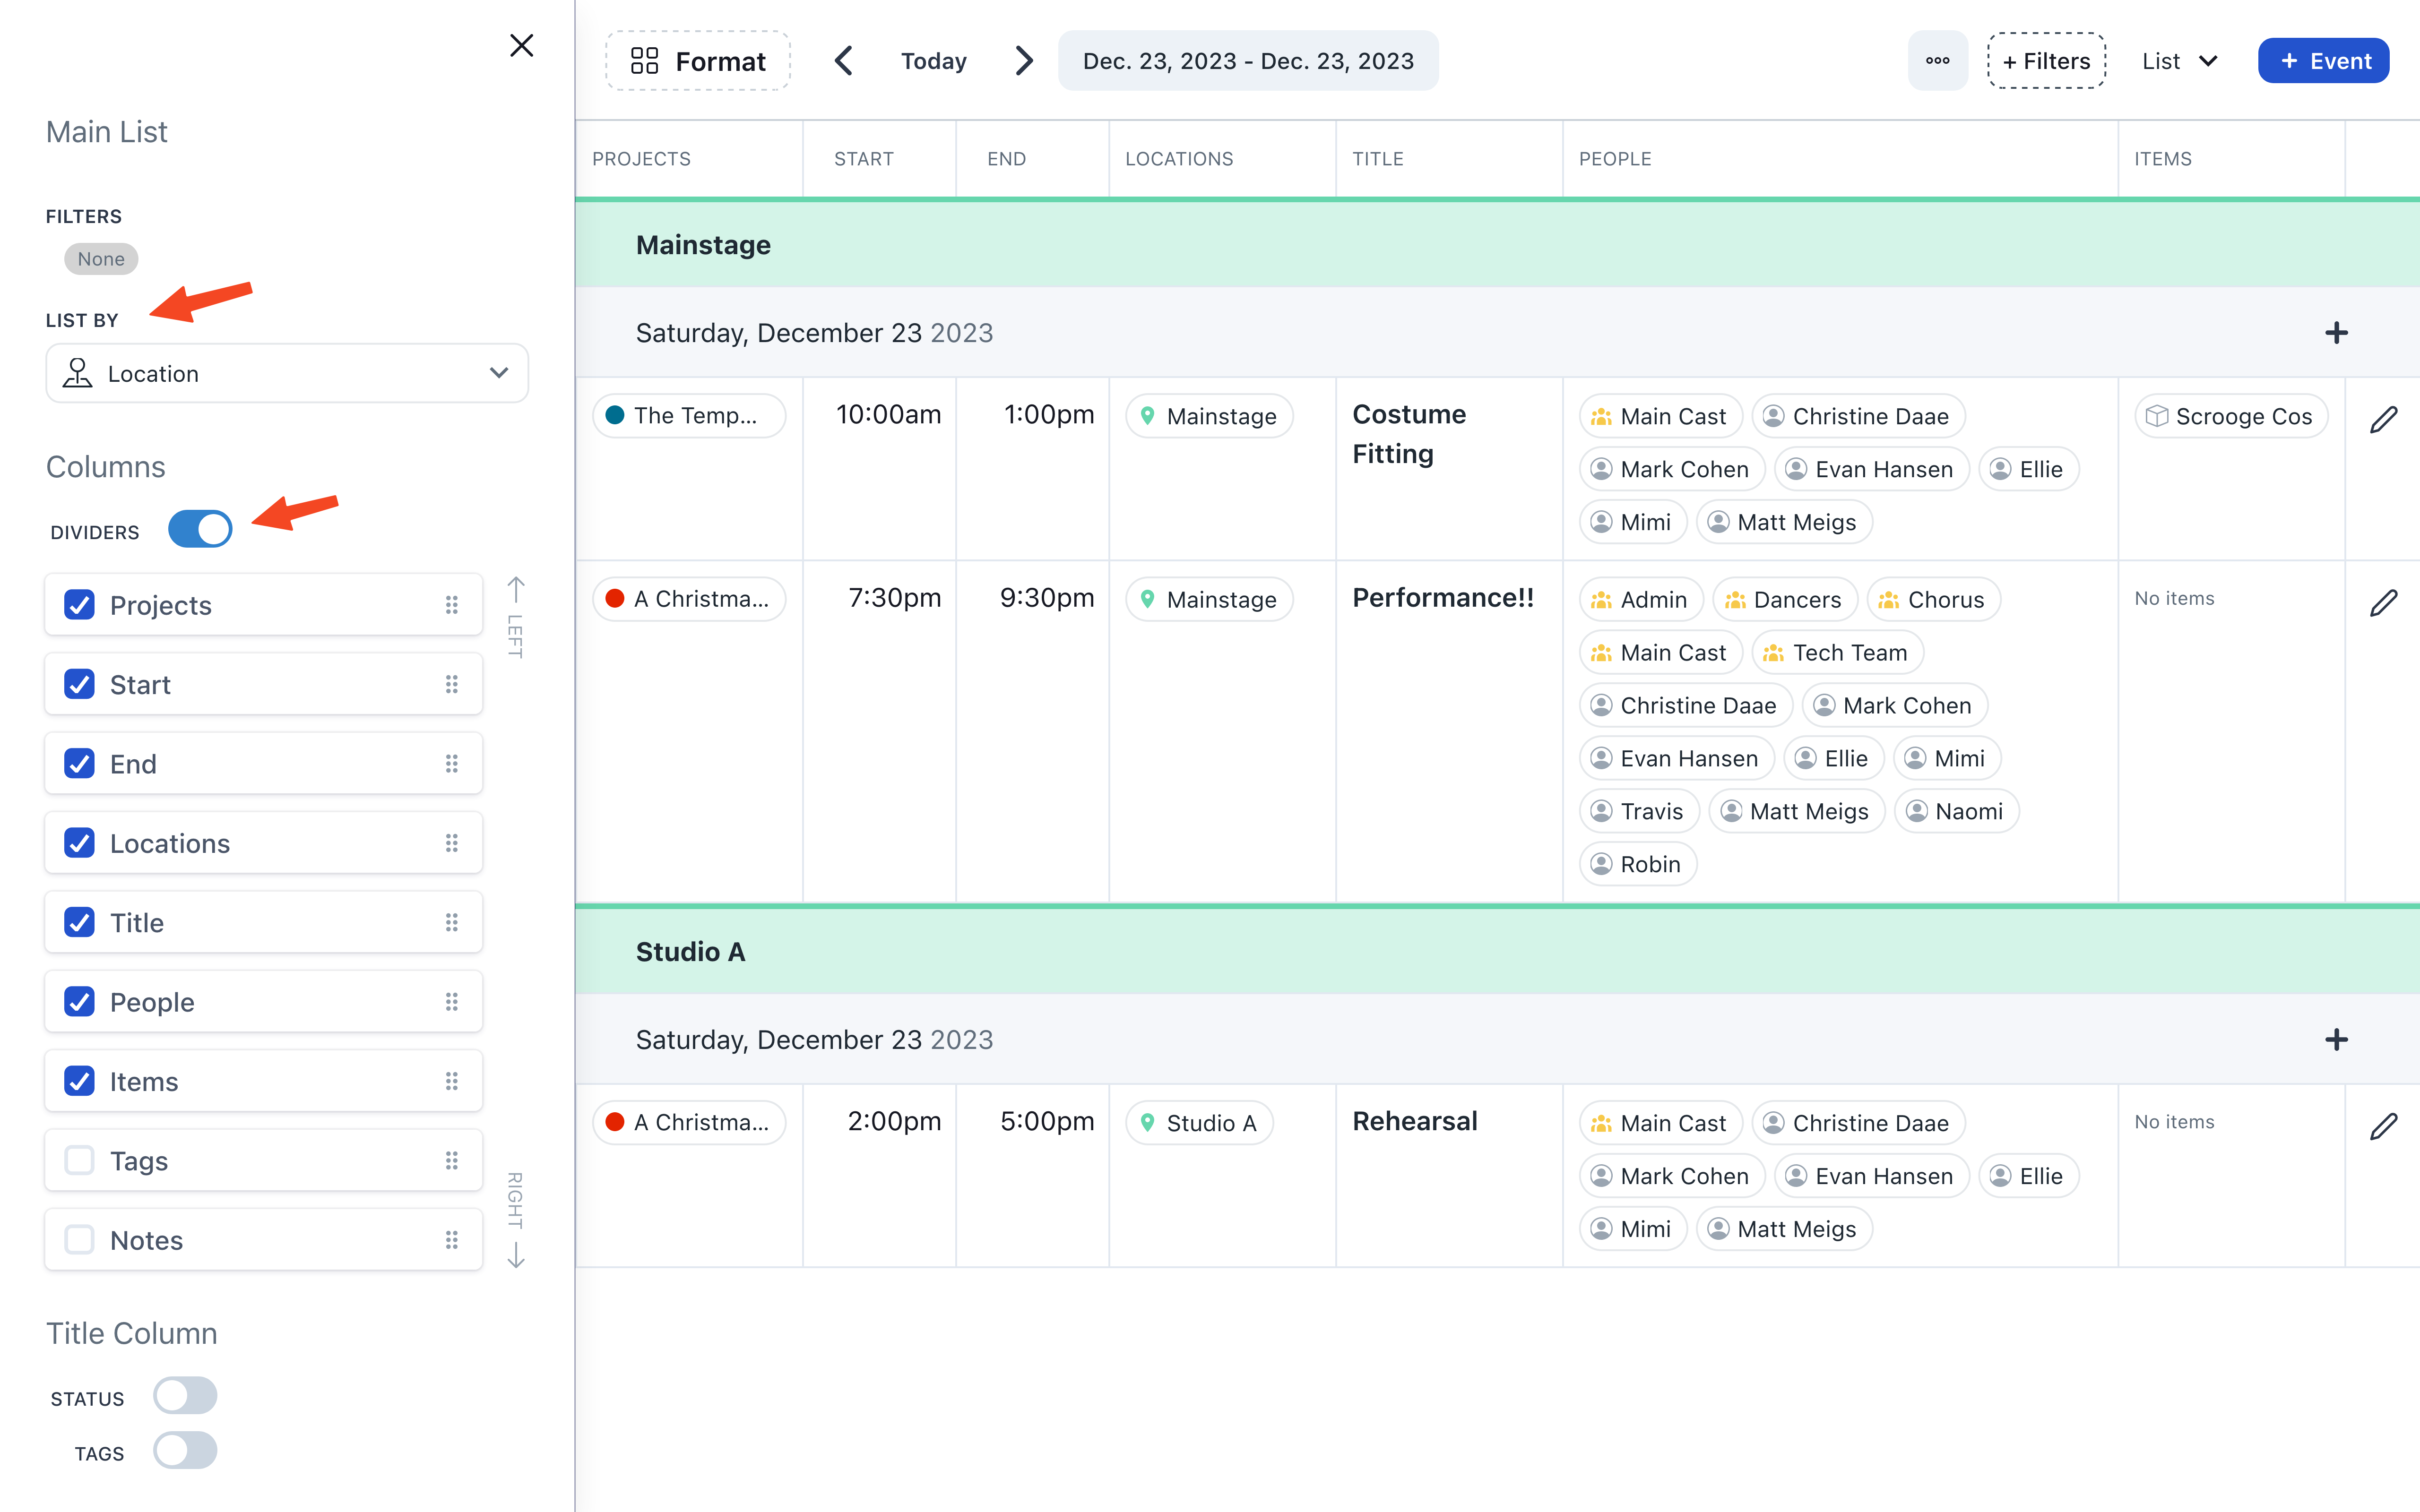
By default, Prospero lists your Events in one list. Sometimes, you want a few lists stacked on top of each other, like lists for the Events in each Location or each Project. Use Format > List By to group your Events by any category. Events may appear more than once if they belong to multiple lists.
List Dividers
If Excel is your aesthetic, we’ve got you covered. You can now choose to display dividers between your columns via Format > Dividers.
Improvements and fixes
- Tags & Collections are now fully displayed in list layout
- People names are legible once more when a conflict is detected
- The time window in list layout is now consistent with the date on the calendar header
- Navigating away and back to list layout no longer changes the time window
- Clearing tutorial data now correctly deletes Inventory and Tags
List Format Options
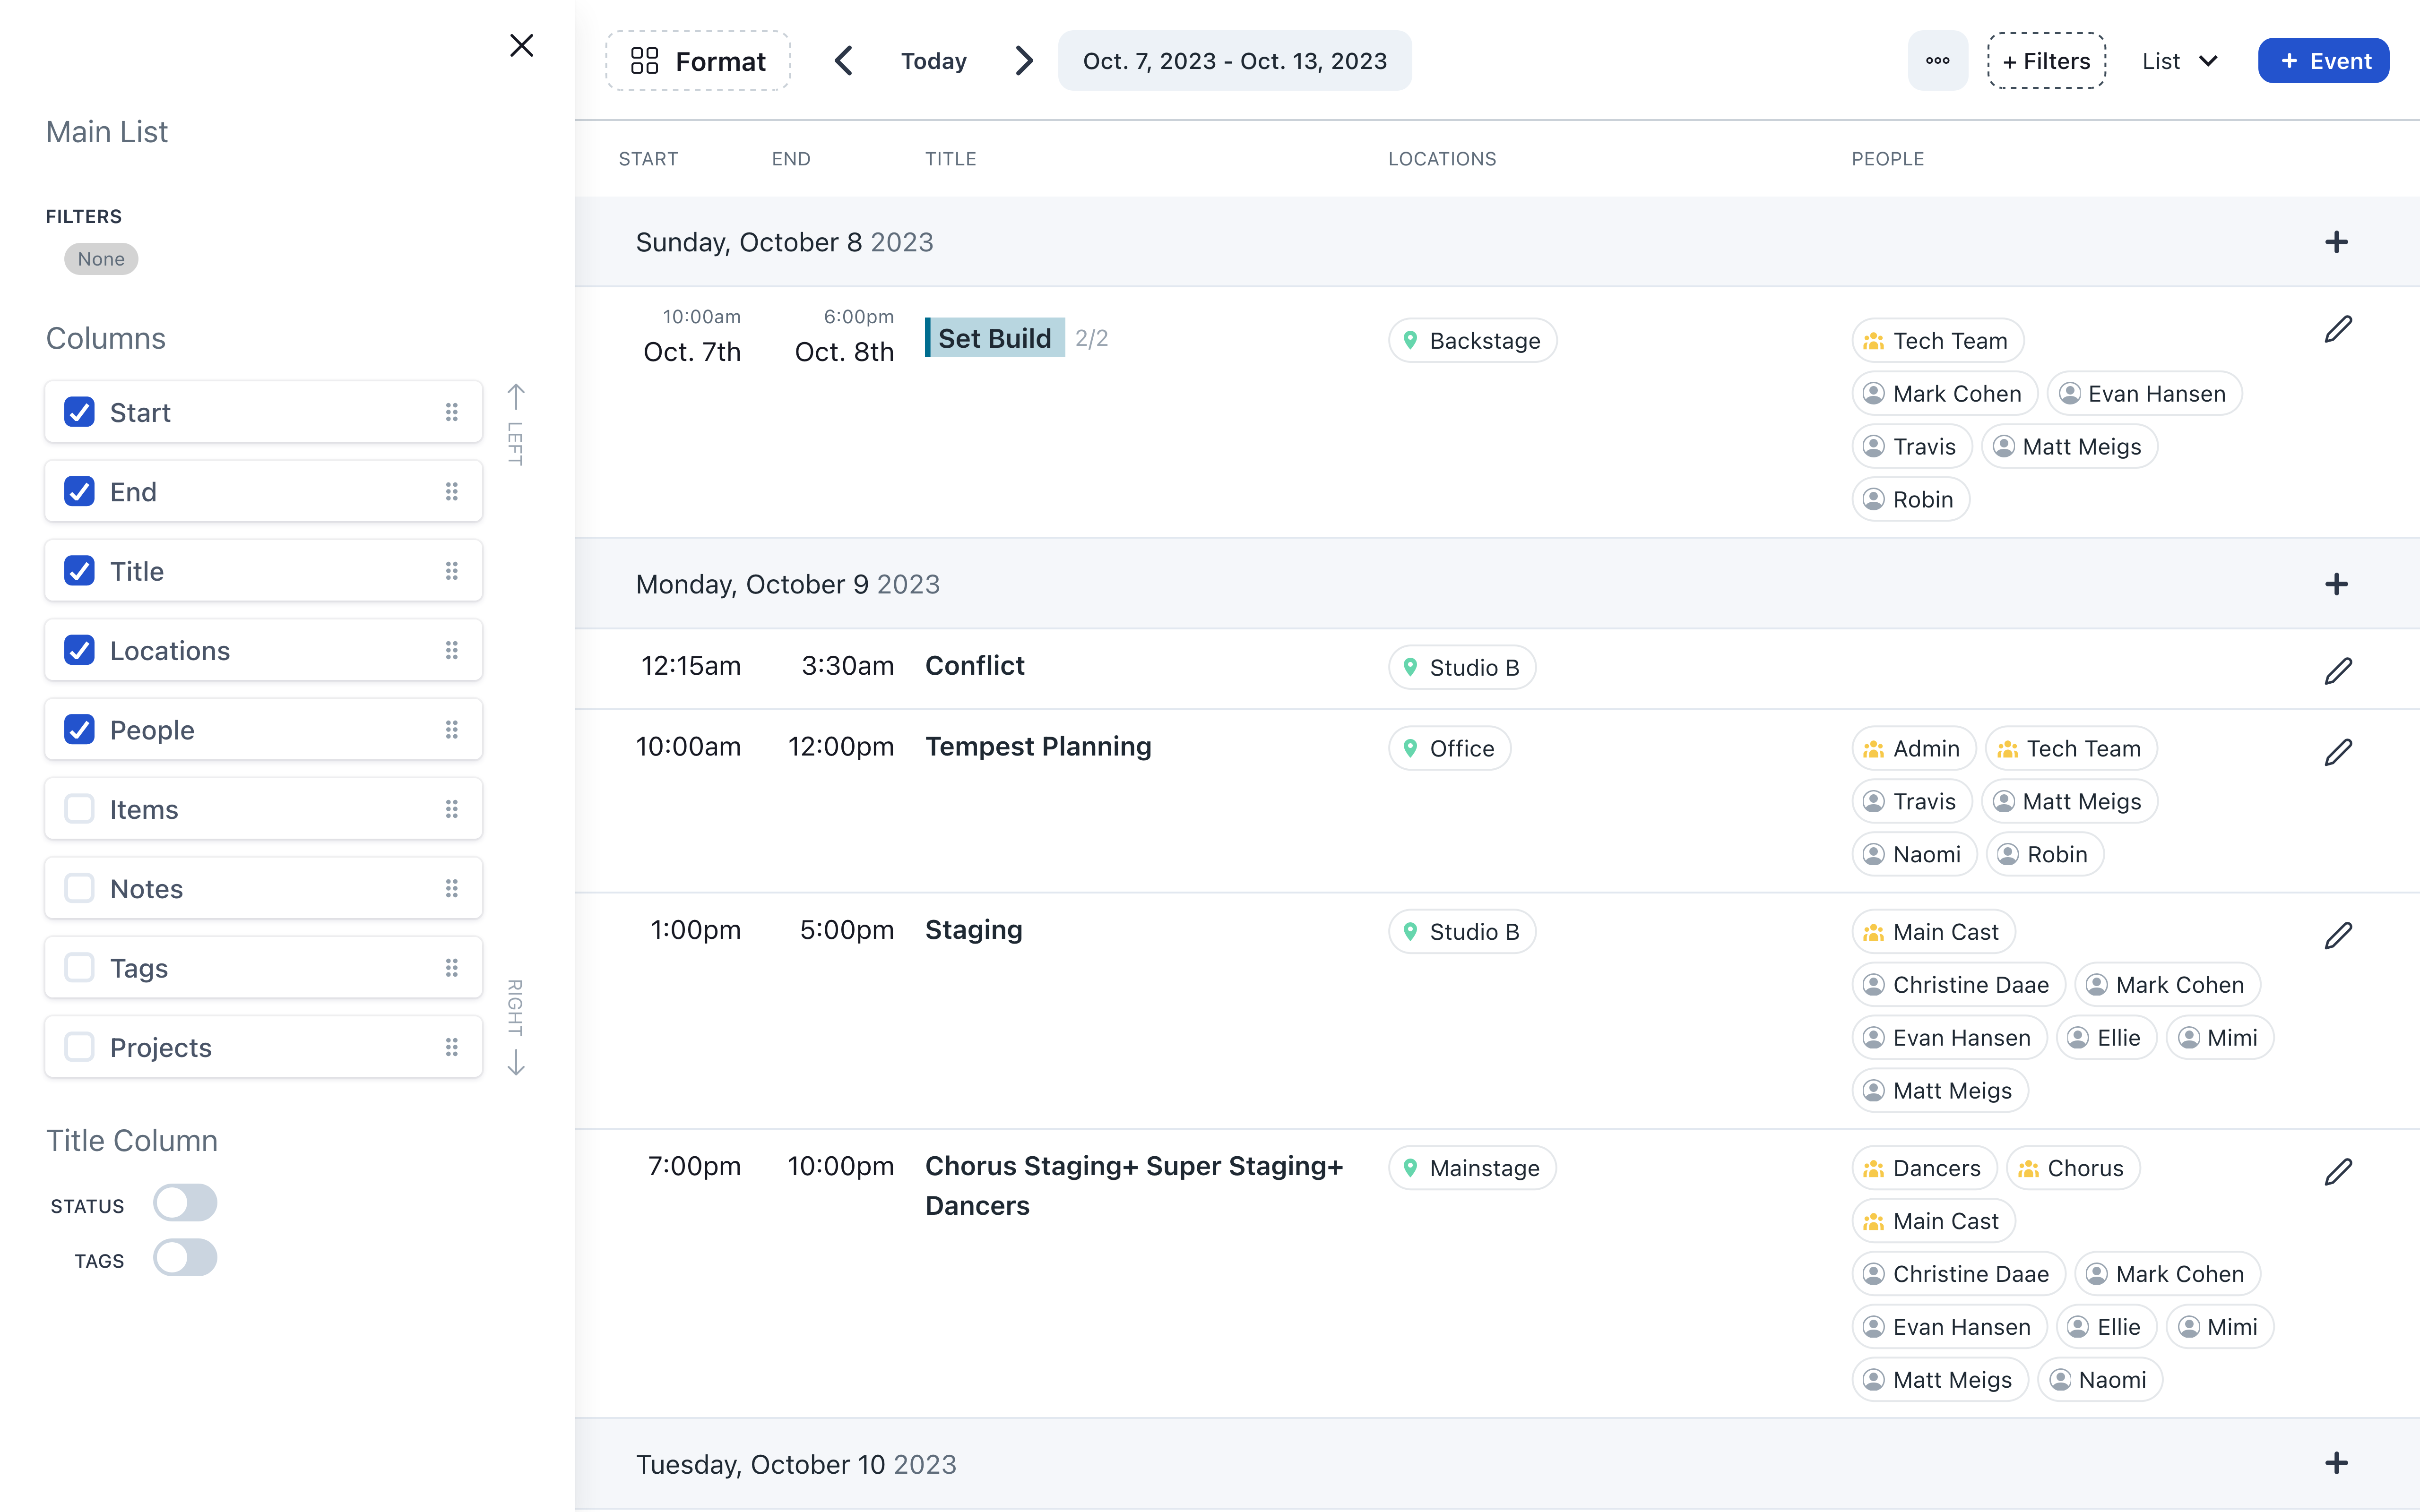
You can now design your own list layout! Open the format menu with the button in the upper-left in list layout. Choose which columns you want displayed in the list. Drag-n-drop columns to shift the order they’re displayed in. Select the option to display Event statuses and tags below the title of the Event.
List Export
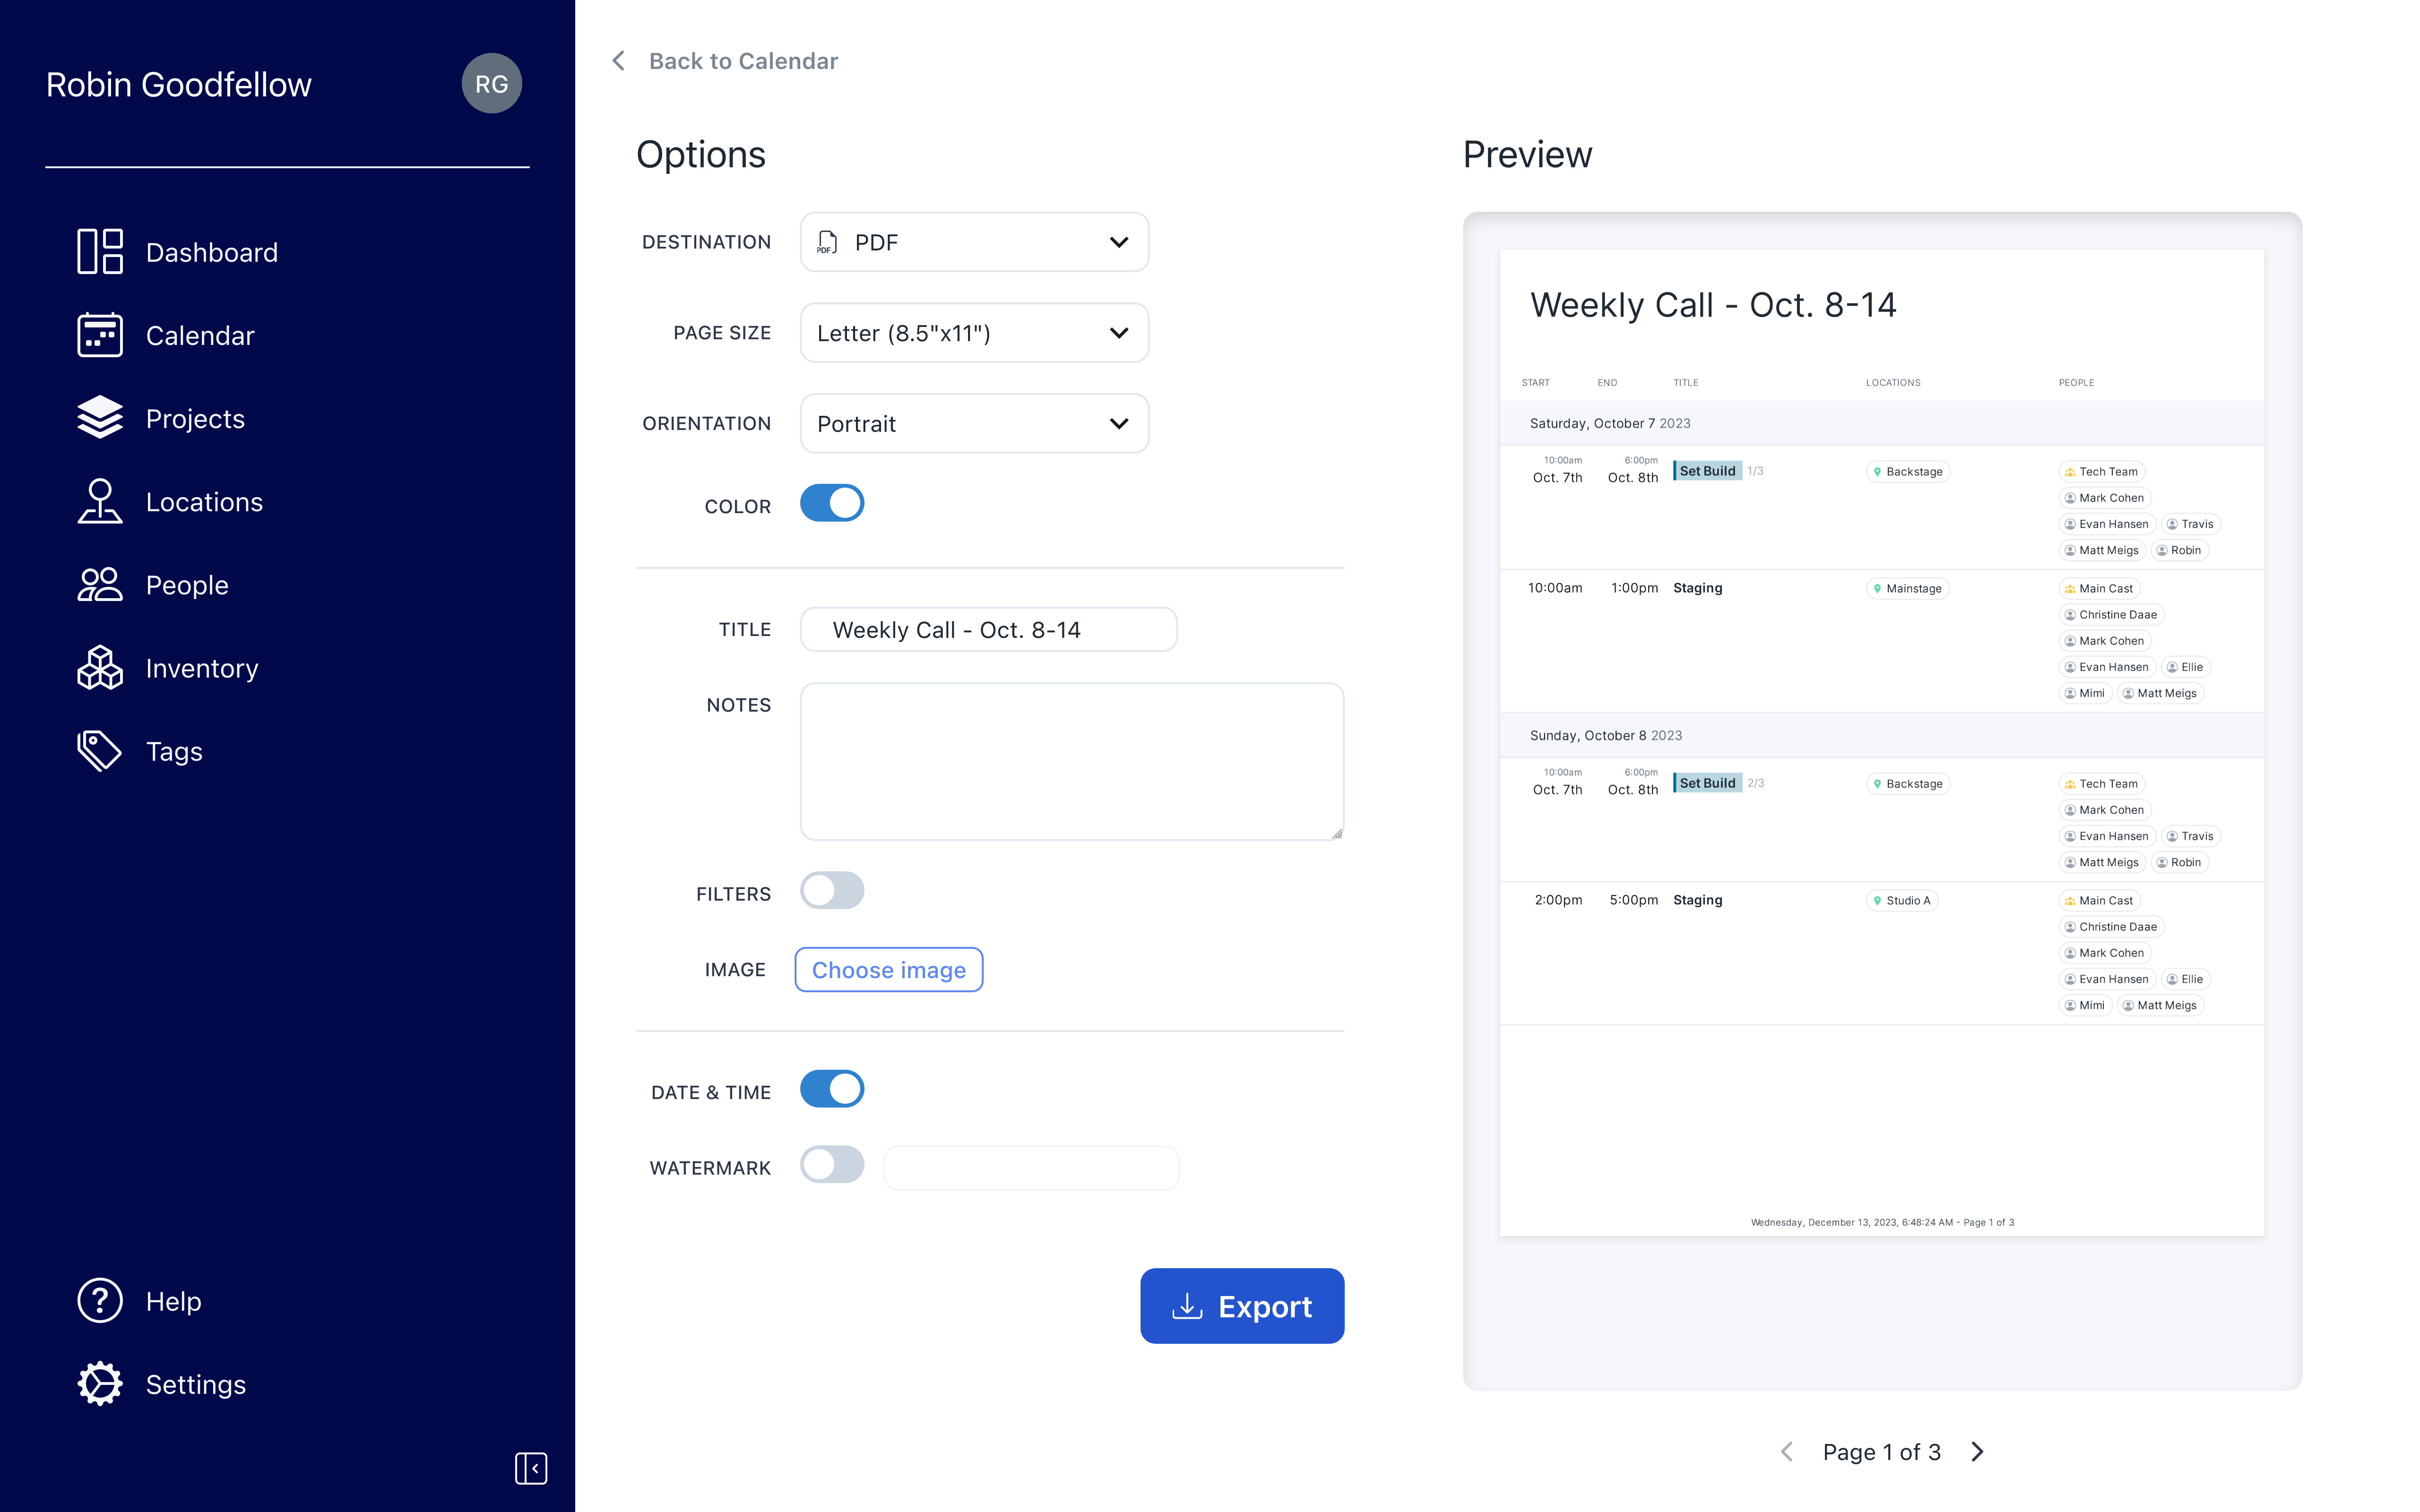
You can now export your list to a PDF. Open the export menu via the “three dots” menu in the upper-right: … > Export. Choose your document options, like page size and orientation. Customize your exported list with a title, notes, or image, displayed at the top of the page. Select the option to include the date & time of export in the footer. You can also print a custom text watermark on every page.
Improvements and fixes
- Events are properly updated when displaying the calendar in a different timezone than your local timezone
- Adding an Event from the day “+” button in list view now always defaults to 10am in your chosen timezone
- Day headers in list view are properly placed in every timezone
List Layout Time Window
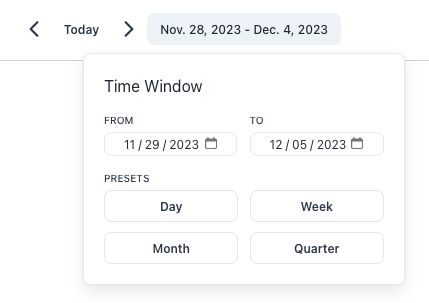
The list layout now only shows events within the time window you select. The default time window is the next 7 days.
Common options (day, week, month, & quarter) are available with single-select. If you’re looking for something more specific, you can customize the range to whatever fits your needs. You can move the time window forward and backward with the navigation buttons.
Improvements and fixes
- Tag filters are now applied to all-day events
People Conflict Detection
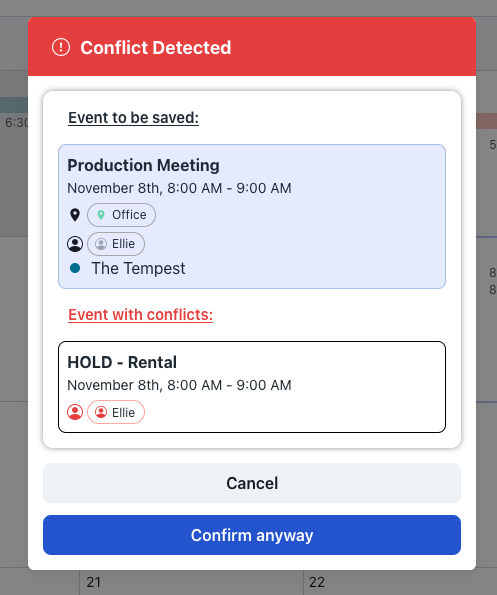
Prospero now warns you when saving an Event if any People assigned to that Event are assigned to another Event at the same time. Location conflicts are displayed in the same warning.
Tags
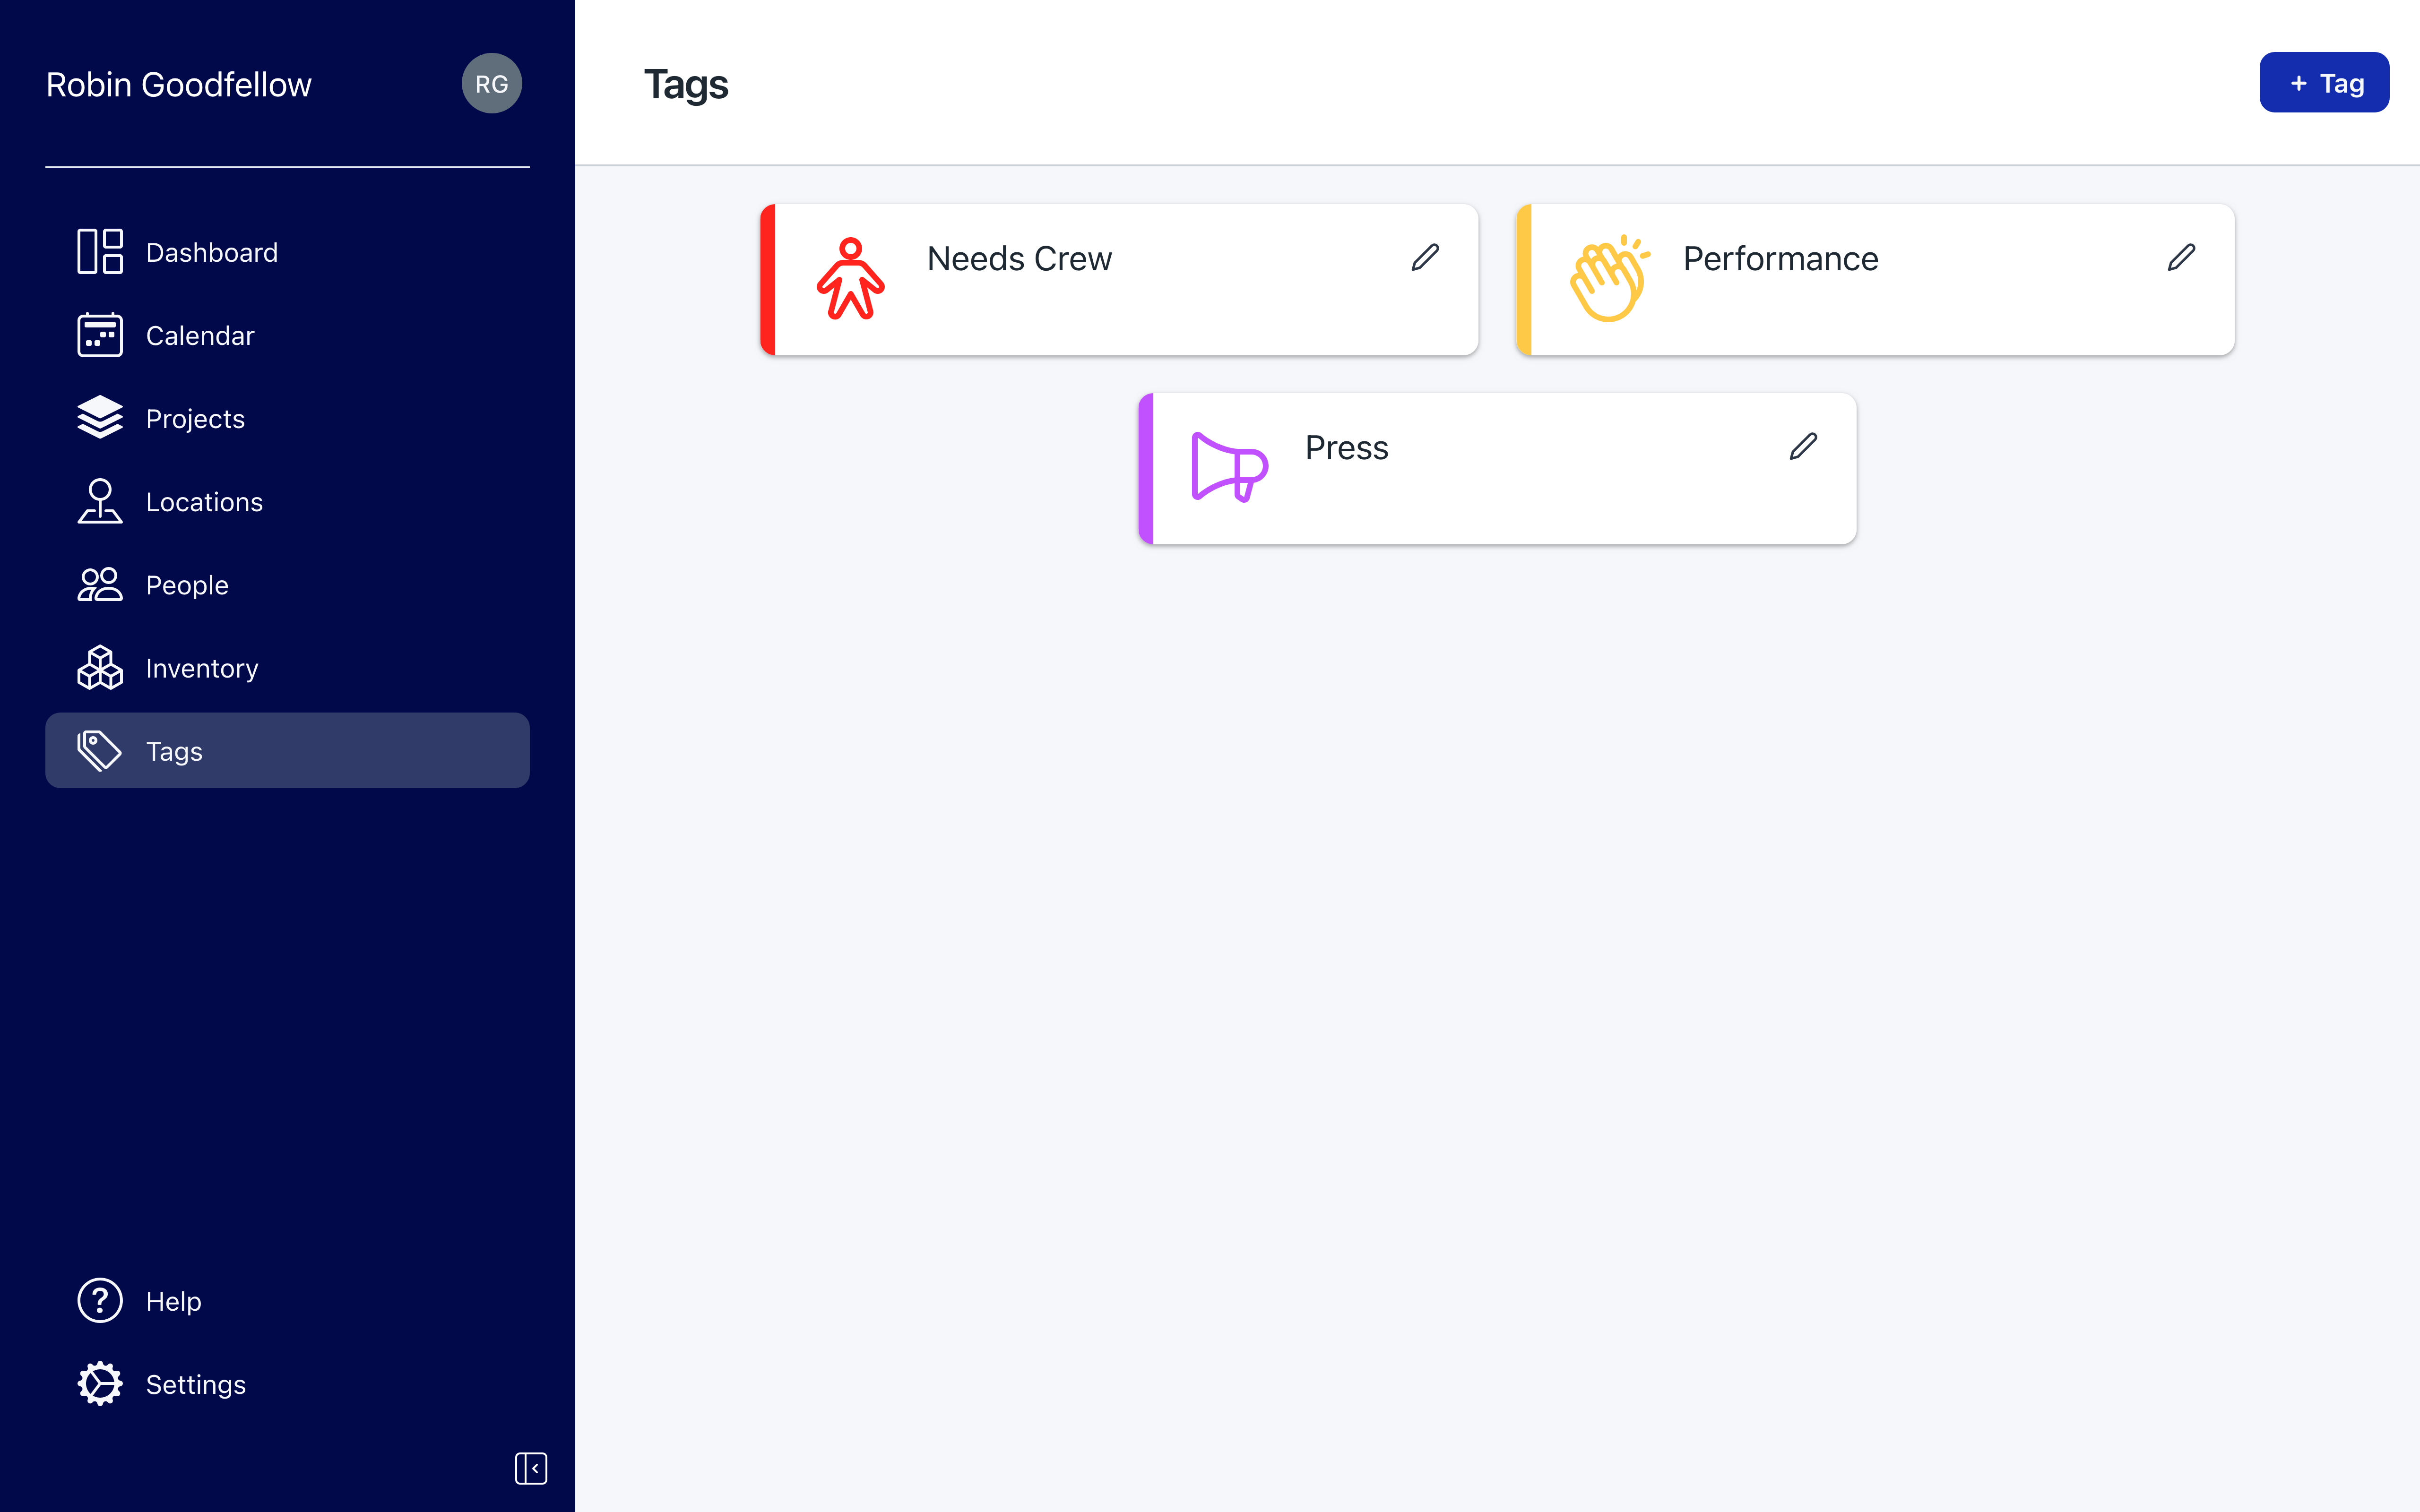
You can now create Tags for your Events! Access the Tags page via the sidebar. Give your Tags names and colors, then choose from 70 theater & arts symbols to make your Tag stand out. Assign Tags to your Events—filter by Tag to create custom Views like performance calendars and press calendars.
Improvements and fixes
- Toggling sync to Google or Outlook when creating or updating a View no longer clears the View name & URL fields
Inventory
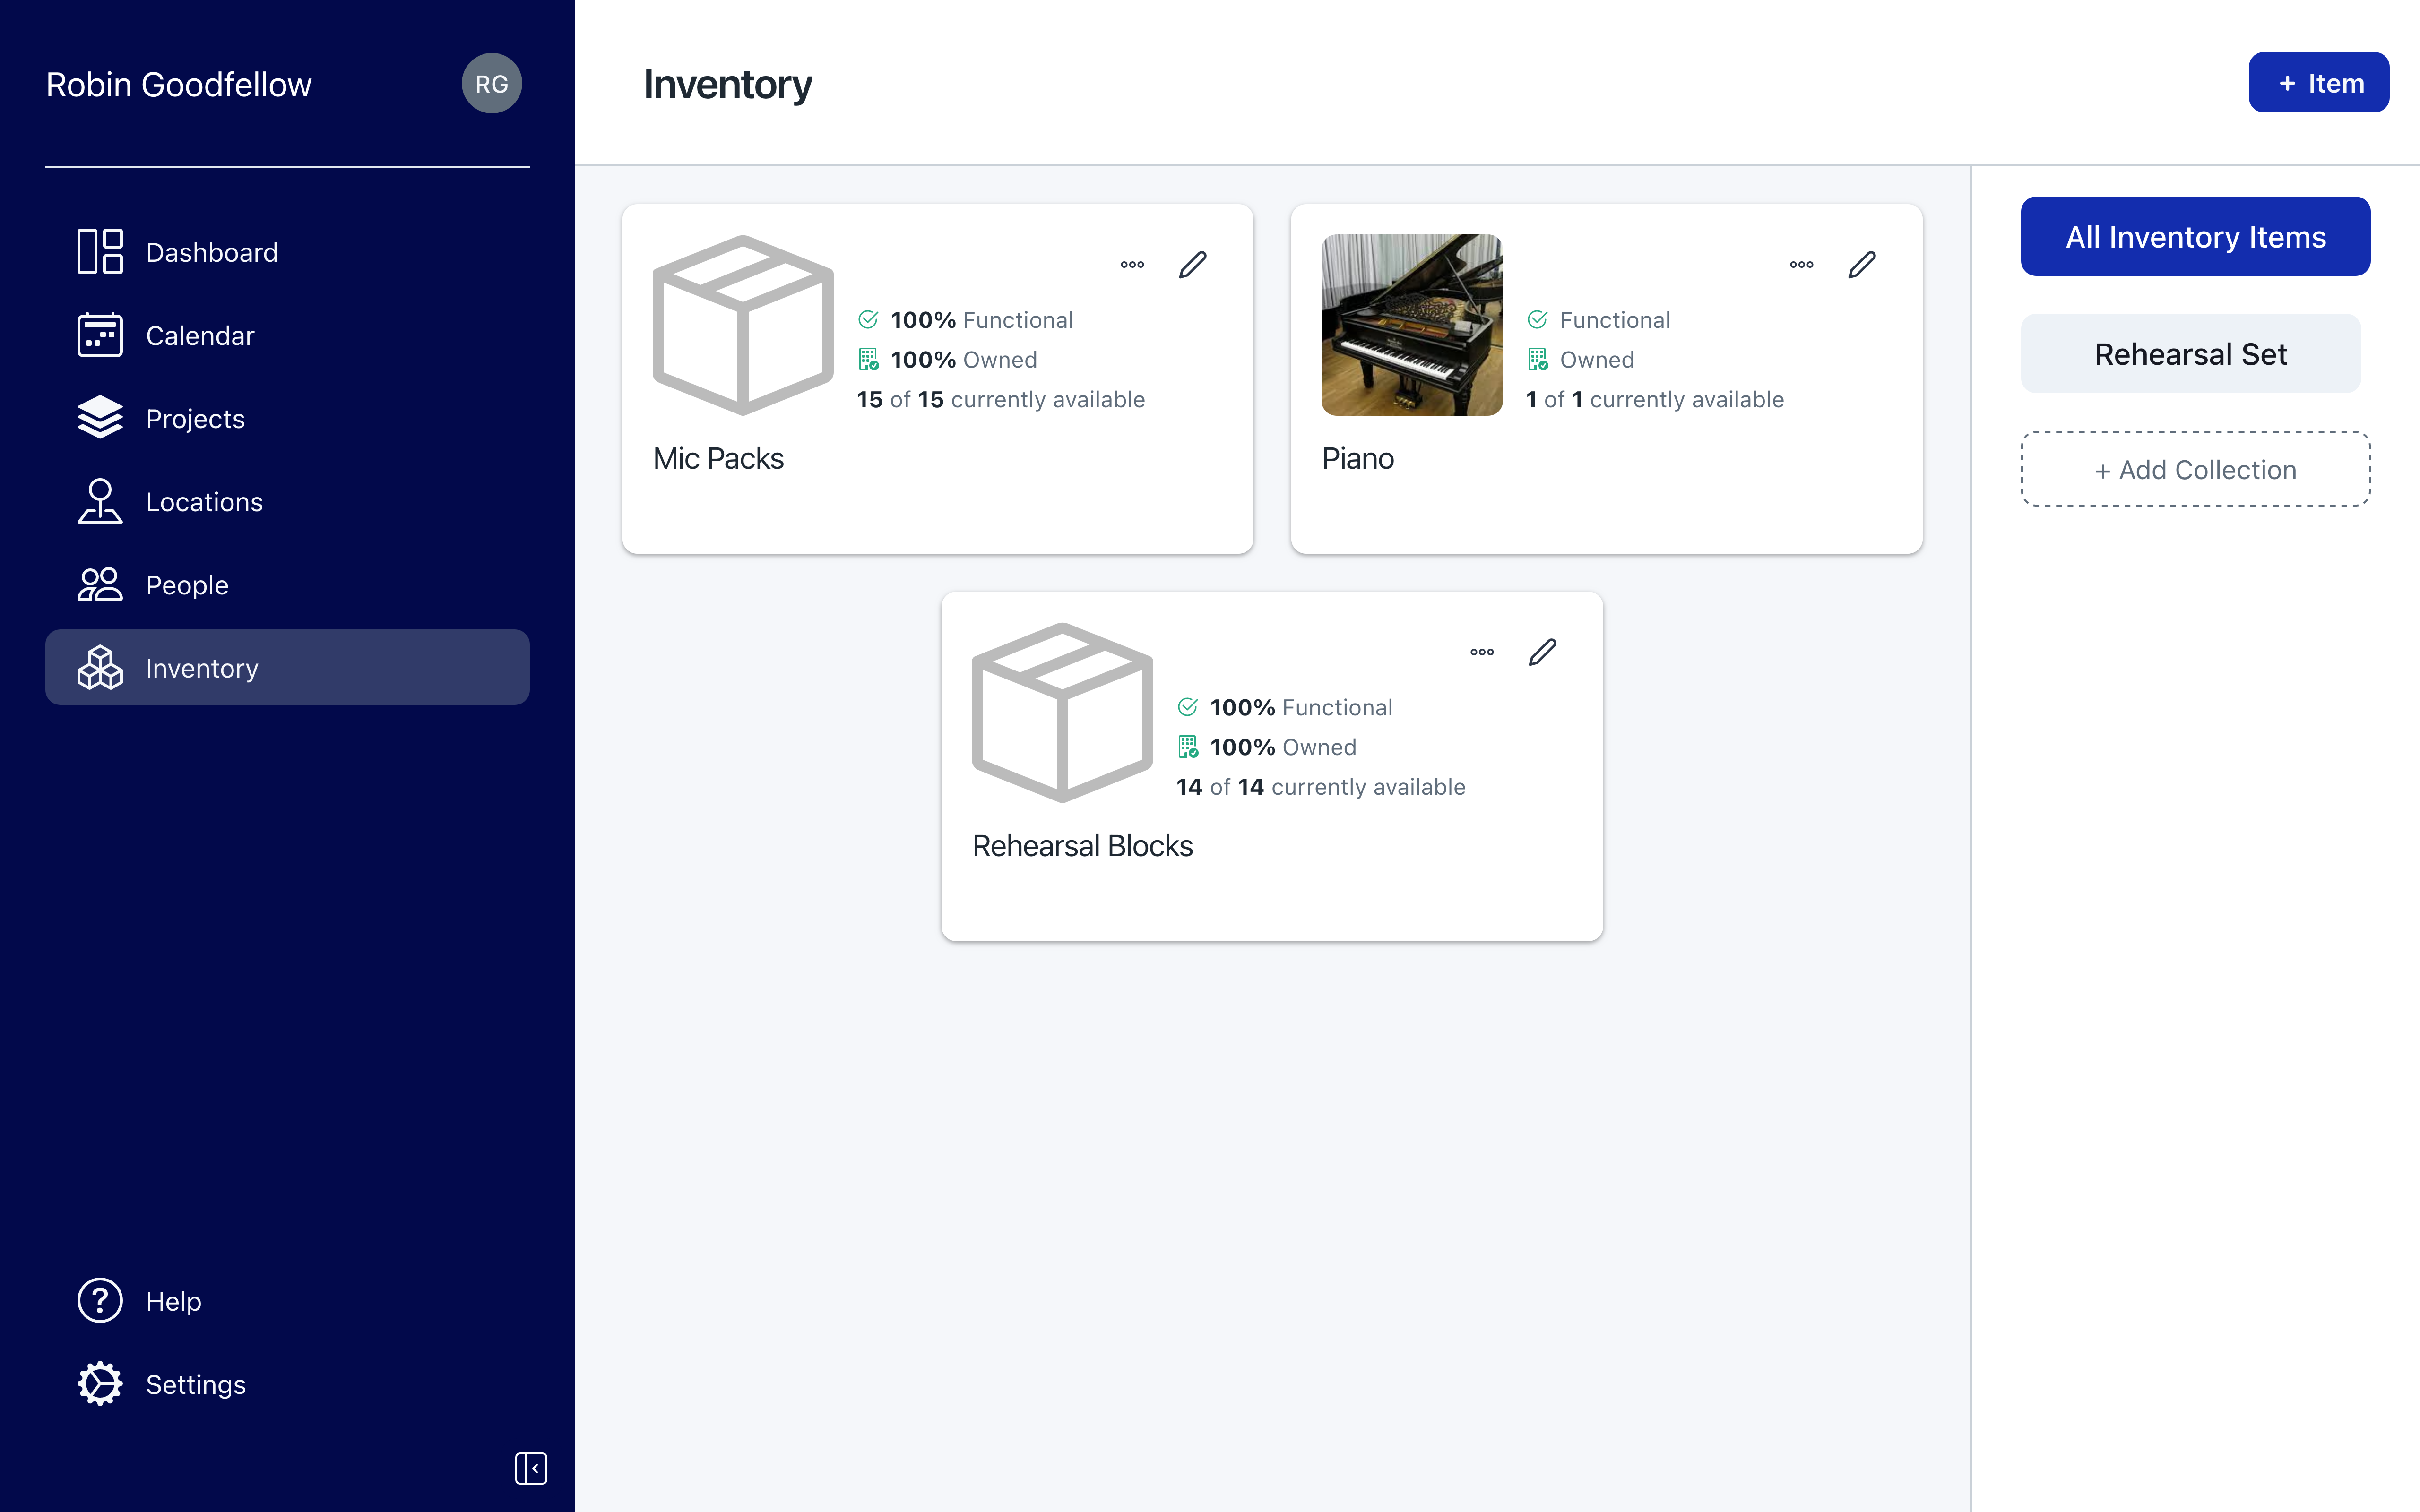
You can now create and manage your Inventory in Prospero! Like projects, locations, and people, inventory has its own page accessible via the sidebar.
Pieces of inventory are called Items in Prospero. Items can be either a “single” item, like a specific costume, or a “set”, like a set of microphone packs. You can switch between “single” and “set” when editing an item and record basic info like name and image. Track the default location, condition, and lifecycle of each item individually, including each item within a “set”.
Just like people, you can group your items into a Collection for speedy data entry in the calendar. Collections are comprised of individual items, so you can add as many of a “set” of items as you like. Add items & collections to an event via the event editor, just like projects, locations, and people. Filter by item or collection to see an item’s usage in time.
Tutorial
Improvements and fixes
- Week & Day layouts released from beta
- While your account is in the trial period, the number of days remaining in your trial is displayed in the sidebar
Onboarding Sequence
New users are presented with an onboarding sequence to help them get the most value out of Prospero. After signing up, you'll be guided through account setup, including:
- Selecting a plan
- Creating your Organization
- Inviting your teammates
- Activating Outlook and/or Google Calendar integrations
Current users will see an abridged version of the onboarding sequence upon your next login.
Improvements and fixes
- Your chosen timezone is now saved locally in your browser. On subsequent logins, Prospero will detect and switch to your previously saved timezone
- We gave the event popup a fresh coat of paint!
- Links in Event notes are properly detected
Native Print & PDF
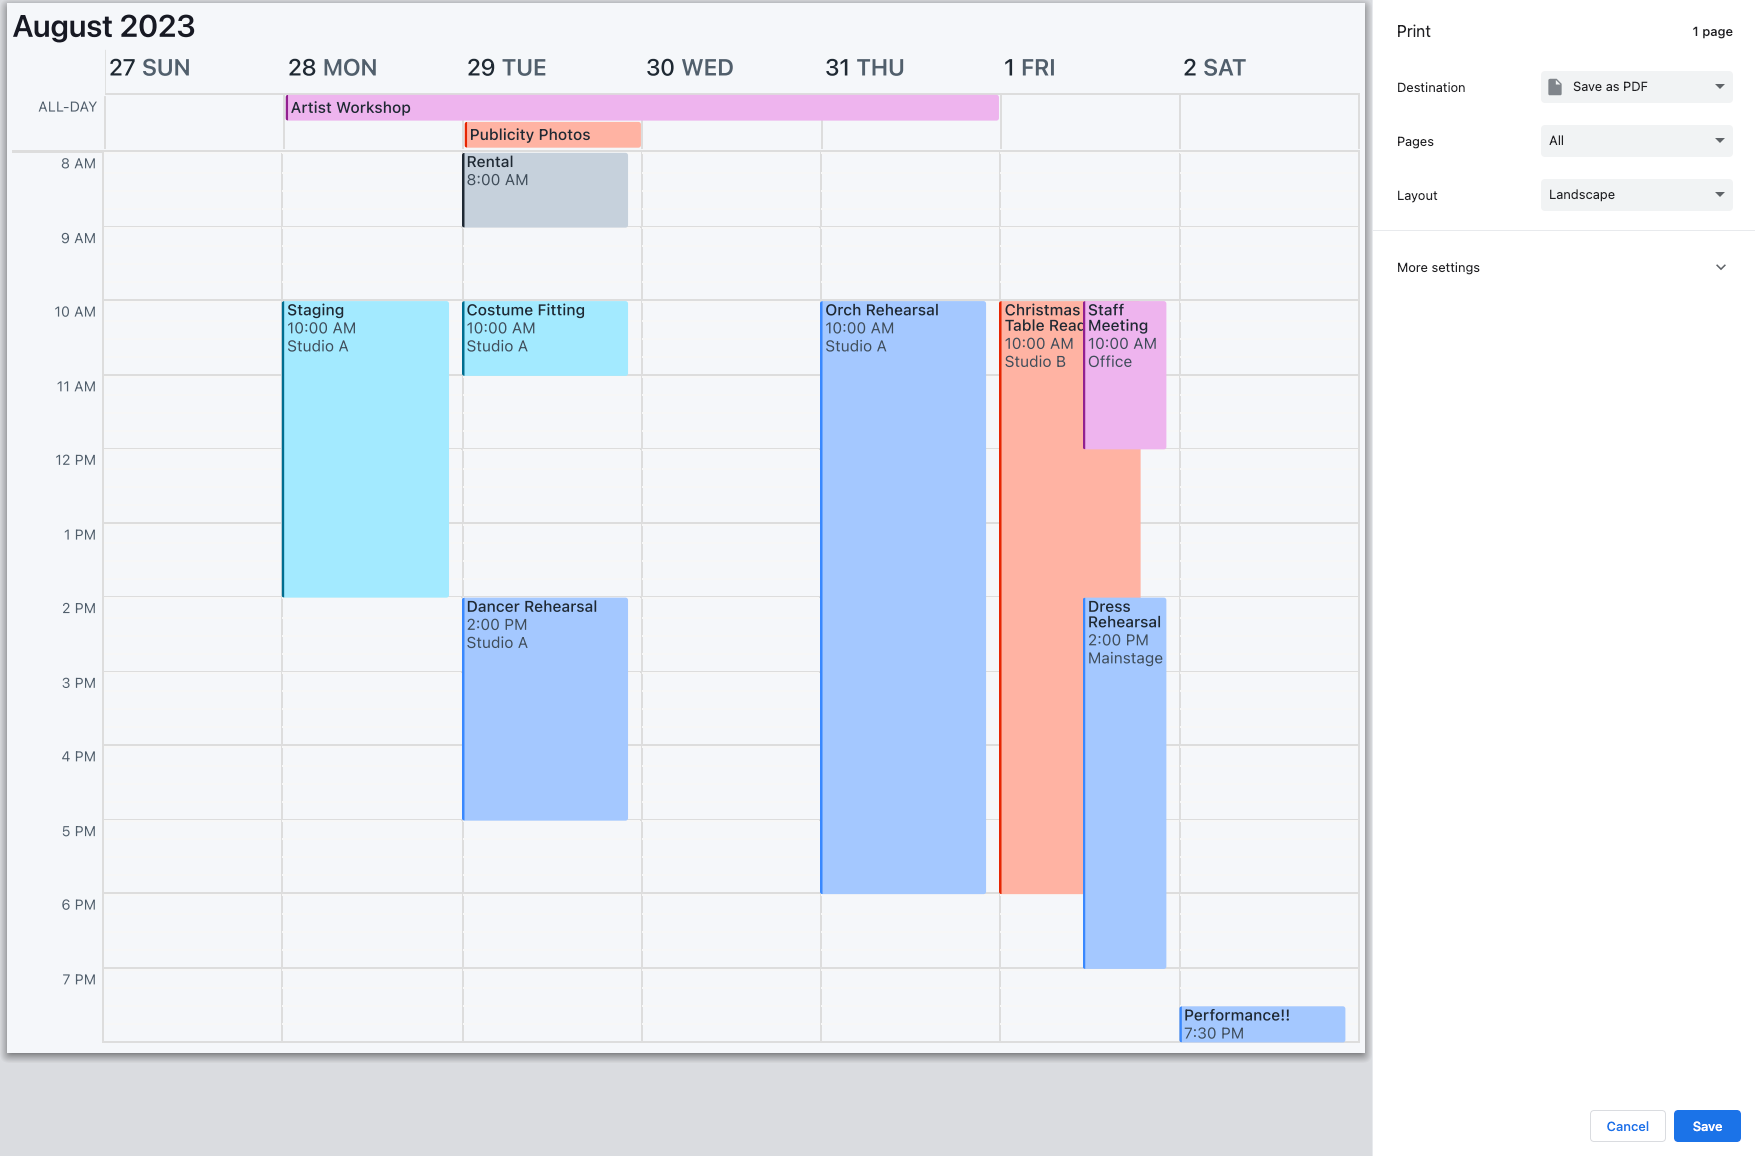
Native print & PDF functionality is here! To print a calendar, navigate to Month, Week, or Day layout. Open the print dialogue at “…” > Print.
If you’re printing a Week or Day layout, you’ll be prompted to select the range of hours to print (i.e., 8am to 11pm). You can choose to print in color or black & white. Clicking the “Print” button will open your browser’s native print dialogue, where you can further fine-tune your settings. To save as a PDF, select “Save as PDF” as the destination in your browser’s native print dialogue.
Known Issue - Firefox has issues rendering some of the lines in the Month layout. We suggest using Safari or Chrome to print.
Outlook Integration
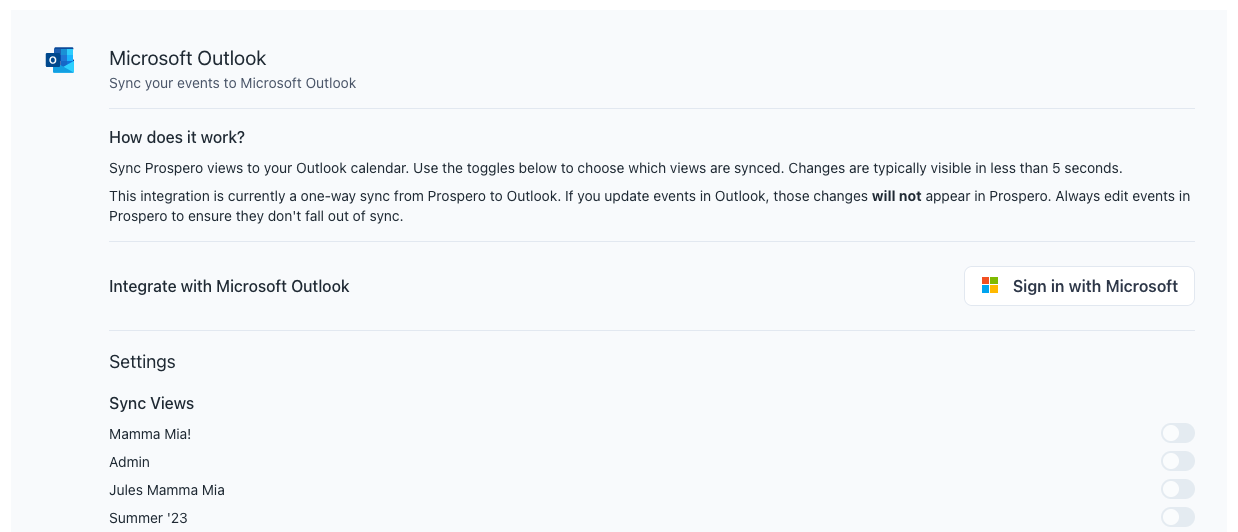
Prospero is now integrated with Microsoft Outlook! Outlook users can enable the integration in Settings > Integrations > Microsoft Outlook. Adjust which Views are synced to your Outlook account in the same place. When you create a new View and you have the integration enabled, you will see the option to sync that View with Outlook.
Sync behavior is identical to Google Calendar sync:
- Changes in Prospero are typically visible in Outlook in less than 5 seconds. In rare circumstances, it may take up to 15 minutes. If you do not see your events appear after 15 minutes, please share your experience in #help with a short screencast explaining what you expected to sync and I’ll troubleshoot.
- Changes in Outlook do not appear in Prospero. At this time, this is a one-way sync from Prospero → Outlook. If you adjust the time of an event in Outlook, the event will not be updated in Prospero. Always edit events in Prospero to keep both systems in sync (a link to the Prospero app is included at the end of every event description).
Improvements and fixes
- When creating and/or updating two Views in a row, the second View modal no longer includes the first View’s information
Invite team members to your Organization
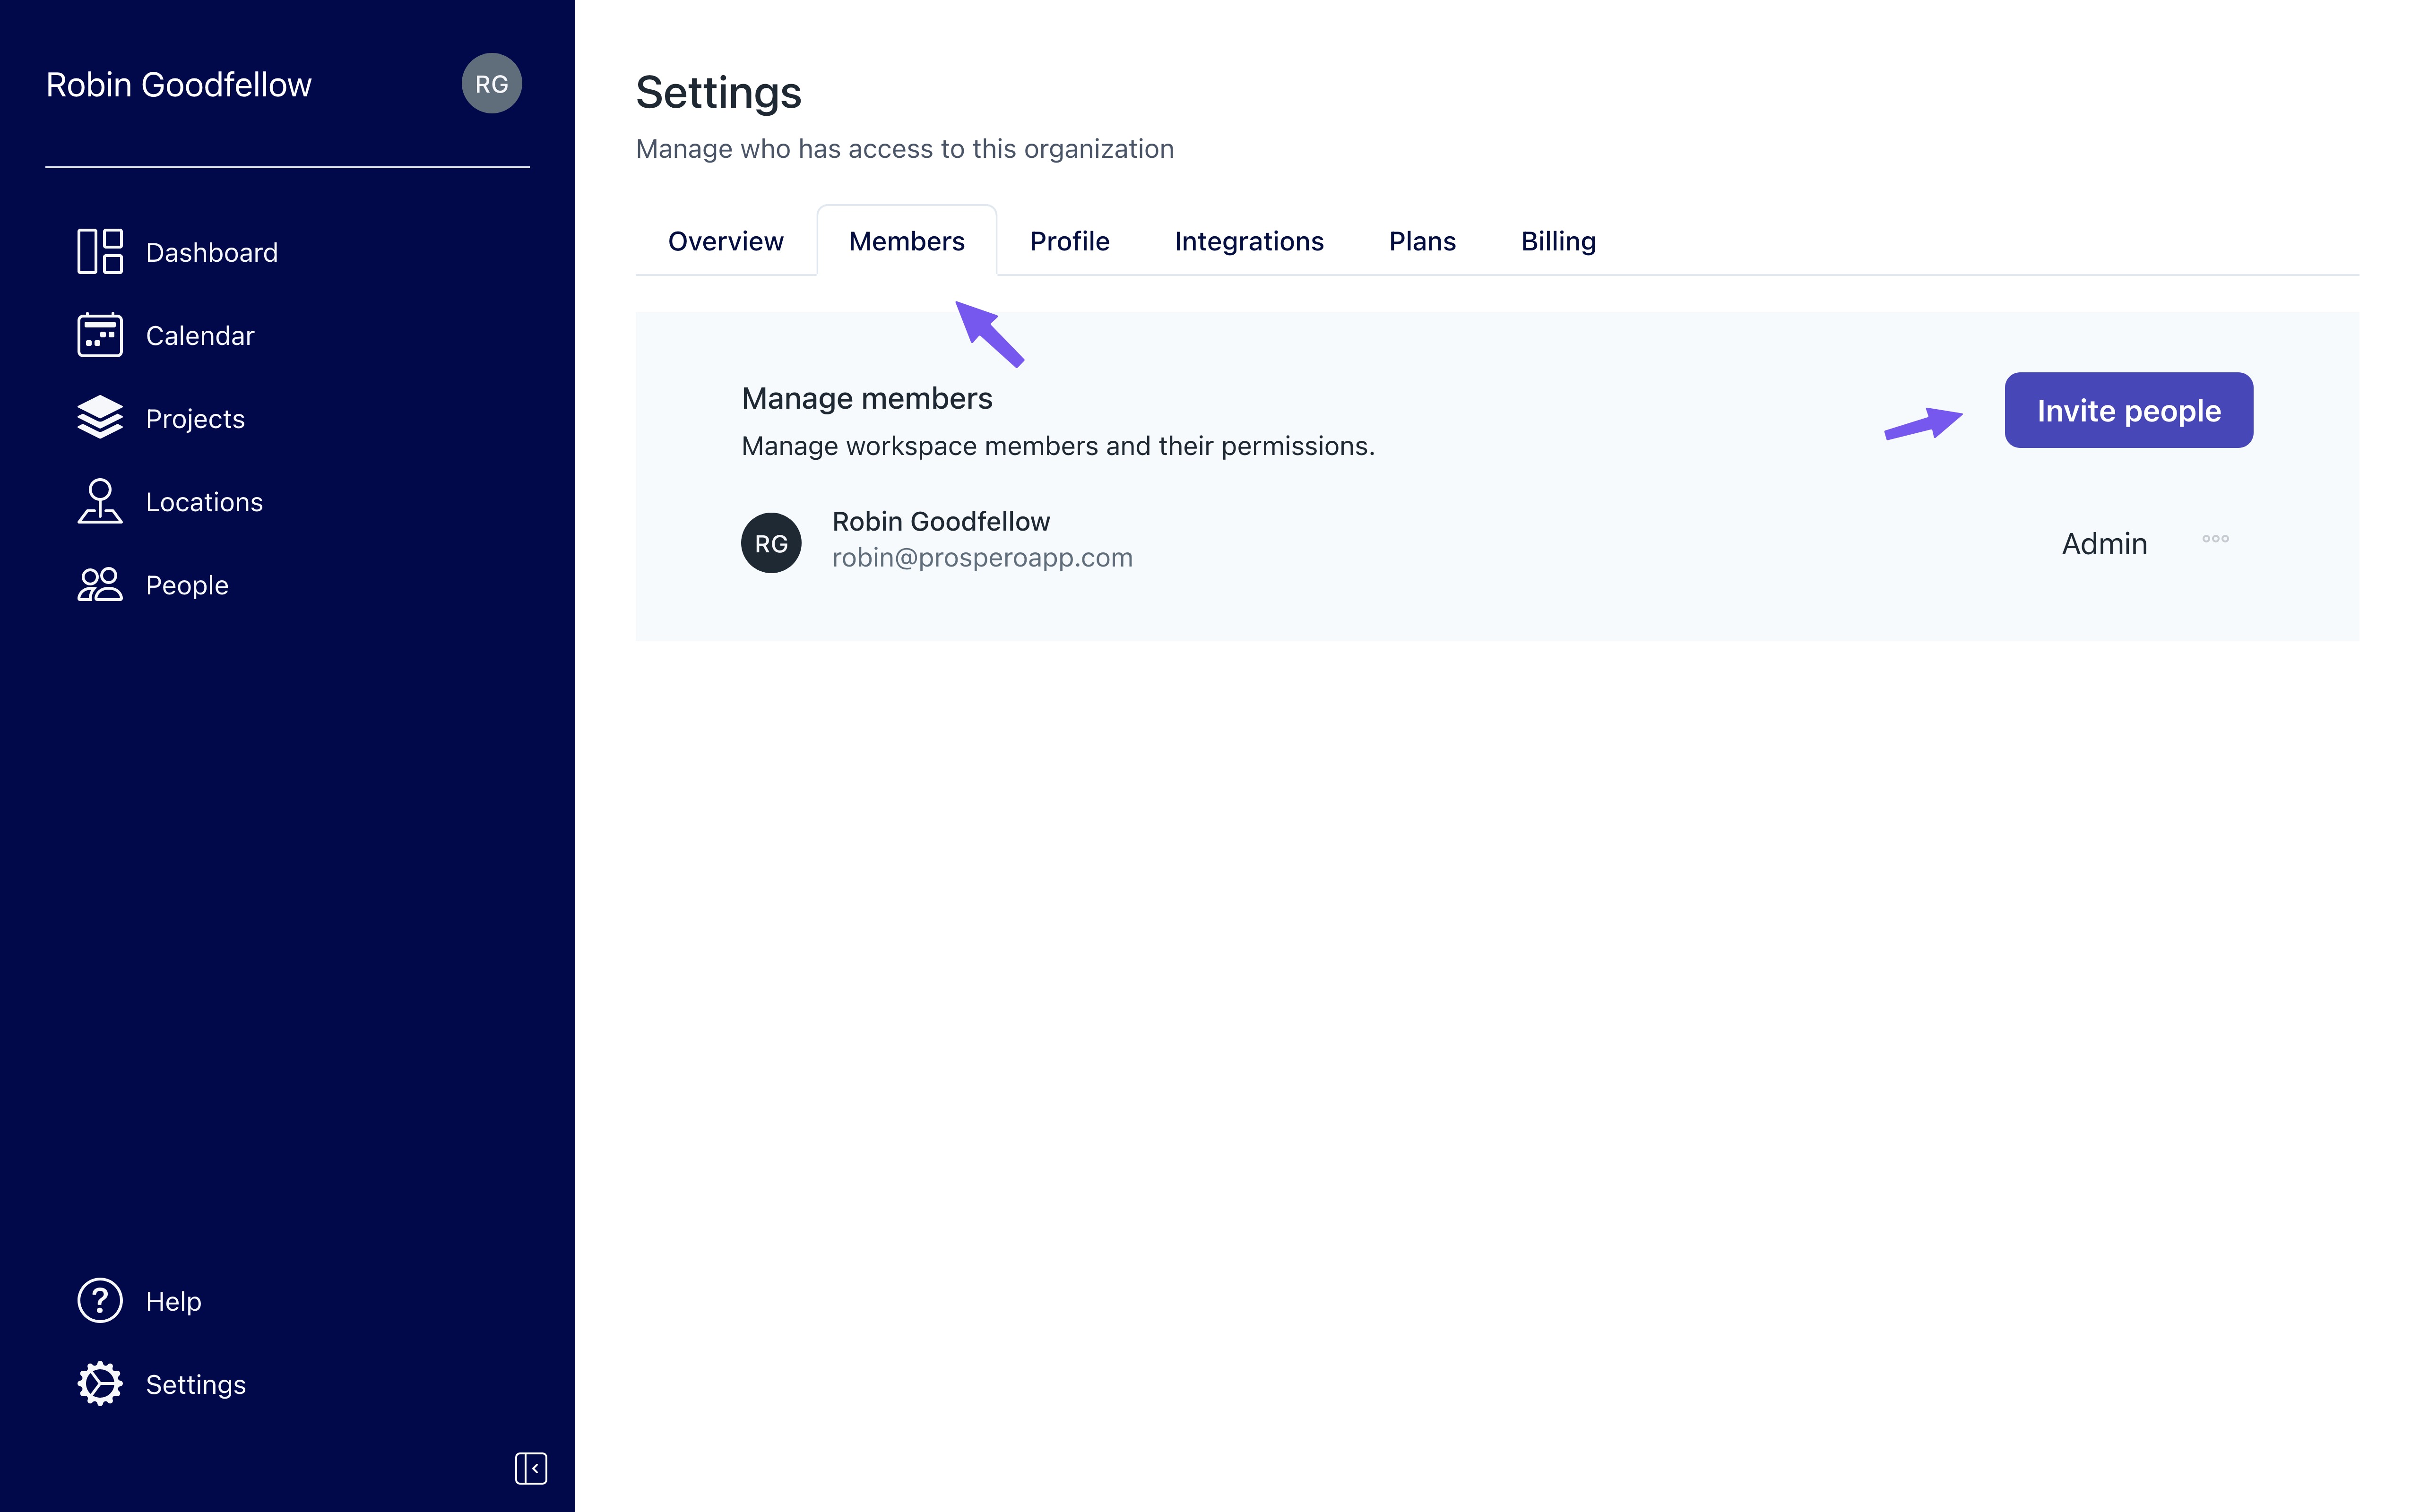
You can now invite other users to your organization! Head to Settings > Members and click Invite people. They'll get an email with a link to sign up and join your Prospero Organization. You can resend invitation emails or revoke invitations from the members tab.
Your Organization (as opposed to individual users) owns the majority of data in your Prospero account. Events, Projects, Locations, People, and Views will be visible and editable by users within your Organization. For the time being there are no permission controls; every user is an "Admin" user with full read & write access to all data. We'll be tackling permissions in the future and would love input on what sort of permissions you'd like to enforce!
Improvements and fixes
- Switching to week & day layouts no longer breaks view links
Week & Day Layouts
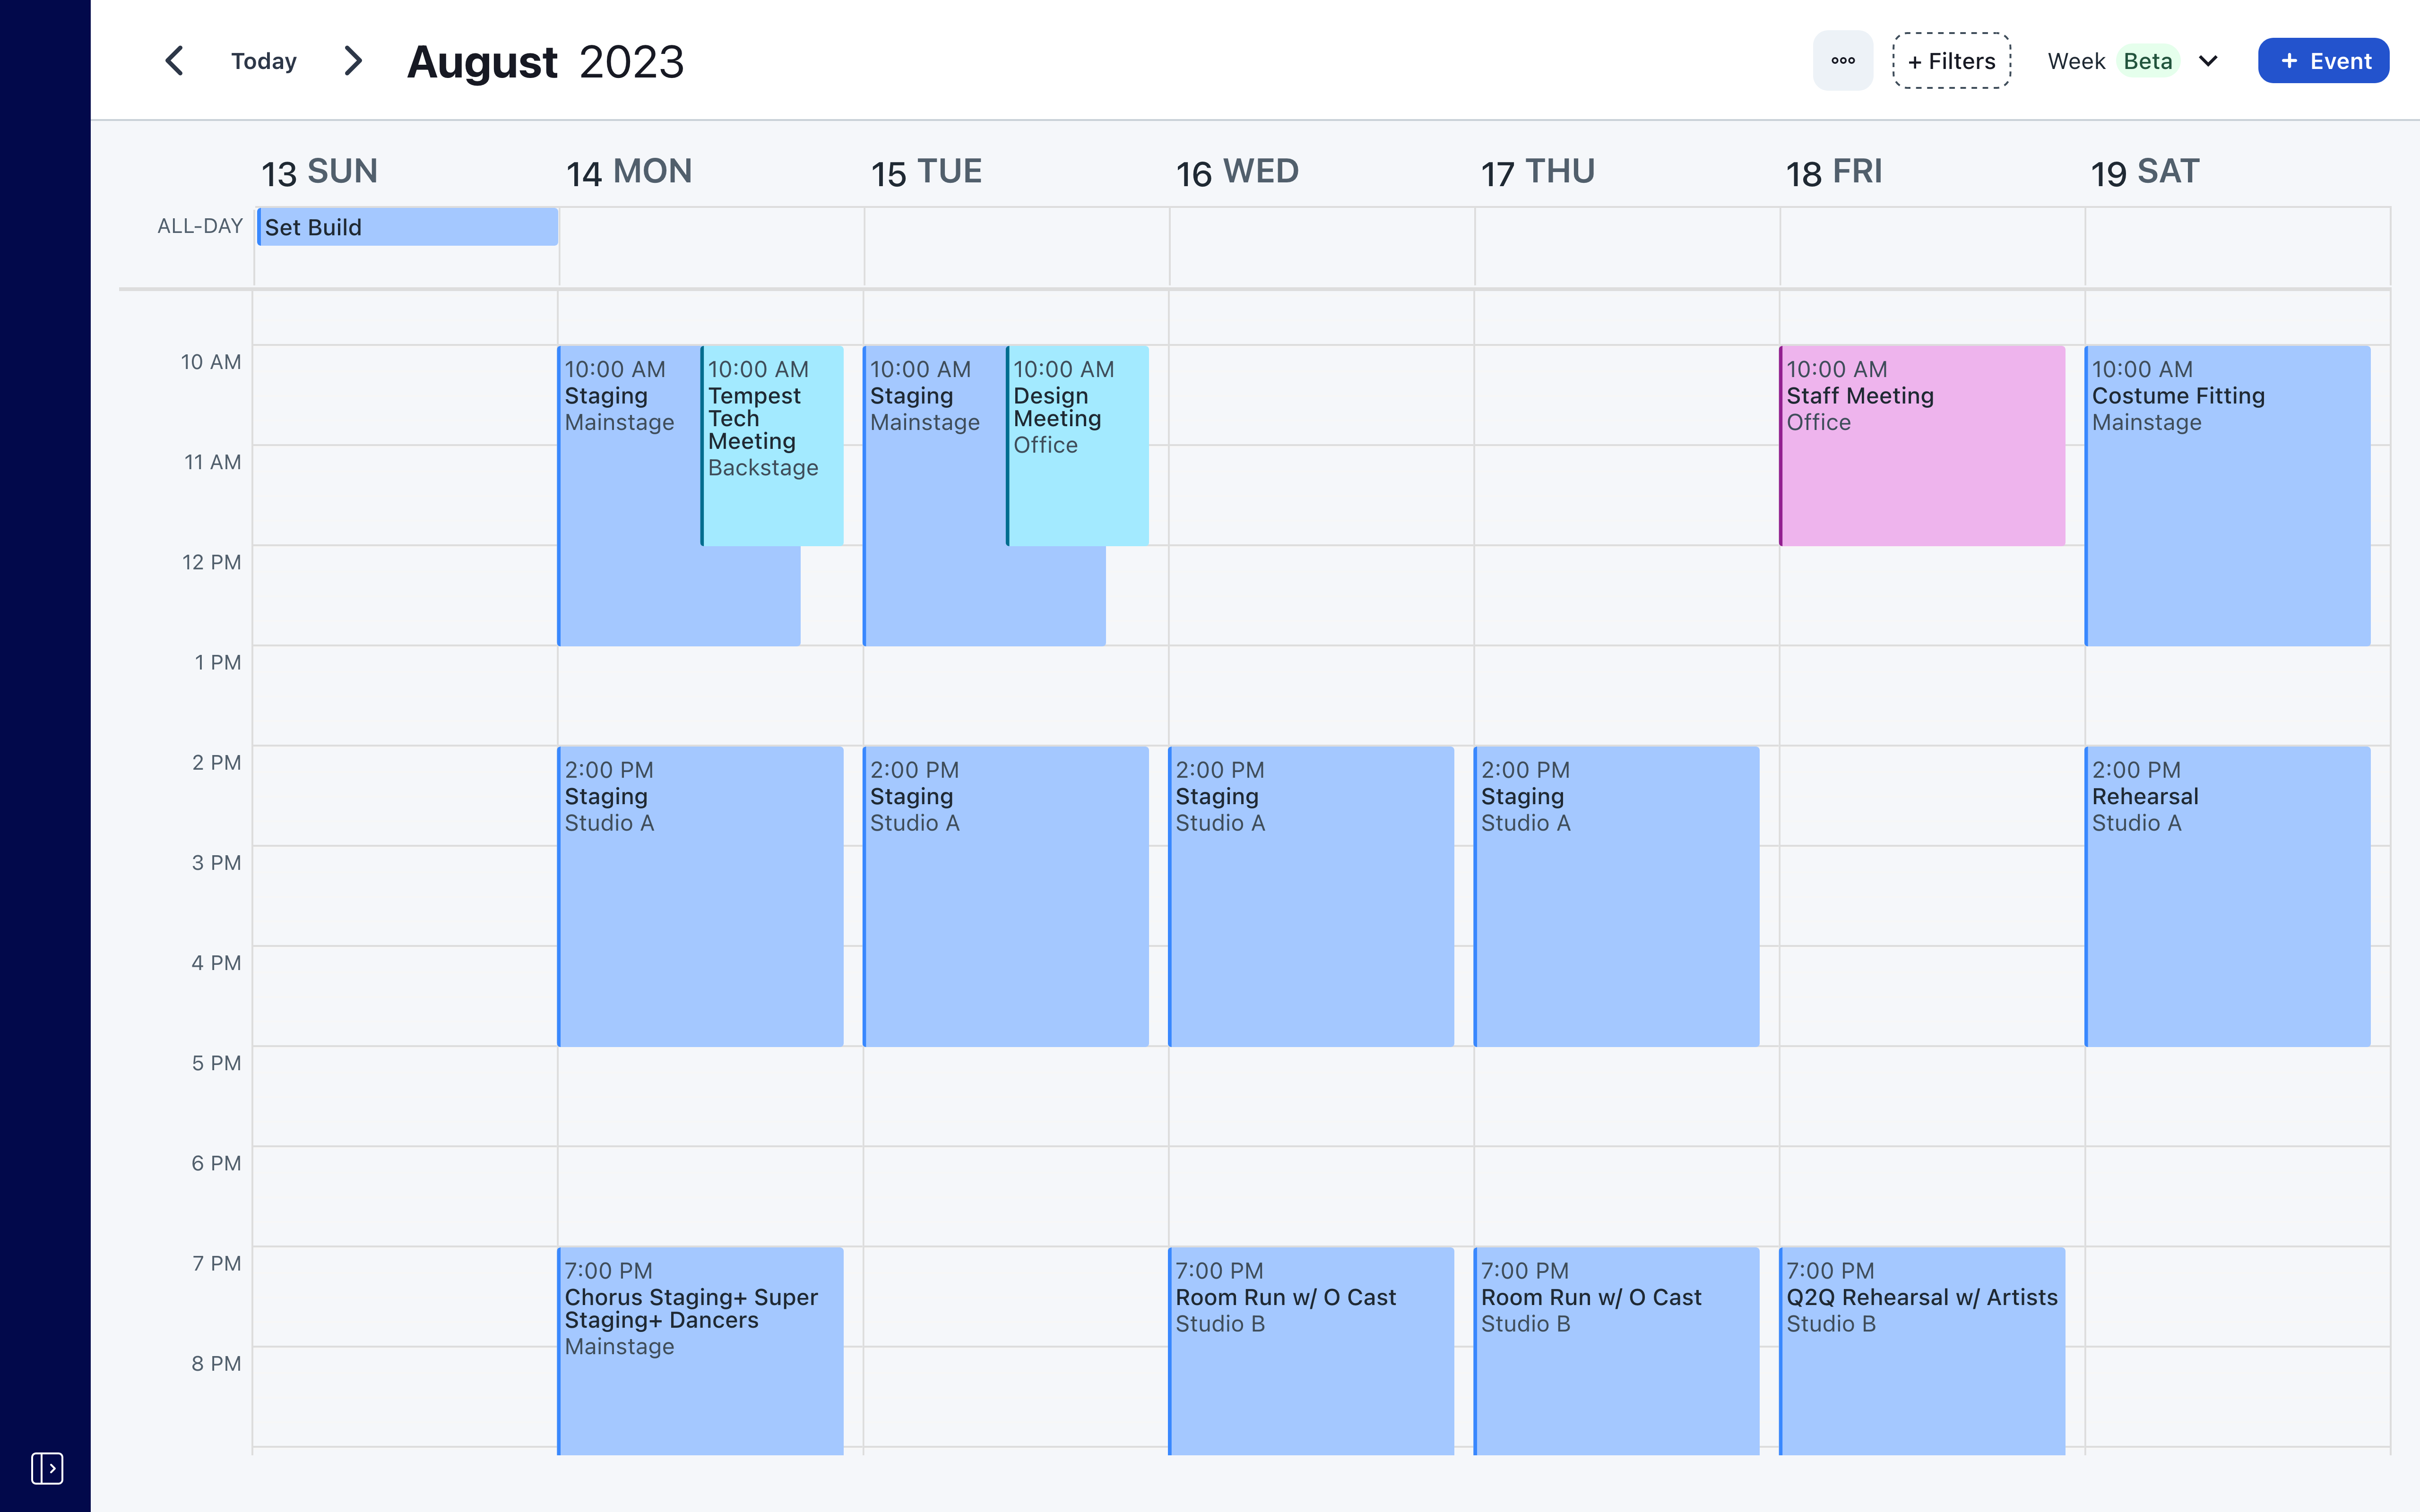
It’s finally here! Week and day layouts have arrived in Prospero. Both layouts are built with drag’n’drop at their core. Quickly create events by dragging on the calendar, adjust the start or end by dragging the edge of an event, or move events by dragging and “dropping” an event to a new spot on the calendar.
Toggle calendar layouts via the dropdown in the top-right corner of the calendar menu (top-left on mobile).
We’re marking this feature as Beta for the next couple of weeks while we squash any pesky bugs. Let us know if you find any!
Official Google Calendar Verification
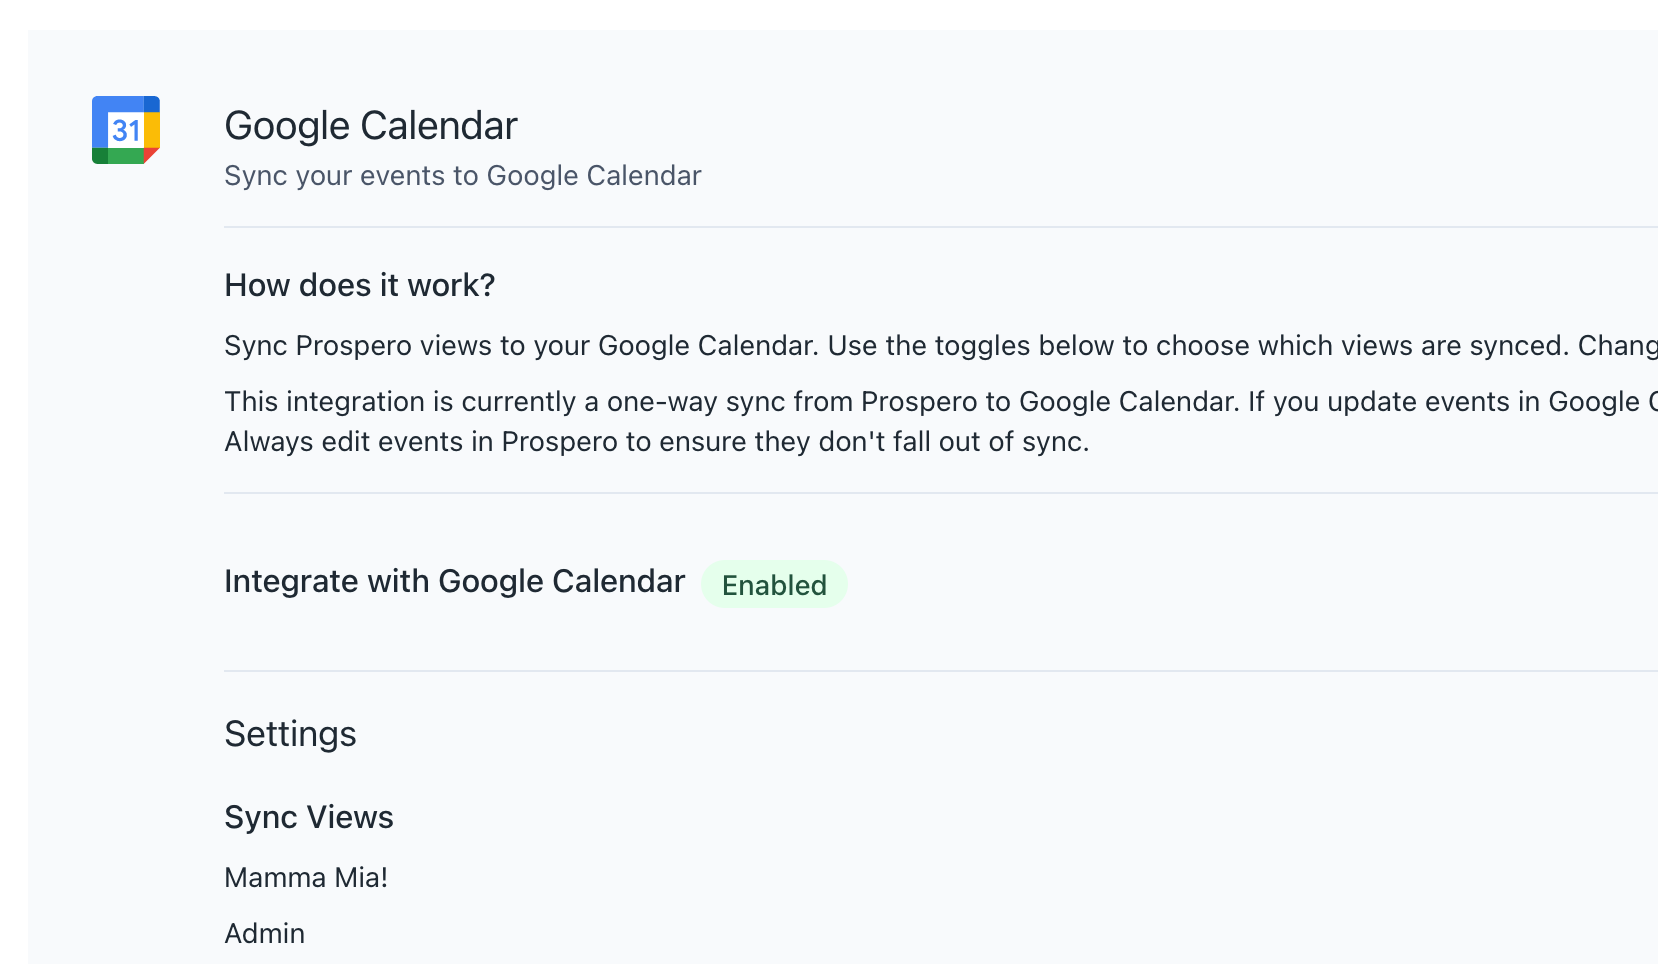
Google officially verified Prospero's Google Calendar integration! No more warnings when turning on the integration.
Views are now set to the timezone you were using when you created it. Viewers will always see your View in that timezone - perfect for folks coming in from out-of-town.
There's a new Title field on People to track job titles. A person's title will appear on their contact card.
There's a new Details field on Projects to include freeform notes.
In-App Billing
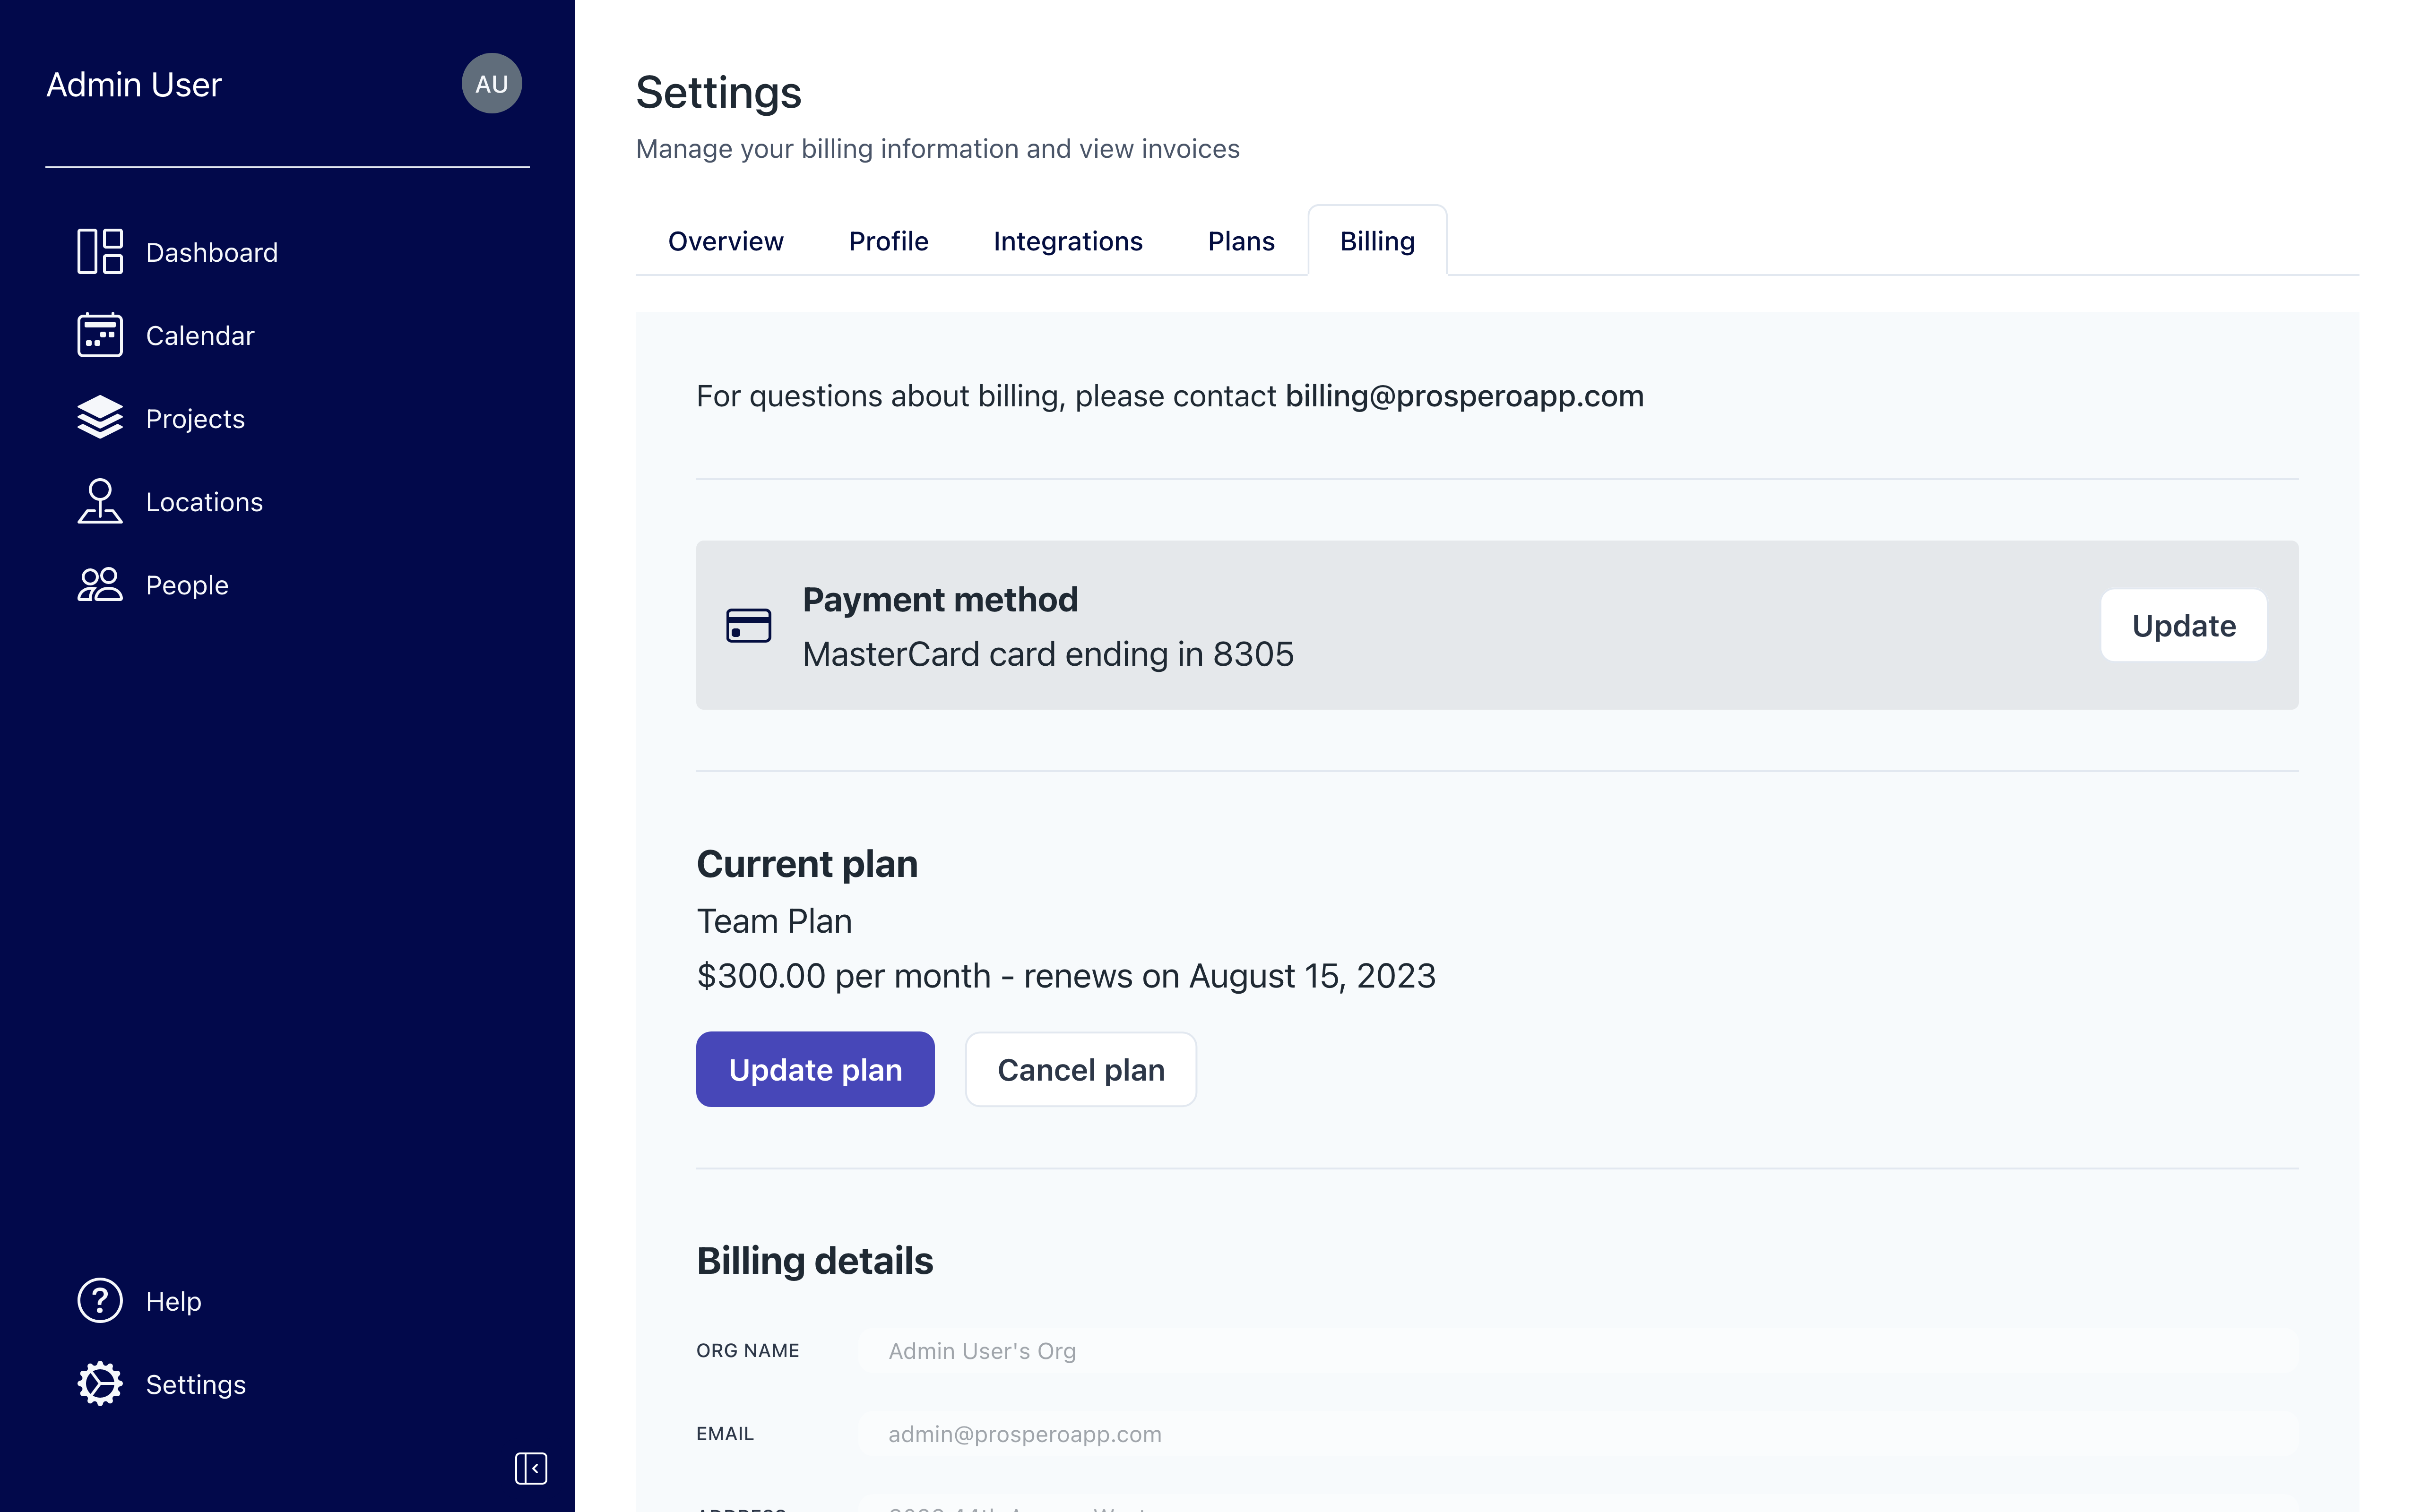
Billing details are now displayed under the "Billing" settings tab. View previous invoices, your billing address & payment method, and your current plan. You can update your billing address & payment method or cancel your plan completely. You can change your plan via the "Plans" settings tab.
Improvements and fixes
- The date & time selections are now separated in the event editor. This is a preliminary step to adding “all-day” events with no specific start or end time
- Project key dates no longer include a time value (date only)
- Projects, Locations, People, and Groups are now all sorted alphabetically
- Fixed a rare bug where applying a filter could cause two full-day events to overlap
- Viewers no longer receive 401 errors when viewing view links
Namespaces
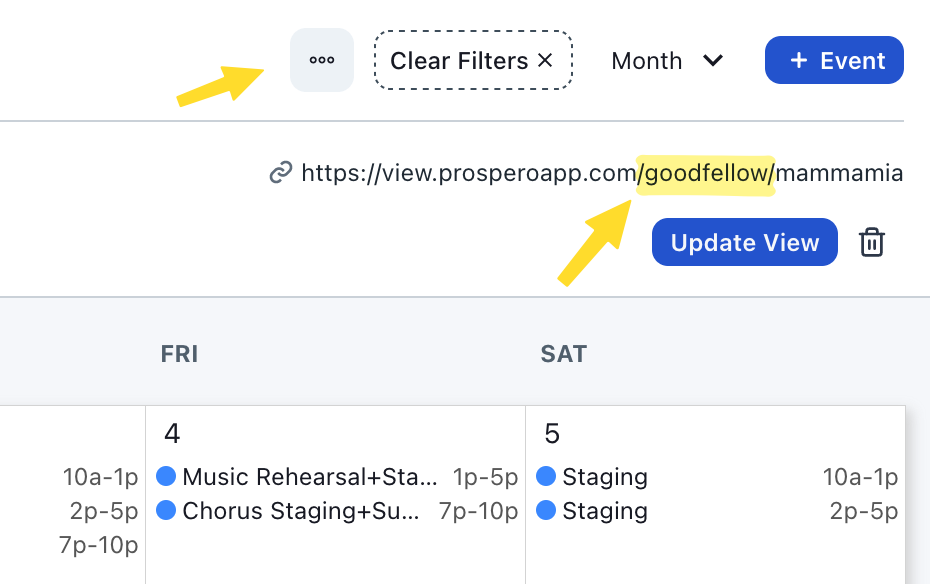
View links now include a Namespace, giving you more customizability and flexibility when sharing your Views. The new format for View links is: https://view.prosperoapp.com/NAMESPACE/CUSTOM_VIEW_URL. This means all of your View links have a new format, so make sure to share the new link with anyone who has the old one! The old links will no longer work.
We made this change to avoid URL conflicts between Prospero users. Now, you and another user can both have a View with the URL "music-man" under distinct namespaces. Your namespace has to be unique across all Prospero users. If you want a common one, best to get it early. 😉
Calendar Timezone
You can now change the timezone the calendar is displayed in via the three dots menu next to the filters button.
Organization and Profile Settings
You can now update the following in Settings:
- Password
- Name
- Organization Name
- Namespace
Improvements and fixes
- Multiday events now appear under "Today" on the dashboard
- An error message now appears if your login session has expired prompting you to re-login. We require a new login every hour for security purposes.
- Selecting a View in the sidebar no longer closes the list of Views underneath the Calendar button
- The top and bottom of the app are no longer obscured on Safari on mobile
- Names of People are now always left-aligned